Integration guide for iOS SDK
This documentation describes how to integrate your iOS app with TrustBuilder MFA MFA.
The TrustBuilder MFA SDK for iOS has been released on October 2022 with a new sample application and a new documentation.
The TrustBuilder MFA SDK for iOS gives you access to the following features:
Activation
Synchronize
Update PIN code
Unlock Device
Get online OTP
Get offline OTP
Check pending push
Online seal
Offline seal
To implement these features, you will need to call functions from the mAccess library. The application implementing the mAccess library should be linked to a white label service.
Useful guides
Reference documentation to get more details about mAccess library for iOS
Requirements
Xcode version currently supported by Apple
Download the TrustBuilder MFA SDK for iOS from Resources Downloads. You can download:
the mAccess library
the source code of an iOS sample application implementing TrustBuilder MFA features
Request the mAccess ID (MAC ID) from the admin
If you use Notifications, you should provide to the admin:
the Firebase API Key → The Google Cloud Messaging API Key corresponding to the Google Sender ID you entered in your application
the Notification Collapse Key → it defines the key used to send collapsible messages to your application
the Package Name of your application
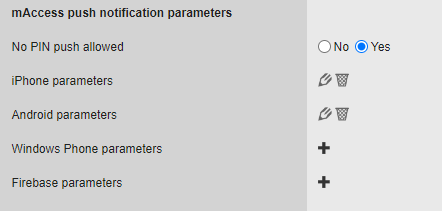
The administrator should log in to the admin console, in a White Label Service (Creating a white label service). In the Service Parameters tab, the admin should scroll down to the mAccess push notification parameters section.
The “No PIN push allowed” has to be set to Yes.

Tell the admin which notification platform is used (Firebase). The notification parameters you provided have to be filled in the right notification platform parameters section.

Go to the Push notifications section below to know more.
If you use sealing feature, ask the admin to set the ‘Transaction sealing’ option to ‘Yes’

In the administration console > Service Parameters tab
Security Best Practices
This sub-section reminds some best practices that may have a significant and positive impact on your app's security. These best practices are implemented in the sample application available in the SDK.
Sources: Apple developer security best practices
General Principles
Local storage
The internal state of the application must be locally stored, and updated each time the library is accessed. This internal state is an ASCII string provides by the function IWStorageDataGet ().
The implementation of this storage is system-dependent, and up to the developer to design.
After each call to a library function, the host must call IWStorageDataChanged (), in order to find out if the internal state has changed. If this function returns a non-zero integer, the host must call IWStorageDataGet () and then update the local storage. When the host application starts, it must get the ASCII string stored locally and give it to the library using the function IWStorageDataSet ().
Synchronous or Asynchronous mode
Some mAccess library functions execute network calls, namely webservice calls, to query TrustBuilder servers. And most mAccess webservice calls are divided in two steps, i.e. two functions, a start function and a finalize function.
There are two different ways of implementing the webservice calls: synchronously or asynchronously. The code architecture of the host will vary according to the chosen mode.
Synchronous mode → The host function myAction will execute the IWActionStart () function and will directly fetch the result of the webservice call. If the result of the IWActionStart() is successful it will then execute the IWActionFinalize ().
CODEFunction myAction (params) { Int result = IWActionStart (params) If (result == IW_ERR_OK) { Int result = IWActionFinalize (otherParams); %%//%%Handle final result here } }Asynchronous mode → The result of the webservice calls will be handled by callback functions which are passed to the start and finalize functions.
CODEFunction myActionStart (params) { IWActionStartAsync (params, myActionStartDone); } Function myActionStartDone (result) { If (result == IW_ERR_OK) { IWActionFinalizeAsync (params, myActionFinalizeDone); } } Function myActionFinalizeDone (result) { %%//%%Handle final result here }
Web services calls
mAccess uses platform dependent functions to call TrustBuilder web services. These functions should be part of the host. Code samples expose such functions. You may use them as is or enhance them.
Synchronous mode
In synchronous mode, the host code should contain only one function:
WebServiceCall: (string URL, int timeout) -> StringThis function performs a GET request to a specific URL. The call is synchronous, and the timeout is given in milliseconds. The response is directly fetched inside the function. It consists of an XML document (as an ASCII string).
On success, the function will have to call IWSetWsBuffer () with the result (XML response). On failure, the function just returns.
Asynchronous mode
In this case the host code should contain two functions. The function executing the API webservice call:
WebServiceCall: (string URL, int timeout) -> IntThis function performs a GET request to a specific URL. The network call response is handled by a second function:
HandleWebServiceCallResult: (object result) -> VoidDepending on the platform implementing the mAccess library the way of declaring this handler function and the structure of the fetched result object may vary.
The final API call result (which is normally a property or a field of the result object) is an XML Document (as an ASCII string).
On success the handler function will have to call IWSetWsBuffer () with the response. Then the function will have to execute the callback function (passed in argument of the mAccess API asynchronous function) with argument 0 (0 = success). Typically:
IWSetWsBuffer (string response);
WSCallBack (0);
On failure, the handler function will have to execute the callback function (passed in argument of the mAccess API asynchronous function) with argument 1 (1 = error).
WSCallBack (1);Should I use online or offline OTP?
In order to generate an online OTP, mAccess will perform one or more webservice calls to TrustBuilder servers. This mode is suitable for a connected application (online banking for instance), as the token will always be synchronized with TrustBuilder Servers. For a non-connected application (VPN dialer, authenticator-type app), Offline OTP is recommended. In this case, an OTP will be generated without any network call. The drawback of this method is the possibility for the token to desynchronize.
Push notifications
Push notifications can notify the user of an authentication request. Before configuring push notifications, we recommend that you learn about the push notifications mechanism for the platform.
With regards to mAccess SDK, your concerns are:
The unique identifier of the user or device → it needs to be sent to TrustBuilder servers via the IWPushRegistrationStart() function. It will allow TrustBuilder to send push notifications to your App.
The variables received inside the notifications → it will be passed in argument in mAccess API push activation and authentication functions (activation code, transaction alias).
The notification platform used on the application → it will depend on the DeviceOS you'll set via the IWSetDeviceOS() function and must match the mAccess push notification parameters set in the Admin console.
Useful documentations:
Firebase Messaging
Firebase Messaging is a solution used to send remote push notifications across Android, iOS and web devices. It allows both background and in-app notifications.
Your project should be created here: https://console.firebase.google.com
Push notifications parameters in the Admin Console
If you use Notifications, you should provide information to the service administrator. The administrator should login to the admin console, in a White Label Service (See Creating a White Label Service).
In the Service Parameters tab, scroll down to the mAccess push notification parameters section.
Provide the notifications parameters depending on the notifications platform used:
Firebase
In Firebase parameters, set the notification parameters depending on the Firebase API version:
V1 API
the service account JSON file → the JSON file containing the private key for your project. You can generate it in the Firebase console.
the Notification Collapse Key - (Optional)→ it defines the key used to send collapsible messages to your application. When several notifications are sent in a short period of time, it allows these notifications to be aggregated.
Legacy API (
 soon deprecated - From mid-June 2024, the Legacy API will no longer deliver notifications - More information)
the Firebase API Key → The Firebase Cloud Messaging API Key corresponding to the Google Sender ID you entered in your application
the Notification Collapse Key - (Optional)→ it defines the key used to send collapsible messages to your application. When several notifications are sent in a short period of time, it allows these notifications to be aggregated.
The Legacy mode will be deprecated in June 2024
Without any action on your part, the configuration will remain in Legacy mode. We recommend to upgrade to API V1. Please refer to this detailed note: How to upgrade to API V1. It is a step-by step explanation on how to generate your serviceaccount JSON from your Firebase portal, fill-in the relevant parameters in the TrustBuilder MFA admin console, and perform the switch.
APNS
In iPhone parameters, set the notification parameters:
Choose the certificate file.
Indicate whether it is a production certificate or a Sandbox certificate.
Enter the certificate password
Enter the AppID.
The sample application in this SDK doesn't allow you to send notifications directly via APNs. It is configured to use Firebase.
Two applications on the same service
To have two applications on the same service, which receive push notifications, you should:
Use the Firebase notifications → change the deviceOS value to "firebase", using the
SetDeviceOSmethod.Set push notifications in the Admin Console
Service parameters tab > "mAccess push notification parameters" > Firebase parameters
Leave the following parameters empty: “Notification Collapse Key” and “Application Package Name”, so all applications will receive the notifications.
SDK integration
This section will focus on how the mAccess library was integrated in the sample application, how it was initialized and how we can interact with it.
Working with C in Swift
The mAccess library for iOS being a static C library, we will need to add a layer between our Swift UI and the C functions. This layer can still be written fully in Swift.
Read Apple Developer documentation to learn how to call imported functions that are declared in a C header.
Bridging header
First we need to add a bridging header file that will allow every Swift file to import the C header files. This header file only contains one line:
#import "iw.h"It needs to be registered in our build settings:

Swift to C
The mAccess library functions for iOS take either int, char*, IW* or void* as parameters.
int does not need any work, as Swift’s int can be directly passed.
Others types will need to be wrapped as a pointer. Some Swift classes exist to make this happen.
For most use cases we’ll use
UnsafeMutablePointer.Swift’s String can be cast as
UnsafePointer<CChar>!, which is the C equivalent of const char*. Then to convert const char* to char* we’ll just usestrdup
let UID = strdup(UIDevice.current.identifierForVendor!.uuidString)Since strdup will allocate a copy of our string, we'll need to deallocate it when finished. Swift offers a very convenient way to do this by using defer which is a block of code that'll be called once the current scope is exited.
defer { UID?.deallocate() }We’ll now be able to easily call any C function such as:
let host = strdup("https://www.myinwebo.com")
defer { host?.deallocate() }
IWWsServerSet(iw, host)
C to Swift
We need to manage the results of C functions. So we need to convert some C pointers back to Swift.
For Int, there is no work that needs to be done.
For char*:
CODEString(cString: urlString, encoding: .isoLatin1)
mAccess library strings are encoded in isoLatin1
WebCall
The web call layer needs to be written directly in the app.
During initialization a callback should be passed to the library that will be called every time a web call is needed. Every params url and params will be provided so the callback won’t need to add any intelligence relative to the current context.
Note that this callback needs to be synchronous.
self.iw = IWInit(0, UID, SN, {
            (url, timeout, user) in
               // here you should implement your web call.
               // user needs to be updated with IWSetWsBuffer with the response.
            }, nil)
Handle the response:
Once the data object is received, it needs to be passed to the library.
if let data = response.data {
            let length = data.count
            let buffer =
UnsafeMutableRawBufferPointer.allocate(byteCount: length, alignment:
MemoryLayout<CChar>.alignment)
            data.copyBytes(to: buffer)
            IWSetWsBuffer(
                  user.bindMemory(to: IW.self, capacity:
MemoryLayout.size(ofValue: user)),
                buffer.baseAddress?.bindMemory(to: CChar.self, capacity:
length))
      }
Initialization
The TrustBuilder service
In our sample code example, the mAccess library for iOS should only be accessible through the InweboService layer. This layer will do all the C to Swift conversion, so the UI layer will only works with pure Swift code.
InweboService is implemented as a Singleton and must be instantiated only once to avoid Thread concurrency when interacting with the library, as it has a current state used by the different processes implemented.
InweboService.sharedInstance.initInwebo(mAccess:
"MAC_ID", hostVersion: "demo_app_ios")
The InweboService constructor is responsible for the library initialization, setting :
The SN to the identifierForVendor UUI.
The Server to the Build Config SERVER
The host version set to ‘demo_ios-" + version’, version being the Build Config VERSION_NAME
The timeout network to 60000
The mAccess to the Build Config MAC_ID
Once instantiated, we can access the library through the method getApi().
mAccess internal state
The internal state of the application must be locally stored, and updated each time the library is accessed.
To achieve that, a ‘data’ file is created in the application internal storage after the first successful connection to the application. This file contains the string needed by the library to work accordingly.
When the application starts the context of mAccess is initialized with the saved file.
let read = strdup(read())
defer { read?.deallocate() }
let storageDidSet = IWStorageDataSet(iw, read)
After each context update, we save the current context to the file.
if IWStorageDataChanged(iw) > 0 {
            if let data = String(cString: IWStorageDataGet(iw),encoding: .isoLatin1) {
                      write(data: data)
              }
              IWStorageDataRelease(iw)
}
Interaction
Using TrustBuilder service
The service must be used for every interaction between the UI layer and the mAccess library. Every web call being synchronous, it’s important to make them outside of the main thread.
CODEDispatchQueue.global().async { // Make any synchronous call }Once the call is finished we can go back the the UI thread
CODEDispatchQueue.main.async { if (result == IW_ERR_OK) { // Success } else { // Failure } }
Error Handling: the web services never raise errors, as these errors are directly handled in the library. A code will be returned by the library to indicate if an error occurred. If the code returned is not IW_ERR_OK (0), then an explicit dialog will be displayed to the user so that he can see what happened.
Features implementation
This section describes the features implemented in the sample application available in the TrustBuilder MFA SDK for iOS.
Activation
1- Activation code
At launch, we will check if an activation code is required by calling IWIsActivated(iw). If the method does return 0, then an activation code is required.
The Activation page needs to ask for an activation code. When the activation code is entered, the user can click on the button ‘Validate’, that will trigger the code validation.
At this point, we only have an activation code. We will now start the activation process on TrustBuilder calling IWActivationStart(iw, code):
If the webservice does not return a response code 0, the application displays a dialog with the corresponding error message.
If the webservice does return the response code 0, the user can proceed on the activation
2- PIN Code
Now that the activation code has been authorized by TrustBuilder , we have to handle the pin code input. To achieve that, we first ask for the IWPinMode(iw). This method will return the pin mode that should be used for the current process :
If the PIN mode is IW_PIN_NONE, then no PIN code are necessary and we can finalize the process with no pin code
We can call IWActivationFinalize() with no PIN value. See section ‘Finalize’.
If the PIN mode is IW_PIN_CURRENT, then the current user PIN is required. Only the PIN input appears
If the PIN mode is IW_PIN_NEW, then a new PIN must be defined. The PIN input as well as the PIN confirmation input are displayed.
After entering the PIN code, the user can click on the button ‘Validate’ :
In all modes, if PIN is not valid, meaning it’s not 4 numbers long or longer than 6 numbers, then a dialog will appear to notify the user that the PIN code entered is not valid.
If the PIN inputs is (are) good, then we can now finalize the process.
We can now finalize the process with IWActivationFinalize(iw).
3- Finalize process
At this point, we have an Activation code, a valid PIN, or no PIN at all in the case of NONE PIN mode. We will now start the activation process on TrustBuilder calling IWActivationFinalize(iw, activationCode, pinValue):
If the webservice does not return a response code 0, the application displays a dialog with the corresponding error message. Then the activation process will restart.
If the webservice does return the response code 0, the TrustBuilder data will be stored on internal storage, a message will be displayed confirming the activation, and the services available will be displayed.
The application is now activated on the device, and the device is added on the TrustBuilder account.
Unlock
Now that the user device is activated, the device can be locked for several reasons: wrong pin entered a couple times, manual action on the admin console, etc.
When starting any controller, the current user session is checked to know if the device is locked with IWIsBlocked(iw). If that’s the case, the use will arrive on the Unlock page
1- Unlock code
The Unlock page asks for an unlock code. When the unlock code is entered, the user can click on the button ‘Validate’.
At this point, we only have an unlock code. We will now start the unlock process on TrustBuilder calling IWResetStart(iw, activationCode) :
If the webservice does not return a response code 0, the application displays a dialog with the corresponding error message. Then the unlock process will restart.
If the webservice does return the response code 0, the user can proceed on the unlock process
2- PIN Code
Now that the unlock code has been accepted by TrustBuilder , we have to handle the pin code input. To achieve that, we first ask for the IWPinMode(iw). This method will return the pin mode that should be used for the current process:
If the PIN mode is ‘IW_PIN_NONE’, then no PIN code are necessary and we can finalize the process with no pin code ○ We can call IWResetFinalize(iw) with no PIN value. See section ‘Finalize’.
If the PIN mode is ‘IW_PIN_CURRENT’, then the current user PIN is required. Only the PIN input appears
If the PIN mode is ‘IW_PIN_NEW’, then a new PIN must be defined. The PIN input as well as the PIN confirmation input are displayed.
After entering the PIN code, the user can click on the button ‘Validate’
If the PIN code entered is empty, or one of the PIN codes in NEW pin mode, then a dialog will appear to notify the user that the code(s) entered is (are) empty.
In NEW PIN mode, if both codes are not equals, then a dialog will appear to notify the user that the PIN codes entered are not the same.
In all modes, if PIN is not valid, meaning it’s not 4 numbers long or longer than 6 numbers, then a dialog will appear to notify the user that the PIN code entered is not valid.
If the PIN inputs is (are) good, then we can now finalize the process
We can now finalize the process with IWResetFinalize(iw, unlockCode, pinCode).
3- Finalize process
At this point, we have an Unlock code, a valid PIN, or no PIN at all in the case of NONE PIN mode.
We will now start the unlock process on TrustBuilder calling IWResetFinalize(iw, unlockCode, pinValue):
If the webservice does not return a response code 0, the application displays a dialog with the corresponding error message. Then the unlock process will restart.
If the webservice does return the response code 0, the authentication data will be stored on internal storage, a message will be displayed confirming the unlocking, and the services available will be displayed.
Synchronization
In order to synchronize information between the application and TrustBuilder server, you can perform a Synchronization. The synchronization is recommended to be done after each authentication.
1- Starting process
In order to synchronize the application, we first need to call the webservice IWSynchronizeStart(iw):
If the webservice does not return a response code 0, the application displays a dialog with the corresponding error message. Then the controller will close.
If the webservice does return the response code 0, the user can proceed on the synchronize process, and the PIN input appears on the screen.
2- Finalizing process
Now that the process has been started by TrustBuilder , we have to handle the pin code input. To achieve that, we first ask for the IWPinMode(iw). This method will return the pin mode that should be used for the current process:
If the PIN mode is ‘IW_PIN_NONE’, then no PIN code are necessary and we can finalize the
process with no pin code.
The method IWResetFinalize(iw) is called with no PIN value.
If the PIN mode is ‘IW_PIN_CURRENT’, then the current user PIN is required.
After entering the PIN code, the user can click on the button ‘Synchronize’.
If the PIN code entered is empty, then a dialog will appear to notify the user that the code entered is empty. The PIN code input will be re-enabled.
If the PIN inputs is good, then we can now finalize the process
The method IWSynchronizeFinalize(iw, pinCode) is now called:
If the webservice does not return a response code 0, the application displays a dialog with the corresponding error message, and the Synchronize process is restarted.
If the webservice does return the response code 0, a message is displayed confirming that the application has been Synchronized. Then the user is redirected to the main menu.
PIN code update
Now that a PIN is set for a user, it has the possibility to update it directly on the application.
1- Starting process
In order to update the PIN, we first need to call the webservice IWPwdUpdateStart(iw):
If the webservice does not return a response code 0, the application displays a dialog with the corresponding error message. Then the activity will close.
If the webservice does return the response code 0, the user can proceed on the pin code update process, and the PIN inputs will appear on the screen.
2- Finalizing process
Now that the process has been started by TrustBuilder , we have to handle the pin code input:
The user will have to enter the current PIN, the new PIN and its confirmation. When this has been done, the user can click on the button ‘Update Pin Code’, that will disabled inputs and trigger pin confirmation:
If one of the three inputs is empty, then a dialog will appear to notify the user that the code(s) entered is (are) empty.
If the new pin is not equal to its confirmation value, then a dialog will appear to notify the user that the confirmation code is not good.
If PIN is not valid, meaning it’s not 4 numbers long or longer than 6 numbers, then a dialog will appear to notify the user that the PIN code entered is not valid.
Else, the process can be finalized
To finalize the process, the webservice IWPwdUpdateFinalize(iw, newPinCode, currentPinCode) will be called:
If the webservice does not return a response code 0, the application displays a dialog with the corresponding error message. Then the process will restart.
If the webservice does return the response code 0, a message is displayed confirming that the PIN Code has been updated. Then the user is redirected to the main menu.
If the password is changed you might want to reset your biokeys. See Biometric registration below.
Biometrics registration
In our sample code, the Biometric registration is using the BiokeyService described in section Biometrics, in Security Guidelines.
When a user is starting this activity, a first check is done to ensure that the current device is supporting Biometrics.
context.canEvaluatePolicy(.deviceOwnerAuthenticationWithBiometrics,
error: &error)
This shouldn’t be an issue as the Biometrics are available on every iOS device supported.
Then, we will check if a Biometric key is already registered in the current device. If that’s the case, the message ‘You already have biometrics registered, but you can override it.’ will be displayed, but the user can still access the process.
1- Starting process
In order to register a new Biometric, we first need to call the webservice IWSetBiokeyStart(iw):
If the webservice does not return a response code 0, the application displays a dialog with the corresponding error message. Then the activity will close.
If the webservice does return the response code 0, the user can proceed on the biometric registration process, and the PIN inputs will appear on the screen.
2- Finalizing process
Now that the process has been started by TrustBuilder, we have to handle the pin code input. To achieve that, we first ask for the IWPinMode(iw). This method will return the pin mode that should be used for the current process:
If the PIN mode is ‘NONE’, then no PIN code are necessary and we can finalize the process with no pin code
If the PIN mode is ‘CURRENT’, then the current user PIN is required.
After entering the PIN code, the user can click on the button ‘Register’, that will disable the PIN code input :
If the PIN code entered is empty, then a dialog will appear to notify the user that the code entered is empty. The PIN code input will be re-enabled.
If the PIN inputs is good, then we can now finalize the process
To finalize the process, the user clicks on the button ‘Register’. A Biometric Prompt will be displayed:
If the Biometric authentication is successful, then the process can continue
If the Biometric authentication is not successful, the process is restarted to step 1
To finalize the process, the method IWSetBiokeyFinalize(iw, pinCode) is now called:
If the webservice does not return a response code 0, the application displays a dialog with the corresponding error message, and the Biometric registration process is restarted to step 1.
If the webservice does return the response code 0, a message is displayed confirming that the Biometric has been registered. Then the user is redirected to the main menu.
3- Reset all registered biokeys(Optional)
After a PIN code update, for security reasons, you may want to remove all the registered biometrics from user’s devices. We will first call IWUnsetBiokeysStart(iw) to start the reset process. To finalize the process IWUnsetBiokeysFinalize(iw,pinCode) will be called.
Online OTP Generation
The online One Time Password (OTP) generation process can be done in two ways : either with the current PIN or with a registered Biometric.
1- Starting process
In order to start an Online OTP generation, we first need to call the webservice IW.OnlineOtpStart(iw, 0):
If the webservice does not return a response code 0, the application displays a dialog with the corresponding error message. Then the activity will close.
If the webservice does return the response code 0, the user can proceed on the OTP generation
2- Finalizing process
Offline OTP Generation
In the case of an offline OTP generation, the process is a little bit different than the online one, even if the UI is nearly the same.
1- Starting process
The offline generation must be done with a perfectly synchronized application. So the first step in the process is to call method IWOtpShouldSynchronize(iw), to ensure that the application is up to date:
If that is not the case, a Dialog is displayed to warn the user that his application is not synchronized, asking him to synchronize it with the Synchronize feature
If the application is synchronized, then we can start the Offline OTP generation process
Then we need to know if the PIN is required. To achieve that, we call the method IWOtpModeQuery(iw, 0):
If ‘1’ is returned, it means that the PIN is required, and the PIN input is displayed
If ‘0’ is returned, the PIN is not required and we do not need the input
2- Finalizing process
If the PIN is required, the user enters it and clicks on the button ‘Generate’:
If the PIN code entered is empty, then a dialog will appear to notify the user that the code entered is empty. The PIN code input will be re-enabled.
If the PIN inputs is good, then we can now finalize the process
If the PIN is not required, the user only has to click on the button ‘Generate’.
This action will trigger the method IWOtpGenerateMa(iw, pin), that will return a generated OTP. To acknowledge the expiration time of this OTP, we must call IWDisplayTime(iw) that will return the remaining time in seconds, time that will be displayed on the UI.
When time comes to expire, then the button ‘Copy’ that copies the OTP on the device clipboard will be disabled.
Check Pending Push
The pending Push check retrieves a potential pending push notification and displays its information to the user.
1- Setting the Device OS
This can be achieve by calling the method IWSetDeviceOS(iw, deviceos).
In our iOS sample application, the solution used for remote notifications is Firebase from Google. To use Firebase from Google for notification, you should configure Firebase and call IWSetDeviceOS(iw, "firebase").
2- Starting push registration
Now that the OS is configured, we can start the process by calling the method IWPushRegistrationStart(iw) :
If the response code is ‘0’, register process is ok, we can call method IWPushRegistrationFinalize(iw)
If the response code is other than ‘0’, the registration process cannot be started and the application displays a dialog with the corresponding error message. The user is then redirected to the main menu
3- Finalizing push registration
If push registration has been successful, we can call the method IWPushRegistrationFinalize(iw, pushId). This method needs a parameter “pushId” which is the id of the device used for notification push service. For Firebase it is the fcm token:
If the response code is ‘0’, device is registered and process end well
If the response code is other than ‘0’, the registration process cannot be finalized and the application displays a dialog with the corresponding error message. The user is then redirected to the main menu
4- Starting check pending push process
If the registration process went successful, we are now able to use the check pending push method, to get push details if a push is sent.
To call the method, users have to click on the “Check pending push” button.
This action will trigger the method IWCheckPush(iw):
If response code is ‘999’, the application displays a Dialog : ‘No pending push available or mobile push service may not be activated’
If response code is ‘0’, a push is available and the application displays the following details under the button :
‘IWPushAlias(iw)’ returns the push ID
‘IWPushAction(iw)’ returns the push action type of the notification (authenticate or activate)
‘IWPushContext(iw)’ returns notification context if there is one.
If response code is other than ‘0’ or ‘999’, the application displays a dialog with the corresponding error message
5- Push Authentication
If your device is registered and an authentication occurs, you should receive a remote notification as a second authentication factor.
You can either fetch it with IWCheckPush(iw) or implement Firebase Messaging.
Online seal
The online seal generation process can be done in two ways: either with the current PIN or with a registered Biometric.
Before using sealing feature, be sure that the “Transaction sealing” option is set to “Yes” (See Requirements)
1- Starting process
In order to start a seal generation, we first need to call the webservice IWOnlineSealStart(iw, 0):
If the webservice does not return a response code 0, the application displays a dialog with the corresponding error message. Then the activity will close.
If the webservice does return the response code 0, the user can proceed on the seal generation
2- Finalizing process
In the case of a generation with the PIN code, we first must retrieve the PIN mode with IWPinMode(iw). This method will return the pin mode that should be used for the current process:
If the PIN mode is ‘NONE’, the user does not need to enter the current PIN, and the generation can be done without PIN
If the PIN mode contains the ‘CURRENT’ code bit (1 -> 0001), then the PIN input appears and the user has to enter his PIN
If the PIN mode contains the ‘BIO’ code bit (8 -> 1000), then the Biometric Prompt is displayed and the user has to authenticate
After entering the PIN code, the user can click on the button ‘Generate’, that will disable the PIN code input :
If the PIN code entered is empty, then a dialog will appear to notify the user that the code entered is empty. The PIN code input will be re-enabled.
If the PIN inputs is good, then we can now finalize the process
A data field is here to represent the data that is going to be sealed
To finalize the process, the method IWOnlineSealFinalize(iw, 0, pinCode, data) is now called, or IWOnlineSealFinalizeExt(iw, 0, bioKey, 1, data) if using a Biokey:
If the webservice does not return a response code 0, the application displays a dialog with the corresponding error message, and the seal generation process is restarted to step 1.
If the webservice does return the response code 0, the generated seal is retrieved through the method IWSealAnswerOtp(iw), is displayed on the user screen, along with a button ‘Copy’ to set the generated seal in the device clipboard.
Offline seal
In the case of an offline seal, the process is a little bit different than the online one, even if the UI is nearly the same.
Before using sealing feature, be sure that the “Transaction sealing” option is set to “Yes” (See Requirements)
1- Starting process
The offline seal generation must be done with a perfectly synchronized application. So the first step in the process is to call method IWSealShouldSynchronize(iw), to ensure that the application is up to date:
If that is not the case, a Dialog is displayed to warn the user that his application is not synchronized, asking him to synchronize it with the Synchronize feature
If the application is synchronized, then we can start the Offline seal generation process
First we need to know if the PIN is required. To achieve that, we call the method IWSealModeQuery(iw, 0):
If ‘1’ is returned, it means that the PIN is required, and the PIN input is displayed
If ‘0’ is returned, the PIN is not required and we do not need the input
2- Finalizing process
If the PIN is required, the enters it and clicks on the button ‘Generate’:
If the PIN code entered is empty, then a dialog will appear to notify the user that the code entered is empty. The PIN code input will be re-enabled.
If the PIN inputs is good, then we can now finalize the process
A data field is here to represent the data that is going to be sealed
If the PIN is not required, the user only has to click on the button ‘Generate’.
This action will trigger the method IWSealGenerate(iw), that will return a generated seal. To acknowledge the expiration time of this seal, we must call IWDisplayTime(iw) that will return the remaining time in seconds, time that will be displayed on the UI.
When time comes to expire, then the button ‘Copy’ that copies the seal on the device clipboard will be disabled.