VMWare Unified Access Gateway (UAG) SAML integration
inWebo MFA can be enabled as a SAML IdP combined with VMware Unified Access Gateway (UAG) to verify users’ identities before they access the application server.
VMware UAG online documentation cis available here:
https://docs.vmware.com/en/Unified-Access-Gateway/2009/uag-deploy-config/GUID-E4C8B88F-C771-4829-ABBE-12F7FBF517C3.html
The purpose of this guide is to explain how to use InWebo as a SAML 2.0 Identity Provider for your UAG.
1. Prerequisites
You need a VMware UAG version >= 3.8 (version beginning 2020)
You need an access as an administrator to an inWebo environment
2. inWebo SAML connector initial configuration
You need to connect to the inWebo administration console (myinwebo.com) to create a new SAML 2.0 connectors:
Into the inWebo administration console:
go to the "Secures Sites" tab
select "Add a connector of type... and chose "SAML 2.0”
Change the connector name if you wish and click on “Add”
Then download your inWebo metadata by using the link “Download inWebo IdP SAML 2.0 metadata in XML format”.

Save the XML file and edit it, you will need to replace “HTTP-Redirect” by “HTTP-POST” into the tag <md:SingleSignOnService…> and <md:SingleLogoutService…>.
As a result, your XML file will have:
<md:SingleSignOnService Binding="urn:oasis:names:tc:SAML:2.0:bindings:HTTP-POST" Location="https://www.myinwebo.com/console/c/xxxx /saml2/yyyyyy"/>
<md:SingleLogoutService Binding="urn:oasis:names:tc:SAML:2.0:bindings:HTTP-POST" Location="https://www.myinwebo.com/console/c/xxxx/saml2/yyyyyy /logout"/>
Your XML file is now compliant with VMware UAG requirement. Save these modifications.
3. VMware UAG initial configuration
You need to connect to the VMware UAG administration console to import the inWebo IdP metadatas (your XML files created and updated previously in section 2.) and download the XML metadatas generated by VMware UAG.
3.1 Import inWebo IdP metadatas in UAG
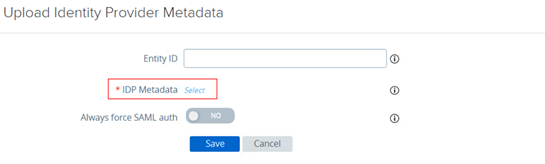
In the “Advanced Settings” menu, in the section “Identity Bridging Settings”, select “Upload Identity Provider Metadata”
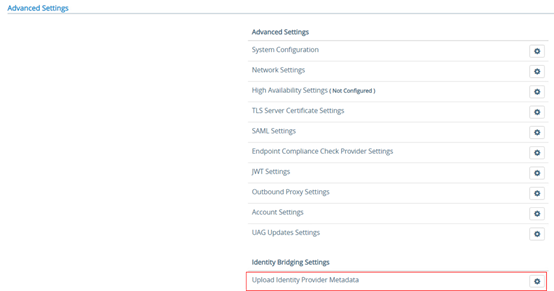
Click on the “Select” button to import your inWebo XML metadatas files (modified in section 2) and “Save”
VMware UAG is now configured with inWebo as an IdP.
3.2 Download UAG metadatas
We are now going to generate the SAML metadatas from VMware UAG.
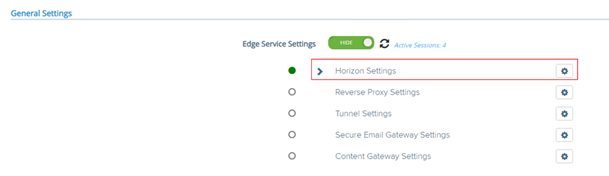
In the “General Settings” menu, in the section “Edge Service Settings”, click on “SHOW”

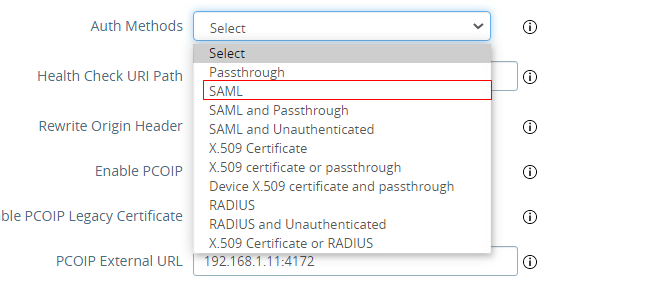
Then enter the “Horizon Settings” menu
At the bottom of the page, click on “More”, to display extra settings fields
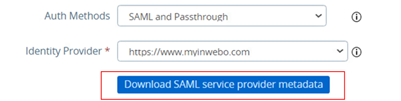
Select “SAML and Passthrough” as the “Auth methods”,
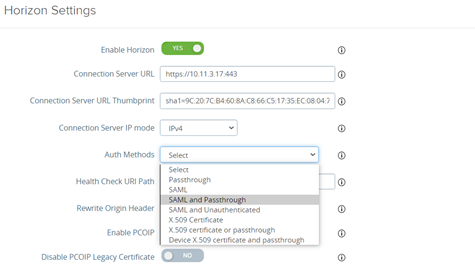
Then select inWebo as the “Identity Provider”
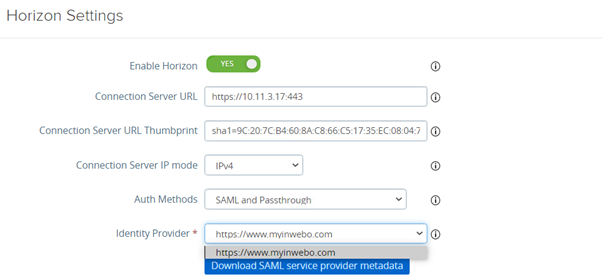
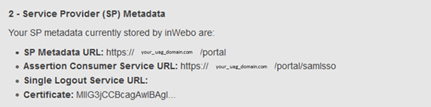
You must now download VMware UAG metadata by clicking on the “Download SAML service provider metadata” button
You will be prompted to enter the external hostname to reach your VMware UAG such as “myuag.domain.com” (without https and port)
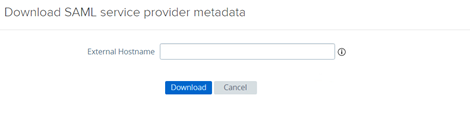
Save the file, you will need it to finalize the inWebo connector into the inWebo administration console (section 4)
Then check the “Proxy Pattern” settings to allow redirection between VMware UAG and inWebo.
It must be similar to (/|/view-client(.*)|/portal(.*)|/appblast(.*))

Then you can “Save” the configuration at the bottom of the page.

Warning: that will apply inWebo Strong authentication based on SAML, be sure to have at least an enrolled and valid inWebo token and still have local access to your UAG in case of issue.
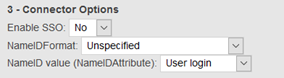
3.3 Extra configuration
You can activate the setting “Match Windows Username” so the username will be passed from SAML authentication to the second step authentication and the user will not have to type his login.

The SAML attribute returned by inWebo platform will fill the login field automatically if you activate this option.
To define the SAML attribute, into the inWebo administration console:
go to the "Secures Sites" tab
Edit the SAML 2.0 connector you have created in section 2
Update “Connector Options” and choose “Unspecified” as the NameIDFormat, then “user login” or “email” depending of the format of login you are using to authenticate
4. Finalize inWebo SAML connector configuration
Go back into the inWebo administration console to finalize the SAML connector you have created in section 2.
Into the inWebo administration console:
go to the "Secures Sites" tab
Edit the SAML 2.0 connector you have created in section 2
Open the XML files generated by VMware UAG (in section 3.2) and copy / past it into the “Service Provider (SP) Metadata” field
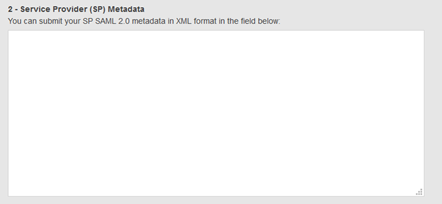
Then click on “Update” to confirm the modification.
Before updating you can do the extra configuration to choose the attribute you want to forward to UAG to fill the login field prompt (section 3.3).
Your inWebo connector is now complete, inWebo can receive redirection from your UAG VMware to perform a strong authentication and reply with the result.
5. Test authentication with a desktop token
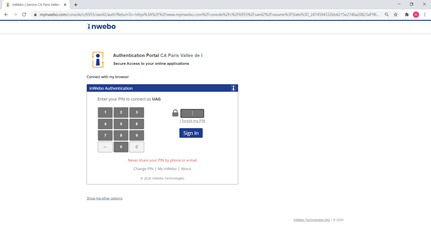
To perform a test, you will need to have an active user with at least a valid token (mobile, pc or browser token). We will perform the test with the VMware Horizon HTML Access (you can do it on the Horizon Client as well)
Launch a browser and open your UAG portal url

You will be automatically redirected on inWebo SAML authentication page where you can use your token (desktop token in this example) to perform the inWebo Strong authentication
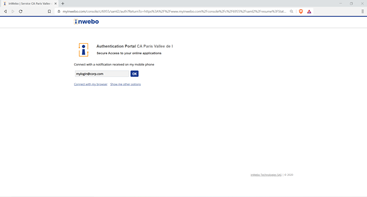
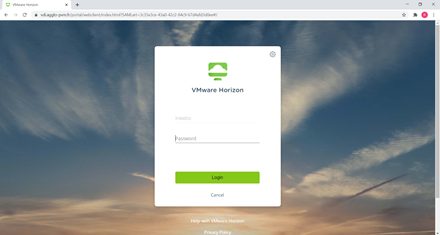
Then, as a second step, you will have to enter your login (if you don’t perfom the extra configuration section above) and your password then click on Login
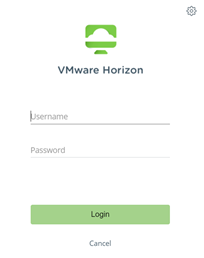
You are connected

6. Test authentication with a browser token and the extra configuration
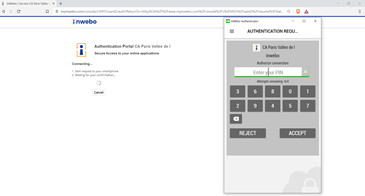
Launch a browser (choose your browser token if you want to use this token to connect) and open your UAG portal url
You will be automatically redirected on inWebo SAML authentication page where you can use your browser token to perform the inWebo Strong authentication as a first step
Then, as a second step, you will have to enter your password only (the login is automatically filled from the SAML assertion provided by inWebo) to be connected
Then, you are connected
7. Implementating a “1 step” user journey
If you want to avoid asking for a login/password as a second step, you can configure your UAG and Horizon with the TrueSSO configuration.
You will have to:
Configure True SSO on Horizon Connection Server
on UAG configure the authMethods on the Horizon Edge Service to be just SAML (not SAML and passthrough).
UAG will then provide the inWebo SAML assertion (after a successfull authentication) to Horizon Connection Server which will validate the assertion.
Horizon Connection Server, by using True SSO technology, will exchange a certificate on behalf of the user with UAG. This way the user will not get the AD password prompt.
The setup up of True SSO is entirely on the Horizon side.
Refer to Horizon True SSO docs for these details: