Thycotic Secret Server - SAML integration
The following steps are necessary to configure Thycotic Secret Server to use inWebo as a SAML IDP to authenticate users with multi-factor authentication.
inWebo SAML connector initial configuration
Create a new SAML connector in the inWebo Administration console
go to the "Secures Sites" tab,
select "Add a connector of type" SAML 2.0.
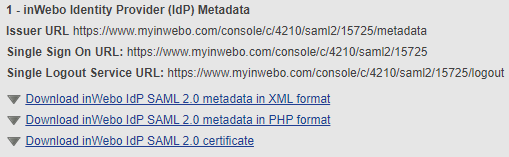
In your SAML connector properties :
note down the “Issuer URL” and the “Single Sign On URL”
click on “Download inWebo IdP SAML 2.0 certificate”
Thycotic Secret Server SAML initial configuration
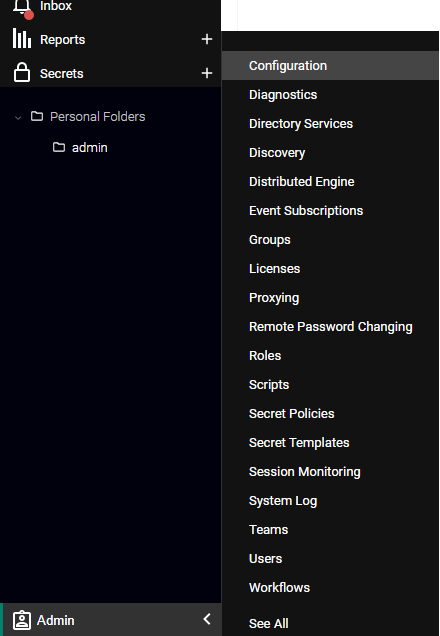
Navigate to Administration menu > Configuration > SAML.
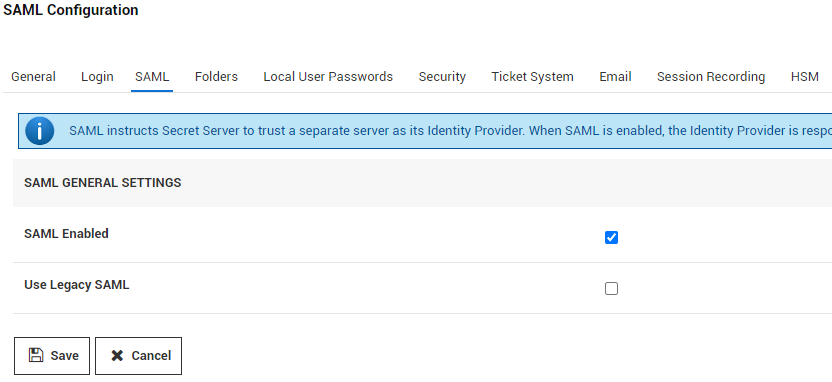
Under General Settings, click Edit, then check the SAML Enabled checkbox. Save changes.
Under SAML SERVICE PROVIDER SETTINGS section click Edit
Enter a name for your Secret Server Service Provider (e.g., SecretServerServiceProvider)
Click Select Certificate…, then click Upload Certificate.

What type of certificate can be used?
The uploaded SAML certificate requires a .pfx file format.
For on-premises instances: the uploaded certificate should match the one used for Secret Server's HTTPS configuration, OR it can be created as a self-signed certificate using the Powershell script here.For Secret Server Cloud users: you will need to generate your own certificate using the Powershell script here.
Note: Run the referenced Powershell script as an Administrator on a machine with .NET 4.5 or above and replace the variables in the script as directed. Your certificate will be created in the directory from which you run the script. The subject name on the certificate is irrelevant, though for on-premises instances it typically will match the URL of the instance.
When the certificate is uploaded, click OK. Then Save the changes.
Click Download Service Provider Metadata (XML) to get the SecretServerSAMLMetadata file. This will be used for uploading into your inWebo SAML connector.
Finalize inWebo SAML connector configuration
Provide SP metadata
Edit the SAML connector in the inWebo administration console and paste in section 2 the SecretServerSAMLMetadata file content you just download from Secret Server.
Click on “Update” to save your modifications.
Configure SAML Assertion
Edit the SAML connector in the inWebo administration console and configure section 3 as follow. Note that you can change the NameID value to User login if the inWebo user login matches the login known by the Secret Server.
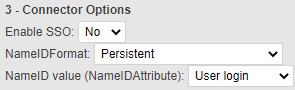
Remove the SAML Attributes in section 4.
Click on “Update” to save your modifications.
Add a secure site for your SP
in Secure site column of the secure site tab of the inWebo Administration console
click on Add a Secure Site of type…
select the SAML connector name you configured,
and configure the Secure site to your Secret Server login page (https://secretserver.com/SecretServer/ )
Locked Out? Here’s how you get around SAML authentication
If during the configuration process for SAML you lock yourself out of your Secret Server (as an administrator or a user), you can log in to Secret Server without using the Single Sign On workflow by using this URL string:
https://yoursecretserver.com/YourSecretServer/login.aspx?preventautologin=true
Note: The Role Permission needed for this is Bypass SAML Login, which Administrators have by default.
Test Authentication
After completing the previous steps, users will log in by entering their username and password, and then they will be prompted for inWebo.
Here is an example with an inWebo browser token.