SAML
The following document refers to a generic TrustBuilder MFA SAML integration. Please, note that some prerequisites and/or steps may differ depending on SAML configuration of the Service Provider.
Introduction
Security Assertion Markup Language (SAML) 2.0 is one of the most widely used open standard for authentication and authorizing between multiple parties.
The SAML workflow implies the following actors:
User → the actual human trying to authenticate and having metadata (identity information) attached to them.
Identity Provider (IdP) → the service that serves as a source of identity and that confirms user identity. Here, TrustBuilder has the IdP role. TrustBuilder authenticates users and returns identity information to the Service Provider.
For a TrustBuilder MFA SAML integration, TrustBuilder can only be the Identity Provider.
Service Provider (SP) → the application that a user tries to access. The SP is the service that requests authentication and identity information about the user. The SP takes authentication responses from the IdP and uses the information to create sessions for the user.
Here is what a basic authentication flow may look like, with TrustBuilder MFA SAML connector set:
The user makes an access request to the SP.
The SP requests authentication from TrustBuilder.
The user is redirected to TrustBuilder to authenticate.
The user enters their PIN and validates. In back-end an OTP is generated by the user device (token web, desktop and mobile ) and sent to TrustBuilder.
TrustBuilder validates the OTP and authenticates the user.
TrustBuilder sends a SAML assertion to the SP. It contains user information such as logins, identifiers, and other relevant attributes.
The SP grants the user access.
Prerequisites
An TrustBuilder service with administrator rights
The Service Provider (SP) Metadata
Configuration
The configuration consists of an exchange of metadata between the SP and the IdP (TrustBuilder): each provides its metadata to the other. Then, it is necessary to make sure that TrustBuilder provides attributes that match with the attributes of the SP so that the authentication works.
Step 1: Create TrustBuilder MFA SAML connector
Login to your administration console.
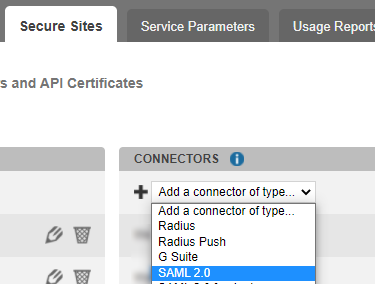
Go to the Secure Sites tab.
In the "connectors” section, click on Add a connector of type… and select SAML 2.0.
Name your connector.
Click on Add to create the connector.
Step 2: Provide the TrustBuilder metadata to the SP
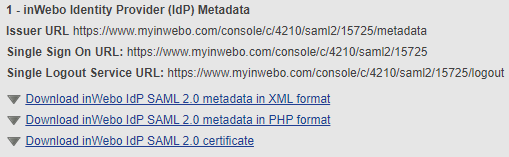
You should provide the TrustBuilder IdP metadata to allow your SAML instance to communicate with the connector. You can download TrustBuilder metadata from the TrustBuilder platform, in the connector’s settings. Depending on the SP configuration method, you will need to copy and paste the Issuer URL, the SSO URL and the Single Logout Service URL, or directly download the metadata in XML format or PHP format.
Step 3: Provide the SP metadata to TrustBuilder
TrustBuilder MFA SAML 2.0 connector needs to know the metadata of your SAML Service Provider authentication instance to communicate with it.
In your administration console, go to the Secure Sites tab.
Edit the SAML 2.0 connector previously created.
Paste the Service Provider (SP) metadata.

Click on Update to save the configuration.
Step 4: Update the TrustBuilder MFA SAML connector
Now that the exchange of metadata between the SP and TrustBuilder is done, you should configure the connector to make sure that TrustBuilder provides attributes that match with the attributes of the SP.
In your administration console, in the connector settings, set the others parameters:
Security Recommendations
To protect users from attacks such as MFA fatigue/Push Bombing, we highly recommend setting the following parameters to "Yes": Browser Token Authentication and Push Authentication. This adds an authentication factor: an attacker will not be able to send push notifications to a user without an enrolled browser token. If users want to use push notifications with the TrustBuilder Authenticator app to authenticate, they will need to enroll a browser token to trigger push notifications.
Setting | Description | |
|---|---|---|
Browser Token Authentication |
| |
Browser Silent Authentication | This parameter only applies to Virtual Authenticator without PIN
| |
Push Authentication |
| |
SAML Assertion settings | SAML assertions contain all the information needed for a service provider to confirm user identity, including the source of the assertion, the time it was issued, and the conditions that make the assertion valid. You can configure some information that will be sent to the SP through the SAML Assertions. You should configure these settings to align the expectations between TrustBuilder and the SP on the user identity that is communicated. | |
3- Connector Options | Enable SSO | This parameter is not to be used (TrustBuilder MFA does not manage sessions between applications) |
NameID | The connector uses the value of the Name ID format This setting defines the format to use to transport the NameID.
Name ID value This setting defines the TrustBuilder user property to use as the name ID value. | |
4- SAML Attributes | If the SP requires TrustBuilder to send specific attributes in its SAML assertion, you should define here the attributes that will be added. Choose a key name and set the value. The value can either be dynamic and related to the TrustBuilder user (user login, user email...) or a static value (in this case the value is the same for all service users). | |
Click on Update.
Step 5: Configure the SP SAML settings
You should configure the SAML settings from your Service Provider platform. Service Providers all have their own unique methods of configuration. However, the following minimal set of configuration is needed for the identity provider to work with a service provider:
You should set the assertions: the source and format of this information will need to be configured. At the minimum, TrustBuilder will send a NameID and some assertions about the user.
You should provide the TrustBuilder IdP metadata to allow your SAML instance to communicate with the connector (See Step 2).
See the “Examples” sub-section below to see some third-party integration documentation.
Step 6: Create a secure site
In your administration console, go to the Secure Sites tab.
Click on Add a secure site of type… and select the SAML connector name you previously configured.
Set the Called URL to point to your SP Internet address.
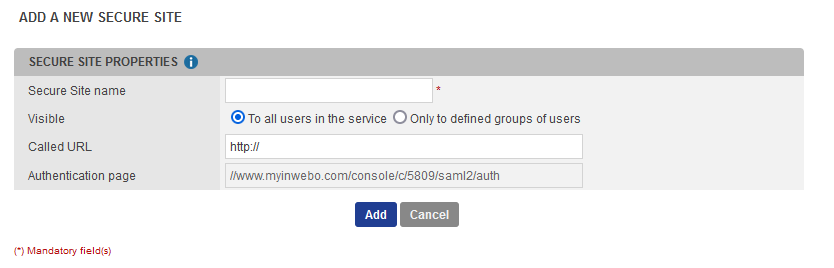
The Called URL setting is only used to set a bookmark for the user on their My Account portal (myinwebo), it has no impact on the security.
Click on Add to create the secure site.
Testing the authentication
To test your SAML authentication, go to the “Called URL”. You can retrieve the called URL from the admin console, in your Secure site settings.
To test the Push Authentication, be sure that the “Push Authentication” is set to Yes, in the connector parameters.
TROUBLESHOOTING
If the URL redirection is successful, but the authentication does not work, it may be an issue linked to attributes. Please check the connector settings and your SP SAML setting (See steps 4 and 5).
There are tools that can help you to debug. For example, “SAML-Tracer” is a web browser plugin for viewing SAML and WS-Federation messages sent through the browser during single sign-on and single logout.
Integration examples
Here are some TrustBuilder documentations that refer to third-party integration, using the TrustBuilder MFA SAML 2.0 connector.