Virtual Authenticator integration
Virtual Authenticator is a 2FA browser token developed by TrustBuilder.
It has the tremendous advantage of not requiring any installation for your users. It is downloaded along with the pages of your web site that need it – authentication page, new user subscription page – that’s it.
The purpose of this guide is to help you implement Virtual Authenticator successfully within your site. We also highly recommend that you read our guide dedicated to Best practices for securing browser enrollments which also applies to Virtual Authenticator
the Activation Code was formerly called "Secure Site ID" in some authentication tools or in the documentation. Please note that a "Secure Site ID" refers to an activation code.
General Principle
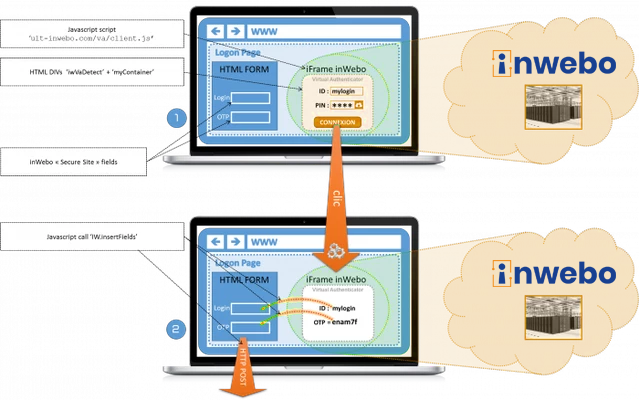
Virtual Authenticator consists of a JavaScript iframe that is called directly from within your html logon page. It is hosted on the ult-inwebo.com domain.
Virtual Authenticator is only an OTP generator, nothing else. Once displayed in the logon page, it will prompt the user's pin code to generate an OTP. Finally, the login/OTP pair is inserted in the form fields and posted/submited (within the meaning of HTML) through the form.
Please note that once the OTP has been generated and posted, it has to be verified and validated by the TrustBuilder servers using the AuthenticateExtended API.
Prerequisites
Using IE11 may cause compatibility issues and affect the user experience. We strongly recommend upgrading to the latest version of Microsoft Edge, Google Chrome or Mozilla Firefox.
For Virtual Authenticator to work, you need to have subscribed to one of the TrustBuilder MFA offers. When subscribing, you have access to the Administration console, where you will add your Secure Sites.
Here is the list of parameters you need to configure:
Make sure Virtual Authenticator is activated for your service → In “Service Parameters” tab > “inWebo Authenticator & Virtual Authenticator”, make sure that “inWebo Virtual Authenticator (browser)” > “Activated” is set to “Yes”.
Create a Secure Site and activate Virtual Authenticator on it → In “Secure Sites” tab > “Secure Sites” section, you need to create a Secure Site (Web Services or Radius) that will load Virtual Authenticator. Use the drop down list to add one.
The Secure Site window opens :
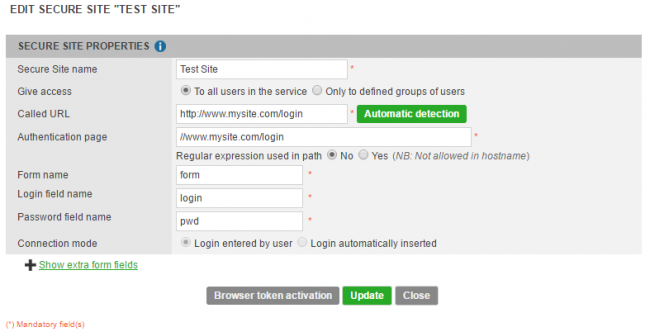
Called URL : This is the url that trusted devices call whenever a user selects your service in his 'Secure Sites' list. It begins with http:// or https://
Authentication page : This is the page where authentication happens. It can be different from Called URL. Enter it beginning with //. It can be either a complete standard web url, or an IP address.
. Note1: if you are developing locally on you PC, 'localhost' is not permitted in the 'Authentication Page field'. Use 127.0.0.1 instead.
. Note2: Additional information concerning all parameters can be found by clicking the online help : (i) pictogram.
Important: "Authentication Page" field
This field has a security target as this value will be compared to the user's browser URL to prevent phishing attacks. Thus, it is crucial the URL entered in "Authentication field" matches exactly what users will enter in their web browser.
When developing/testing, it's a common mistake that prevent Virtual Authenticator to be displayed. If you've entered an IP address in this field, you must also access with this same IP address on your web browser for Virtual Authenticator to work and be displayed.
When you are done, click the “Add” button to validate your secure site configuration. Then before closing the window, click the “Browser token activation” button. You should see a new non-editable field “Bookmark alias” appear.
The Bookmark alias is a string like '1a2b2c4d4e6f7g8h9i0j1k2l3m4n5o6p' and is a unique identifier that will allow you to integrate Virtual Authenticator in your authentication and subscription pages.
Integration
Virtual Authenticator integration is very simple. Simply add a few HTML tags in 2 places in your HTML source code and you are set.
Insert a HTML form
Your logon page must include a HTML form with an explicit and unique 'name' tag, and also at least 2 input fields for the login and the OTP, also with an explicit 'name' tag. The following example is corresponding to the secure site parameters entered above:
...
<form name="form" action=....>
  <input name="login" type="text"....>
  <input name="pwd" type="password"....>
</form>
...
Edit HTML header
Call Virtual Authenticator JavaScript by adding the following tag in your HTML header:
<script type="text/JavaScript" src="https://ult-inwebo.com/va/client.js"></script>Edit HTML body
Insert configuration parameters in your HTML body. These parameters are located in a div tag in the body of your page.
<div id="myContainer" style="display:none;"></div>
<div id="iwVaDetect" data-action="authentication" data-container="myContainer"
 data-lang="en" data-alias="1a2b3c4d5e6f7g8h9i0j1k2l3m4n5o6p" data-width="auto"></div>
Table summarizing all start tag attributes and values:
Start Tags | Possible values | Description |
|---|---|---|
id |
| id of the Virtual Authenticator starting div. Leave “iwVaDetect” for basic implementation – mandatory |
data-container | any value | id of the div element that will host the display of Virtual Authenticator – mandatory |
data-alias | example 1a2b3c4d5e6f7g8h9i0j1k2l3m4n5o6p | Bookmark ID alias – mandatory |
data-action | authentication | for users authentication |
activation | for users to activate their browser token. They are prompted to enter an Activation code | |
pushactivation | for users to activate their browser, with a push notification received on their registered mobile | |
unlock | for users to unlock their browser token. Users a prompted to enter an unlock code to reset their pin code | |
changepin | to allow users to change their pin code | |
data-nopin |
| Boolean. If set to 1, authentication without pin is forced |
data-silent-run |
| Boolean. If set to 1 no splash screen is displayed when Virtual Authenticator loads and if no pin is required for authentication then the action is performed silently |
data-quiet-start |
| Boolean. If set to 1 no splash screen is displayed when Virtual Authenticator loads |
data-lang |
| Sets the language of Virtual Authenticator interface. Default value “auto” means that the browser language is used. |
data-randompad |
| Boolean. If set to 1 numeric keys on keypad are displayed in a random order |
data-usekeypad |
| Boolean. If set to 0 Virtual Authenticator is displayed without the virtual keypad |
data-width | auto (default) | iframe size is set depending on the viewport width (responsive mode) |
“S” or “small” | good for screen having a width from 320 to 349px | |
“M” or “medium” | good for screen having a width from 350 to 449px | |
“L” or “Large” | good for screen having a width from 450 to 599px | |
“XL” or “xlarge” | good for screen having a width - equal to or over 600px | |
custom numeric size | set a size in pixel, e.g. 400 |
Optional tags:
Action authentication: you can insert the login that will be authenticated in your page and Virtual Authenticator will use it (useful in two-step auth scenarios)
<div id="inwebologin" style="display:none;">mylogin</div>Action activation: you can insert an activation code in your page. (Useful in custom provisioning workflows to pre-fill the "Activation code" field during activation)
<div id="inweboactivationcode" style="display:none">123456789</div>Basic integration
The basic integration consists in adding the tags described above in the header and the body of your HTML page. Virtual Authenticator will be displayed in the container you have set in the “data-container” attribute of the “iwVaDetect” parameter div element.
Advanced integration
Examples
Typical handling of a successful authentication:
    if (data.type == "error" && data.code == "nok" && data.result.reason == "no_profile") {
        //your logic here
    }
Typical trapping of nok:no profile cases (i.e a non trusted/enrolled browser):
    if (data.type == "error" && data.code == "nok" && data.result.reason == "no_profile") {
        //your logic here
    }
Typical handling of a successful activation:
    if (data.type == "success" && data.code == "ok" && data.action == "activation") {
        //your logic here
        //you can restart in 'authenticate' mode
    }
Typical way of detecting that Virtual Authenticator UI display is ready
    if (data.type == "info" && data.action == "ui_shown") {
        //your logic here
    }
Full sample code
JavaScript code (in HTML header, i.e between <head> </head>)
<script type="text/JavaScript">
VA_jQuery(document).ready(function(){
	iwpopup("myContainer", "myStart", function() {
		iwstart("myStart", function(iw, data) {
        	//Successful authentication
			if (data.action == "authentication" && data.code == "ok") {
				iw.insertFields(data.result);
			}
        	//Virtual Authenticator is not activated
			if (data.type == "error" && data.code == "nok" && data.result.reason == "no_profile") {
				//We terminate the previous instance of Virtual Authenticator
				iwterminate();
 				//We encapsulate the restart of Virtual Authenticator on action "activation" in a setTimeout
				setTimeout(function() {
					iwstart("myStartActivate", function(iw, data) {
						//handle successful activation here
						if (data.type == "success" && data.code == "ok" && data.action == "activation") {
							window.location.href = window.location.href;
						}
					});
				}, 0);
			}
		});
   });
});
</script>
HTML Tags in the body (between <body> </body>):
<div id="myStart" data-action="authentication" data-container="myContainer" data-quiet-start="1"
 	data-lang="auto" data-width="M" data-alias="1a2b2c4d4e6f7g8h9i0j1k2l3m4n5o6p"></div>
<div id="myStartActivate" data-action="activation" data-container="myContainer" data-quiet-start="1"
 	data-lang="auto" data-width="M" data-alias="1a2b2c4d4e6f7g8h9i0j1k2l3m4n5o6p"></div>
<div id="myContainer"></div>
Note: The data.alias '1a2b2c4d4e6f7g8h9i0j1k2l3m4n5o6p' is to be replaced by your own “bookmark alias” as shown in your secure site.
Function iwterminate()
This function can be used to properly terminate an instance of Virtual Authenticator If you plan to immediately restart another instance of the token, it is highly recommended to encapsulate the new call to iwstart() in a setTimeout function. This will ensure that the previous instance has been completely removed from the browser context.