Parallels Remote Access Server, RADIUS and RADIUS "push" integration
Parallels Remote Access Server RADIUS Configuration
To configure Radius properties:
In the Parallels RAS Console, navigate to the Connection > Second Level Authentication tab.
In the Provider drop-down list, select Radius.
Click the Settings button. The Radius Properties dialog opens.
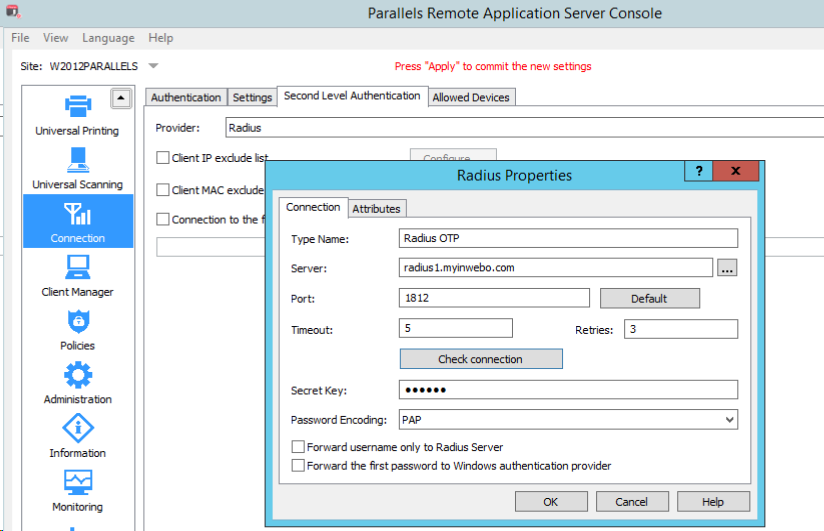
823pxIn the Server field, enter the hostname or IP address of the Radius Server. (see inWebo RADIUS server list)
In the Port field, enter the port number for the Radius Server. (1812)
In the Timeout field, specify the packet timeout in seconds.
In the Retries field, specify the number of retries when attempting to establish a connection.
For inWebo the Radius authentication time (Timeout*(Retries+1)) should be below the 30s duration of an OTP
Type the Secret Key and specify the Password Encoding as PAP (Password Authentication Protocol)
Click OK when done.
Click the Check connection button to validate the connection. If the connection is configured correctly, you will see a confirmation message.
In the Value field, enter the value for the selected attribute type (numeric, string, IP address, date, etc).
About ‘push’ RADIUS mode
if you are using the 'push' radius mode (notification sent to the user's smartphone), the global response time must be long enough to allow the user to authenticate with his smartphone.
A "Radius Authentication time" of 60 seconds is recommended. (timeout 60 / 1 Retries)
inWebo RADIUS servers
Fill the indication for your first inWebo radius authentication server:
inWebo Radius server addresses :
Primary: radius-a.myinwebo.com (95.131.139.137)
Secondary: radius-b.myinwebo.com (217.180.130.59)
(See RADIUS integration and redundancy for additional details and configuration)
InWebo RADIUS configuration
You can create your own inWebo account at inWebo Signup page. This will give you access to you inWebo Administration Console.
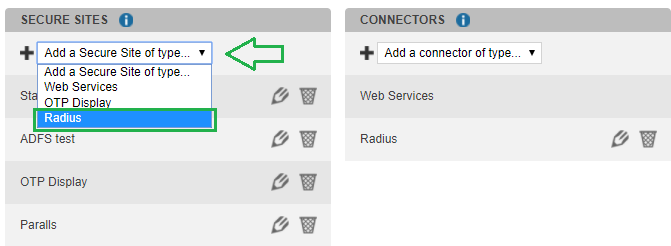
Once connected, go to Secure Sites tab > CONNECTORS section.
Select “Add a connector of type…”, and choose “Radius” or “Radius Push” :
The popup below will appear. Enter the External URL of to reach your Parallels Remote Application Server, along with the RADIUS secret you have defined earlier:

Click “Add/update”
Creating a new secure site for your portal page
In the "Secure Sites" tab of your inWebo Administration Console, "Add a Secure Site of type..." > Radius
Fill the site properties with the following information:
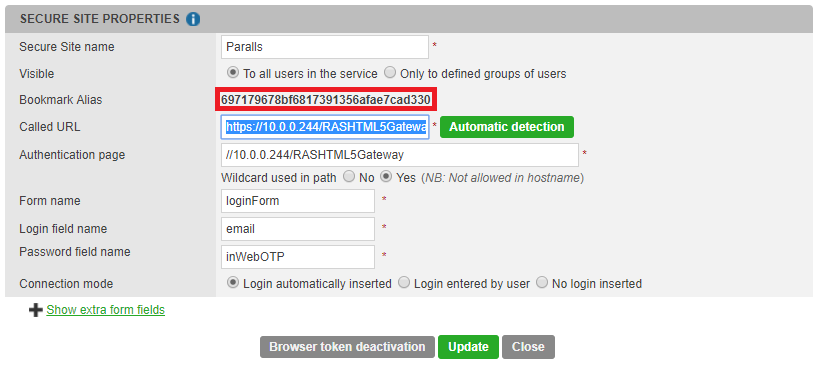
Called URL: https://***webaddress***/RASHTML5Gateway
Authentication page: //10.0.0.244/RASHTML5Gateway
Wildcard used in path >Yes<
Form name : loginForm
Login field name : email
Password field name : inWebOTP
You have to activate the Browser token to create the Bookmark Alias
Basic Virtual authenticator integration the HTML 5 Parallels portal
Modifying the index page
file location: Open ProgramFiles/Parallels/.../RASHTML5Gateway/www/index.html in a text editor.
Lines to Add in the <HEAD> section:
<script type="text/javascript" src="https://ult-inwebo.com/va/client.js"></script>

<script type="text/javascript">
    VA_jQuery(document).ready(function(){
        iwpopup("myContainer", "myStart", function() {
            iwstart("myStart", function(iw, data) {
                //Successful authentication
                if (data.action == "authentication" && data.code == "ok") {
				$("#inLogin").val(data.result.values[0]);
				$("#inWebOTP").val(data.result.values[1]);

                }
                //Virtual Authenticator is not activated
                if (data.type == "error" && data.code == "nok" && data.result.reason == "no_profile") {
                //We terminate the previous instance of Virtual Authenticator
                iwterminate();
                //We encapsulate the restart of Virtual Authenticator on action "activation" in a setTimeout
                setTimeout(function() {
                    iwstart("myStartActivate", function(iw, data) {
                    //handle successful activation here
                        });
                    }, 0);
                }
            });
        });
    });
</script>
Lines to Add in the BODY section:
<div id="myContainer"></div>
<div id="myStart" data-action="authentication" data-container="myContainer" data-quiet-start="1" data-lang="auto" data-width="M"data-alias="xxxxx_secure_site_ID_xxxxx"></div>
<div id="myStartActivate" data-action="activation" data-container="myContainer" data-quiet-start="1" data-lang="auto" data-width="M"data-alias="xxxxx_secure_site_ID_xxxxx"></div>
Change the data-alias information to match the alias given for in the Secure site created for this page.
Modifying the "tpl-login" script
Find and modify the script with id="tpl-login"" as below
<script id="tpl-login" type="text/template">
	<div class="pax-content-wrapper">
		<div class="container">
			<!-- ko with: login-->
			<div class="navbar pax-navbar-sub-alternative">
				<h3 class="navbar-text" data-bind="text: getLoginText()"/>
			</div>
			<form class="pax-form-narrow" data-bind="submit:doLogin" target="loginFrame" method="post" action="blank.html">
				<div class="row form-group">
					<div class="col-md-6 col-md-offset-3">
						<input class="form-control" id="inLogin" type="text" name="email" data-bind="paxPlaceholder: _('user@domain'), value: email, valueUpdate: 'blur'">
						</div>
						<div class="col-md-6 col-md-offset-3 pax-validation-message"/>
					</div>
					<div class="row form-group">
						<div class="col-md-6 col-md-offset-3">
							<input class="form-control" type="password" name="password" data-bind="paxPlaceholder: _('Password'), value: password" autocomplete="off">
							</div>
							<div class="col-md-6 col-md-offset-3 pax-validation-message"/>
						</div>
						<div class="row form-group pax-no-validation pax-increased-distance">
							<div class="col-xs-6">
								<a class="pax-no-underline" href="#/restore">
									<!--b(data-bind='text:_("Forgot password?")')-->
								</a>
							</div>
						</div>
						<div class="form-group pax-no-validation pax-increased-distance">
							<button class="btn btn-primary btn-block" data-bind="disable: disableLogin() || disableLoginNoSpin()" style="margin-bottom: 60px;">
								<span data-bind="text:_('Login')"/>
								<div class="small-spinner-login" data-bind="visible:disableLogin()"/>
							</button>
						</div>
						<div class="form-group pax-no-validation pax-additional text-center">
							<p data-bind="html:app.viewmodel.theme.messageLogon()" style="white-space: pre-wrap; word-wrap: break-word; margin-top: -40px;padding-bottom: 40px;"/>
						</div>
					</form>
					<div style="position:fixed; top:20%; left:20%; background-color:#cae8ca; border:2px solid #4CAF50;">
						<div>OTP</div>
						<div>
							<input type="text" id="inWebOTP">
							</div>
						</div>
						<!-- /ko-->
					</div>
				</div>
</script>
Authenticating with a portal modified with Virtual Authenticator
The portal will automatically display the inWebo authentication frame
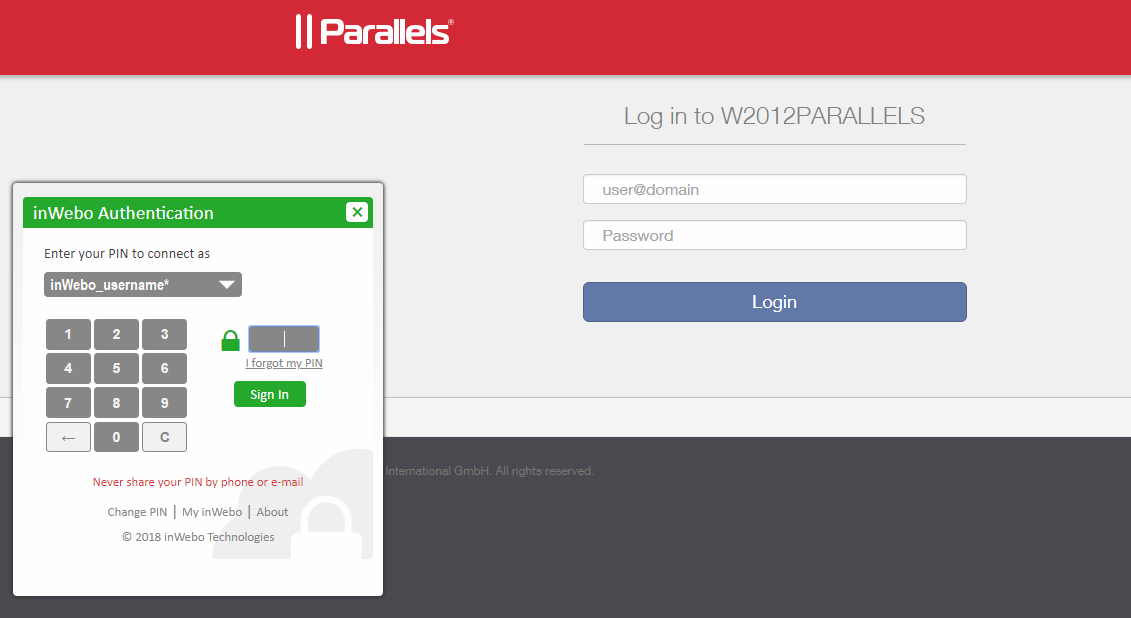
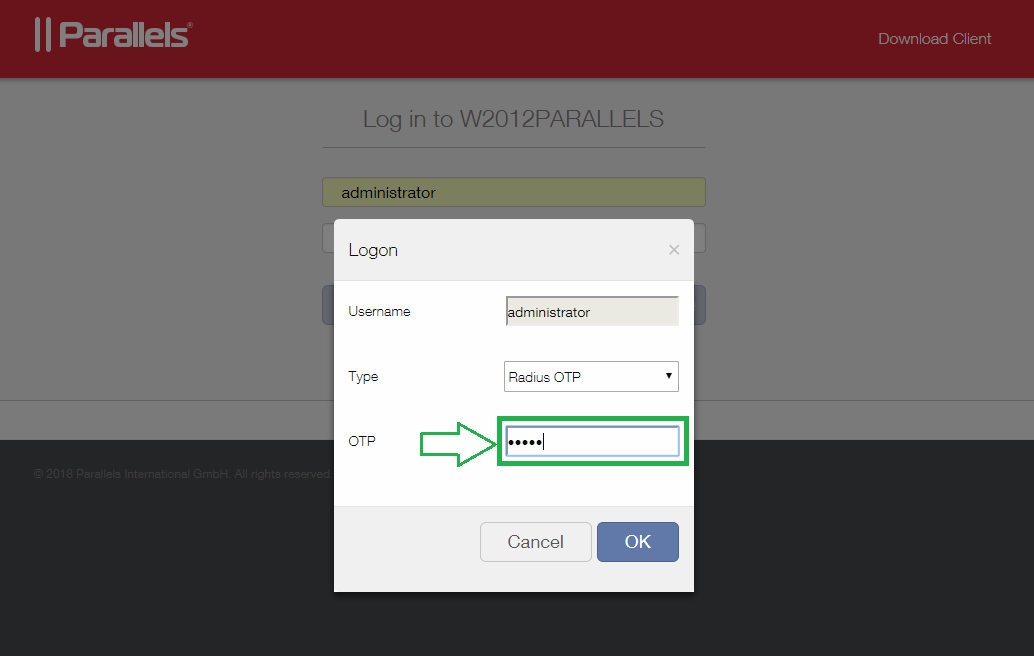
Once authenticated with a PIN code the inWebo frame will fill automatically the UPN(user@domain) and generate the OTP
Verify that the inWebo login match the correct UPN
Warning: only a registered Device and a correct PIN code can generate the right OTP for a specific service.
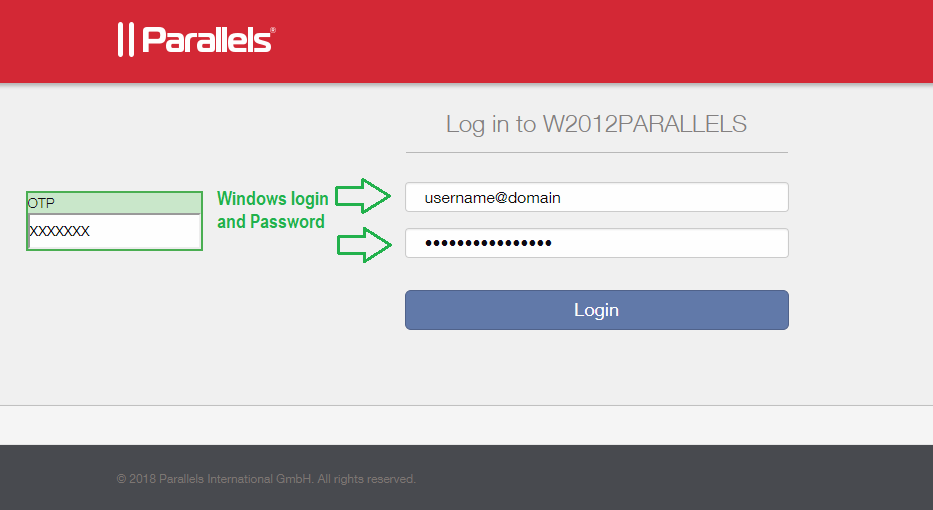
Fill the Windows password and copy the generated OTP before proceeding the “Login” button.
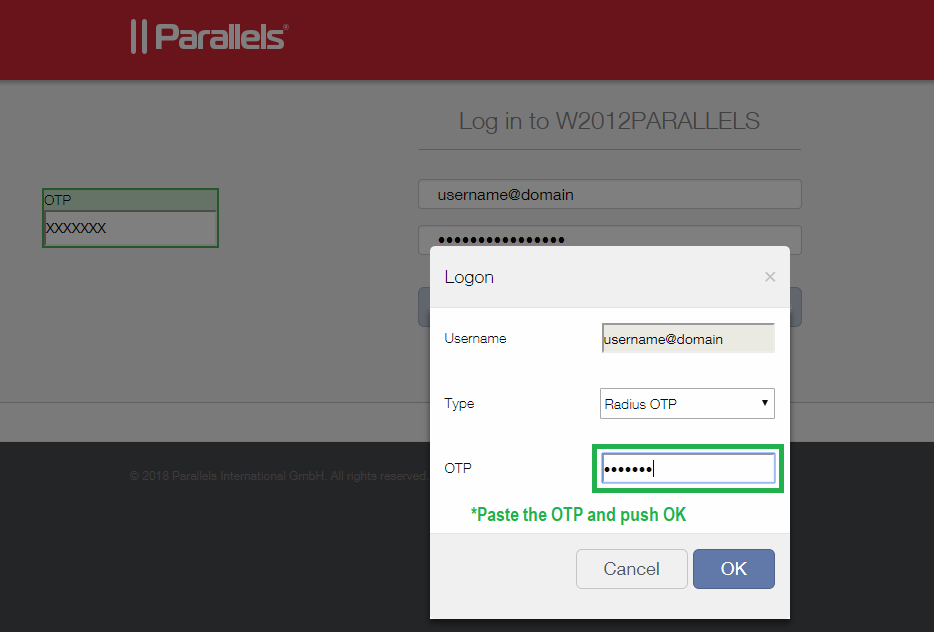
Paste the OTP and push OK to access you content.
Authenticating in RADIUS "PUSH" mode
When using a RADIUS PUSH secure site as authentication process, there is no modification to the company portal,
The user just need to type a random character chain for the OTP request
This request is sent to our platform which ask your PIN code on the user's phone to accept the RADIUS authentication.
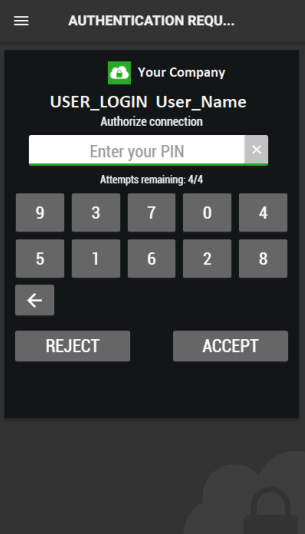
Once the authentication validated the RADIUS authentication is accepted.
Authenticating with Parallels Client on Windows environment
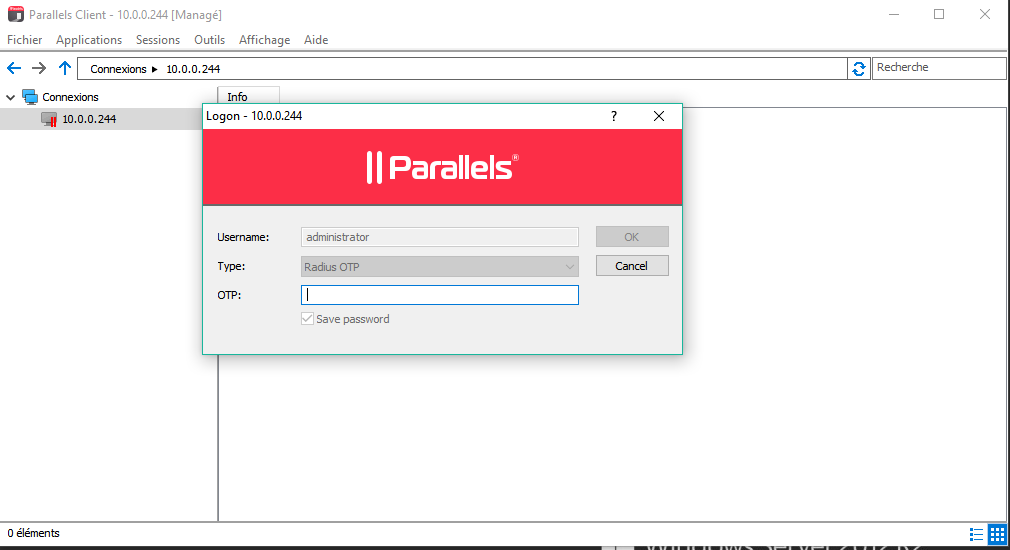
Warning: The username should be in UPN format and correspond to inWebo login to accept the RADIUS authentication.
In RADIUS "Push" mode
For RADIUS push the user just need to type a random character chain for the OTP request,
As above this request is sent to our platform which ask your PIN code on the user's phone to accept the RADIUS authentication.