OpenID Connect (OIDC)
OpenID Connect is an identity layer built on top of the OAuth 2.0 protocol. OAuth2 is only concerned with authorization, meaning granting access to resources, controls and delegates authorization to access a protected resource. Open ID Connect (OIDC) extends the OAuth 2.0 protocol with user authentication and Single Sign-on (SSO) functionality.
OIDC is supported by some OAuth 2.0 providers, such as Google and Azure Active Directory. It defines a sign-in flow that enables a client application to authenticate a user, and to retrieve information (claims) about the user (user name, email, and so on). User identity information is encoded in a secure JSON Web Token (JWT), called ID token.
About OIDC
OIDC (OpenID Connect) extends OAuth 2.0 for user authentication. It enables to retrieve and store authentication information about a user. This sub-section contains basic information about OIDC supported by TrustBuilder MFA.
The OpenID Connect specification uses specific terms (see OpenID Connect terminology).
Roles
Relying party (RP): the client application that requests the ID token from TrustBuilder.
OIDC Provider (OP): the authorization server that issues the ID token. In this case TrustBuilder is the OpenID Connect Provider.
User: whose information (claims) is contained in the ID token.
Endpoints
OIDC specifies endpoints to be used by the relying party to communicate with the OIDC provider. OIDC defines core endpoints which are used to initiate and complete the OIDC authentication and authorization process.
Authorization endpoint: initiates the authentication and authorization flow. It requests the user's authentication and consent to obtain authorization grant. Carried across from OAuth
Token endpoint: requests an ID token and/or an Access token and/or a Refresh Token. Carried across from OAuth
User info endpoint: request information (claims) about the authenticated user by providing a valid access token. New to OpenID Connect
OIDC also defines other optional endpoints which are used to provide additional functionality or services to the Relying party. The Discovery endpoint is useful for TrustBuilder MFA integration. Discovery endpoint returns the OIDC Provider metadata as a JSON object. OpenID server publishes its metadata at a well-known URL, typically https://server.com/.well-known/openid-configuration. TrustBuilder provides the Discovery URL at the connector creation.
Tokens
In response to an authentication request, an ID token or/and an Access token or/and a Refresh token are issued.
ID token: signed JWT containing encoded information (claims) about the authenticated user. It is issued by the OpenID Provider to prove that the user has been authenticated.
Access token: JWT containing authorization information. It informs that the bearer of the token has been authorized to access the resource to perform specific actions (specified by the scopes granted) on behalf of the user. It cannot tell if the user has been authenticated.
Refresh token: used to obtain a renewed access token without having to re-authenticate the user.
Flows
OpenID Connect has defined 3 authentications flows. These flows dictate what response types an authorization request can request and how tokens are returned to the relying party.
As this documentation page refers to OpenID connect, we consider the following flows with the openid scope included in the request. It is mandatory to tell the authorization server to run OpenID Connect protocol.
The value of the response_type parameter in the request determines the authorization processing flow to be used:
codefor authorization codeid_tokenfor ID tokentokenfor access token
Known issue: a problem has been reported that has an impact on the Authorization Code flow. It is currently being fixed. Contact TrustBuilder support for more information.
“response_type” value | Flow |
|---|---|
| Authorization Code flow 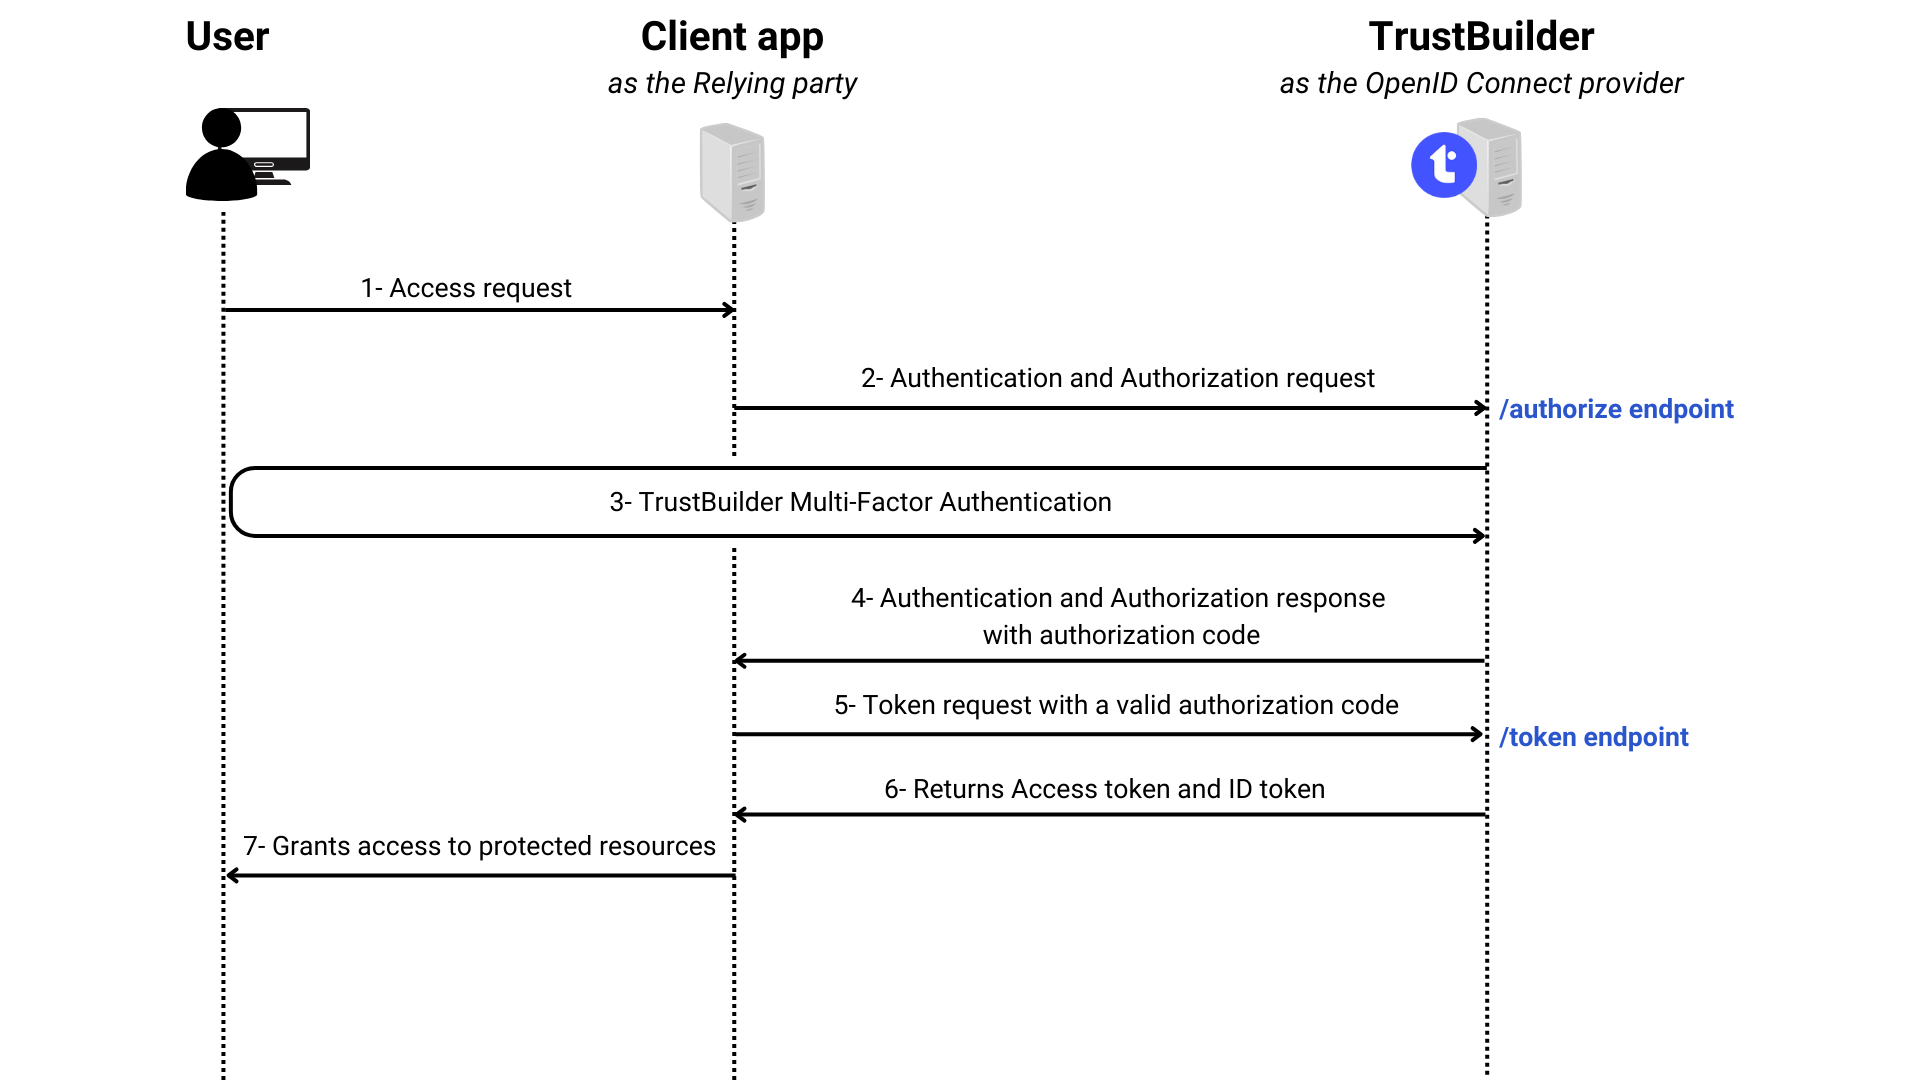 1. Users requests access to the client application which is MFA protected. 2. The client application sends an Authentication and Authorization request to TrustBuilder trough the Authorization endpoint. In the request, the response_type parameter is set to 3. TrustBuilder requests the user to authenticate. The user authenticates with one of the TrustBuilder authentication methods. 4. After the successful user authentication, TrustBuilder sends the encoded authentication responses including the authorization code. 5. The client application sends a token request to TrustBuilder through the Token endpoint. A valid authorization code should be presented in the request. 6. TrustBuilder sends an Access token containing authorization information and an ID Token containing information about the authenticated user. 7. The client application validates the access token and grants the user access to its protected resources. If needed, the client app can request user claims (information) to TrustBuilder through the Userinfo endpoint. A valid access token should be presented in the request. TrustBuilder will return claims about the authenticated user to the client application. Only the claims scoped by the access token are returned. |
| Implicit flow .png?inst-v=ec66afee-d2c4-48a4-a718-698b015bde83) 1. Users requests access to the client application which is MFA protected. 2. The client application sends an Authentication and Authorization request to TrustBuilder trough the Authorization endpoint. In the request, the response_type parameter is set to 3. TrustBuilder requests the user to authenticate. The user authenticates with one of the TrustBuilder authentication methods. 4. After the successful user authentication, TrustBuilder sends the encoded authentication responses including the ID token. 5. The client application validates the ID token and grants the user access to its protected resources. |
| Implicit flow .png?inst-v=ec66afee-d2c4-48a4-a718-698b015bde83) 1. Users requests access to the client application which is MFA protected. 2. The client application sends an Authentication and Authorization request to TrustBuilder trough the Authorization endpoint. In the request, the response_type parameter is set to 3. TrustBuilder requests the user to authenticate. The user authenticates with one of the TrustBuilder authentication methods. 4. After the successful user authentication, TrustBuilder sends the encoded authentication responses including the Access token and ID token. 5. The client application validates the Access token and the ID token and grants the user access to its protected resources. |
| Hybrid flow .png?inst-v=ec66afee-d2c4-48a4-a718-698b015bde83) 1. Users requests access to the client application which is MFA protected. 2. The client application sends an Authentication and Authorization request to TrustBuilder trough the Authorization endpoint. In the request, the response_type parameter is set to 3. TrustBuilder requests the user to authenticate. The user authenticates with one of the TrustBuilder authentication methods. 4. After the successful user authentication, TrustBuilder sends the encoded authentication responses including the authorization code. 5. The client application sends a token request to TrustBuilder through the Token endpoint. A valid authorization code should be presented in the request. 6. TrustBuilder sends an Access token containing authorization information and an ID Token containing information about the authenticated user. 7. The client application validates the access token and grants the user access to its protected resources. If needed, the client app can request user claims (information) to TrustBuilder through the Userinfo endpoint. A valid access token should be presented in the request. TrustBuilder will return claims about the authenticated user to the client application. Only the claims scoped by the access token are returned. |
| Hybrid flow .png?inst-v=ec66afee-d2c4-48a4-a718-698b015bde83) 1. Users requests access to the client application which is MFA protected. 2. The client application sends an Authentication and Authorization request to TrustBuilder trough the Authorization endpoint. In the request, the response_type parameter is set to 3. TrustBuilder requests the user to authenticate. The user authenticates with one of the TrustBuilder authentication methods. 4. After the successful user authentication, TrustBuilder sends the encoded authentication responses including the authorization code. 5. The client application sends a token request to TrustBuilder through the Token endpoint. A valid authorization code should be presented in the request. 6. TrustBuilder sends an Access token containing authorization information and an ID Token containing information about the authenticated user. 7. The client application validates the access token and grants the user access to its protected resources. If needed, the client app can request user claims (information) to TrustBuilder through the Userinfo endpoint. A valid access token should be presented in the request. TrustBuilder will return claims about the authenticated user to the client application. Only the claims scoped by the access token are returned. |
| Hybrid flow .png?inst-v=ec66afee-d2c4-48a4-a718-698b015bde83) 1. Users requests access to the client application which is MFA protected. 2. The client application sends an Authentication and Authorization request to TrustBuilder trough the Authorization endpoint. In the request, the response_type parameter is set to 3. TrustBuilder requests the user to authenticate. The user authenticates with one of the TrustBuilder authentication methods. 4. After the successful user authentication, TrustBuilder sends the encoded authentication responses including the authorization code. 5. The client application sends a token request to TrustBuilder through the Token endpoint. A valid authorization code should be presented in the request. 6. TrustBuilder sends an Access token containing authorization information and an ID Token containing information about the authenticated user. 7. The client application validates the access token and grants the user access to its protected resources. If needed, the client app can request user claims (information) to TrustBuilder through the Userinfo endpoint. A valid access token should be presented in the request. TrustBuilder will return claims about the authenticated user to the client application. Only the claims scoped by the access token are returned. |
Authentication request
The minimal required OpenID authentication request parameters are the following:
response_type: determines the authorization processing flow to be used.
codefor authorization codeid_tokenfor ID tokentokenfor access token
client_id: public identifier of the client application that asks for authorization.
scope: space separated list of scopes that the client application requests.
openidmust be included for all requests. More informationredirect_uri: the redirection URI to which the response will be sent. This URI must exactly match one of the registered redirection URIs for the client at the OpenID Provider.
nonce: random string that added to the initial request and then included inside the ID Token to mitigate the replay attacks. Required in the implicit flow, otherwise recommended
Other request parameters:
state: Opaque value to be returned in the access token to maintain state between the request and the callback. If set in the request, then the state is returned to the client application as part of the redirect_uri.
response_mode: determines the mechanism to be used for returning Authorization Response parameters from the Authorization Endpoint.
form_post → encoded as HTML form transmitted via the HTTP POST method
query → encoded in the query string added to the redirect_uri
fragment → encoded in the fragment added to the redirect_uri
Scope value | Associated claims |
|---|---|
email, email_verified | |
phone | phone_number, phone_number_verified |
profile | name, family_name, given_name, middle_name, nickname, preferred_username, profile, picture, website, gender, birthdate, zoneinfo, locale, updated_at |
address | address |
Integrate TrustBuilder MFA through OIDC
To integrate TrustBuilder MFA with your application through OpenID Connect, you should configure an “OpenID Connect” connector in TrustBuilder. You should also provide the required TrustBuilder OIDC information to your application to be able to communicate with TrustBuilder.
Configure OIDC connector in TrustBuilder
Login to TrustBuilder MFA administration console.
Go to the Secure Sites tab.
In the "Connectors” section, click on Add a connector of type… and select Open ID Connect
Configure the connector settings.
OpenID Connect connector settings | |
|---|---|
Setting | Description |
Connector name | A chosen name / information to define the connector's goal |
Client ID | Unique client application identifier that will be used during authentications |
Login Type | Indicates whether the login used during the authentication should be retrieved in the login field, the email field or the login 2 field. |
Client Secret | Secret used by the client application to authenticate with the Authorization Server (a character string without spaces) |
Validity period | The maximum amount of time that the token should remain valid, in seconds. This field can remain empty (the default is 1 year). |
Default | Select the default authentication method to use on the authentication page served by TrustBuilder:
To protect users from attacks such as Push Bombing, we recommend selecting the QR code authentication. The QR code authentication method does not use push notifications, therefore it does not enable a push bombing scenario. More information about protecting users from Push Bombing attacks |
Scopes | Determines the claims (user information) returned within the OpenID token. By default |
Custom claims | Add client app specific claims. They are not standard OIDC claims. |
Click on Add to create the OpenID Connect connector.
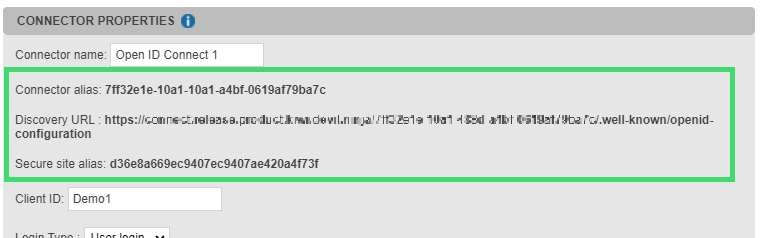
The connector creation automatically generates a connector alias, a discovery URL and a secure site alias. These elements are displayed on the top of the connector properties.
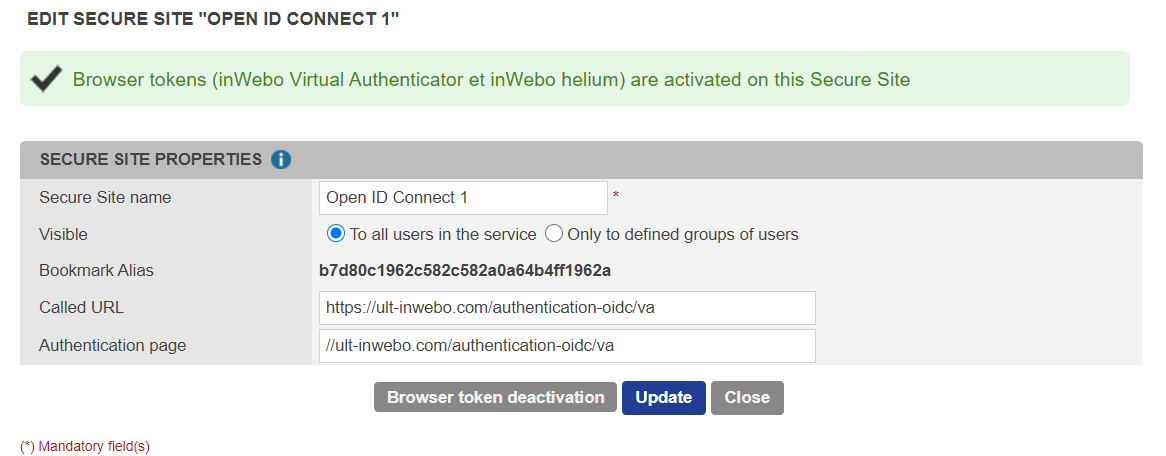
The associated secure site is automatically generated (in Secure sites tabs).
Provide TrustBuilder metadata to the Relying party
You should provide TrustBuilder metadata to allow TrustBuilder (the OIDC provider) and your client application (the Relying party) to communicate.
The OIDC provider metadata can be retrieved at the Discovery URL. The connector properties should match the client application OIDC properties.
Test the OIDC connection to TrustBuilder
To test the OIDC connector the most important entry is the authorization_endpoint. You can retrieve the authorization_endpoint value in the JSON file returned by the Discovery URL.
In the example below, the OIDC flow is implicit with reponse_type=id_token. Only an ID_token will be issued
Set up a simple HTML form posting to the authorization_endpoint URL to initiate the authentication dialog with TrustBuilder.
Example of form: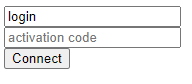 CODE
CODE<form method="post" name="logon" id="form" action="https://connect.myinwebo.com/168d150b-c1e4-459d-b1ca-e142a8150861/authorize"> <input name="login_hint" value="login"> <input name="iw_activation_code" placeholder="activation code"> <input type="hidden" name="redirect_uri" value="result.html"> <input type="hidden" name="client_id" value="MyOIDC"> <input type="hidden" name="response_type" value="id_token"> <input type="hidden" name="response_mode" value="query"> <input type="hidden" name="scope" value="openid"> <input type="hidden" name="nonce" value="asdorj5"> <input type="submit" value="Connect" /> </form>After posting the form you should be redirected to the TrustBuilder MFA authentication page of the connector. Click on Activate this browser to allow your browser become a trusted device.
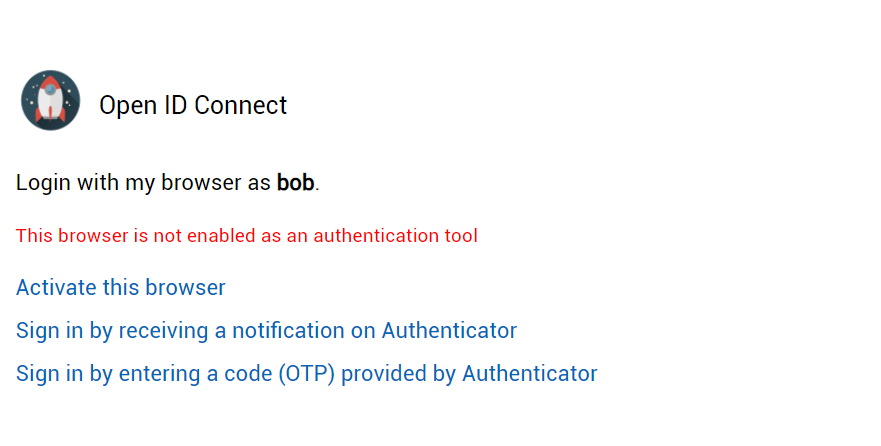
After browser token activation, you should be able to authenticate.
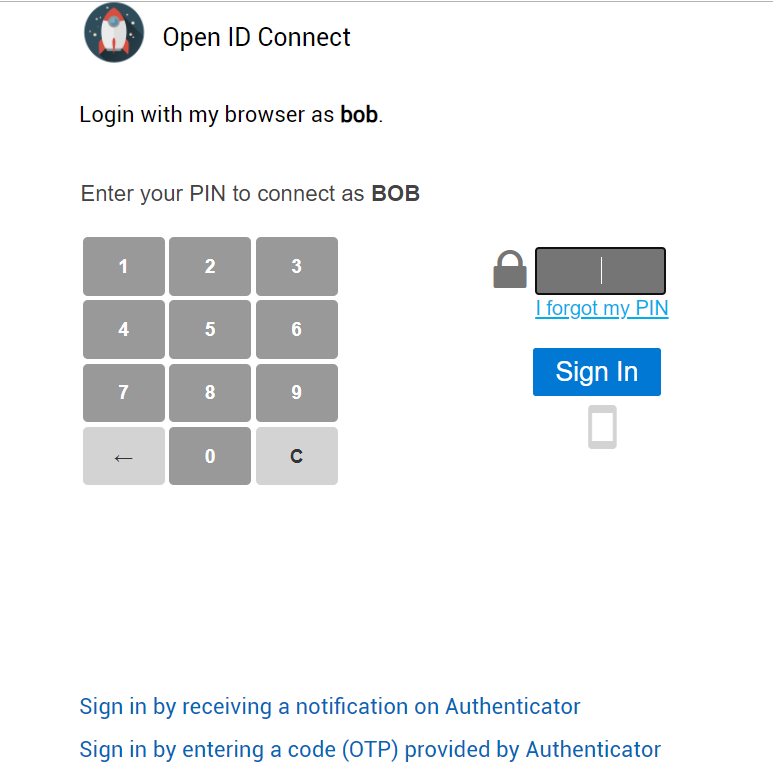
Example of TrustBuilder MFA connection page after activation of the browser token (Virtual Authenticator)
After successful authentication, you are redirected to a page specified in the
redirect_uriof the sample form above.
Here is a sample page to retrieve the result of an OIDC authenticationCODE<html> <head> <script> function getUrlVars() { var vars = {}; var parts = window.location.href.replace(/[#?&]+([^=&]+)=([^&]*)/gi, function(m,key,value) { ; return vars; } document.addEventListener('DOMContentLoaded', (event) => { console.log("Dom loaded !"); setTimeout(getUrlVars(),500); }) </script> </head> <body> Authentication successful </body> </html>Open the JavaScript console and see the result of the authentication under the form of a id_token encoded and encrypted.
The ID_token returns information about the authenticated user, the Client ID, the issuer URL (TrustBuilder), a creation date, an expiration date and a nonce.
Here is a sample ID_token:
eyJraWQiOiJBRFJrQ1VrWXVibHJoUTVYeEFUYUhNT25LclNnRHVHWVRvUExUbHdoSE40IiwiYWxnIjoiUlMyNTYifQ.eyJzdWIiOiJib2IiLCJhdWQiOiJNeU9JREMiLCJpc3MiOiJodHRwczpcL1wvY29ubmVjdC5teWlud2Viby5jb21cLzE2OGQxNTBiLWMxZTQtNDU5ZC1iMWNhLWUxNDJhODE1MDg2MVwvIiwiZXhwIjoxNzEzMTkwMDU4LCJpYXQiOjE2MTg1ODIwNTgsIm5vbmNlIjoiYXNkb3JqNSJ9.JcnBuWBiU8zgOVWb4OPSlwapcGgJJcoTjwX2kJZsCR3ZM2XVsUwnamrYhEOXP_lsmLytSmk5BesIsv6VZl1RYXkLYQu4IRDxE2bRByfZ5F8MW_OdEYobpa47BXRaveDPHTWZQnkOpxROYgtGRIHHByz1DAak-PWKx5FA_7WH11g4eD5_7FDkZyGqfswFjdVOsnfPDZw9ICkP2QQnVyS8-kcuxUewLZI1YgjUF9abmrm2Rb8Pp2FBcmIsoFP9LeFGBNB7OisM1TieKtmSuU7C2cozSWeTZ0g8rrtIVYVlt2jWgjRmfpXJXF3PZi1QsqAjOkHF0mZAkN6giE52d6gRpwYou can decode this id token on JWT.IO.
Let's see the payload returned once the id_token is decoded:
{
"sub": "bob",
"aud": "MyOIDC",
"iss": "https://connect.myinwebo.com/168d150b-c1e4-459d-b1ca-e142a8150861/",
"exp": 1713190058,
"iat": 1618582058,
"nonce": "asdorj5"
}