Microsoft Entra ID
This documentation refers to the Microsoft Entra ID (Microsoft Azure Active Directory) integration. It explains how to protect your Entra ID applications with TrustBuilder MFA. The TrustBuilder MFA Azure AD connector uses OpenID Connect.
Prerequisites
Entra ID account at a Premium level (P1 or P2)
A TrustBuilder MFA account
Configuring TrustBuilder MFA
Entra ID uses the UPN (UserPrincipalName) attribute as a login for the authentication process. To communicate with TrustBuilder, this requires the TrustBuilder MFA user logins to be in UPN format (e.g. nom.prenom@domain.dom). Please be careful when choosing the TrustBuilder MFA login to use for the exchange with Entra ID (see “Login type” parameter below).
Step 1: Creating a new TrustBuilder MFA Azure AD connector
Note that the connector still uses the name “Azure AD”.
Connect as administrator to the administration console.
Go to “Secure Sites” section.
Choose to create a connector of type “OIDC Azure AD”.
Fill in the fields to create your Azure AD Connector:
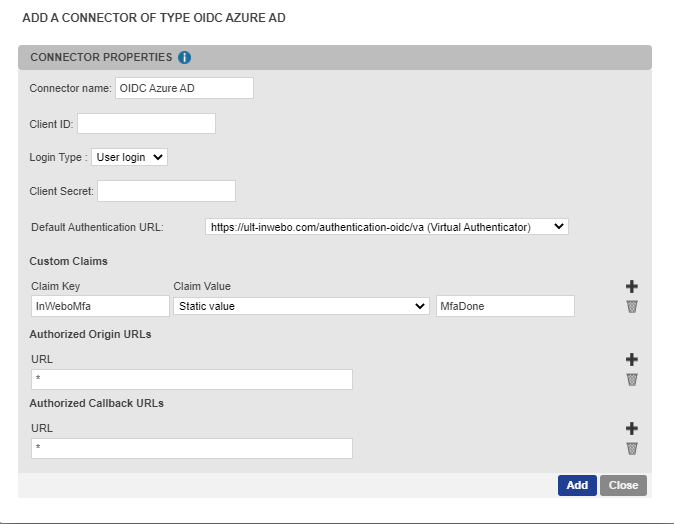
Connector name → Enter a chosen name / information to define the connector's goal in the administration console. The name of the connector will be used to create the secure site, so it will appear in the authentication context sentence.
Client ID → Enter the client ID. It allows the junction between the TrustBuilder MFA connector and the Entra ID custom control (when creating the custom control, the ClientID is mentioned in the JSON code).
Login Type → Select the login type to use during user authentication process: user login, login 2 and user email.
Entra ID uses the UPN (UserPrincipalName) attribute as a login for the authentication process. To communicate with TrustBuilder, this requires the TrustBuilder MFA user logins to be in UPN format (e.g. nom.prenom@domain.dom). The login type value must match the Entra ID UPN value.
If the TrustBuilder MFA user logins match the Entra ID UPN, we suggest you to choose "login type= user login".
If the TrustBuilder MFA user logins do not match the Entra ID UPN:
Option 1: Change the format of the TrustBuilder MFA users logins
If it is still possible and without impact, we recommend that you change the format of your TrustBuilder MFA users logins to match the Entra ID UPN.Option 2 (if option 1 is not possible): Use another TrustBuilder MFA login type (login 2 or user email)
“login 2”: the TrustBuilder MFA User emails must match the Entra ID UPN. Enter the UPN value in the “login 2 field” of user properties.
Optional: the login 2 field is supported from IWDS 2.4. Please check your IWDS version. Then you should to edit the LDAP IWDS settings tab to associate the login 2 field with the value "userprincipalname". Once done, launch a synchronization so that all users have their login 2 field updated and usable for the TrustBuilder MFA Azure AD connector. See IWDS documentation"user mail": the TrustBuilder MFA User emails must match the Entra ID UPN for all the users.
Optional: if you are not sure that your AD users mails match the UPN format, edit the LDAP IWDS settings tab to associate the mail field with the value "userprincipalname” - See IWDS documentation
As there is no uniqueness constraint, several TrustBuilder MFA users can have the same email. If an email is associated to several TrustBuilder MFA user accounts, TrustBuilder won’t be able to choose a specific user account for the login included in the exchange from Entra ID. In this case, the synchronization between Entra ID and TrustBuilder will block for all affected user accounts. It is recommended to export the list of users from the administration console and check by sorting that there are no duplicates.
Client Secret → a character string without spaces - It is not used for the Azure AD connector (this value is defined for OpenID Connect standards).
Authentication URL → Select the default authentication method to use on the authentication page served by TrustBuilder:
https://ult-inwebo.com/authentication-oidc/va → The first authentication option presented to users will be a page embedding Virtual Authenticator (VA).
https://ult-inwebo.com/authentication-oidc/helium → The first authentication option presented to users will be a page embedding Helium.
https://ult-inwebo.com/authentication-oidc/neon → The first authentication option presented to users will be a page embedding mAccess Web.
https://ult-inwebo.com/authentication-oidc/authenticator → Push notifications with Authenticator app will be presented to users as an authentication method.
https://ult-inwebo.com/authentication-oidc/authenticator-with-qrcode → QR code authentication with Authenticator app will be presented to users as an authentication method
More information about QR code authentication methodOther page… → You can use a custom page
To protect users from attacks such as Push Bombing, we recommend selecting the QR code authentication. The QR code authentication method does not use push notifications, therefore it does not enable a push bombing scenario.
More information about protecting users from Push Bombing attacks
Custom claims → Check that the claim keys and values are present: InWeboMFa - Static value - MfaDone.
Click on Add to create the Azure AD connector.
A connector alias, a secure site alias and a discovery URL have been automatically generated. These elements are displayed on the top of the connector properties.
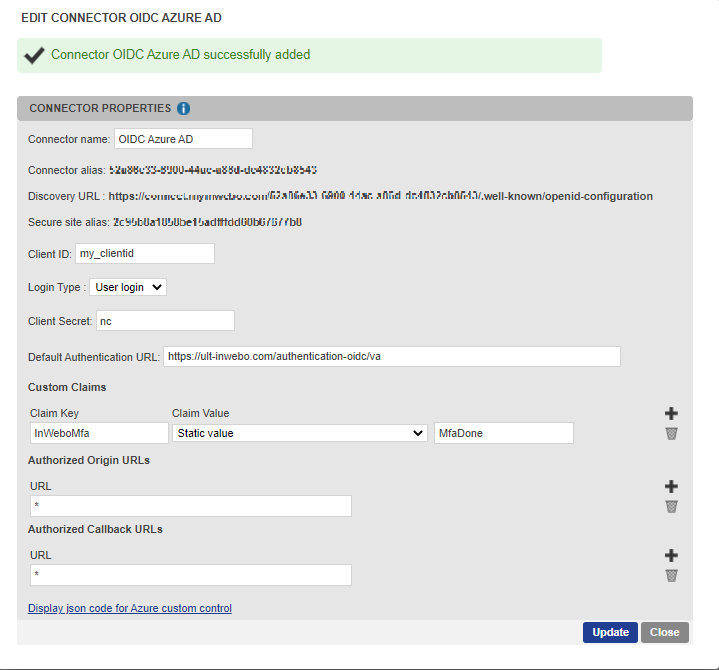
Click on “Display json code for Azure custom control” at the bottom of the connector properties.
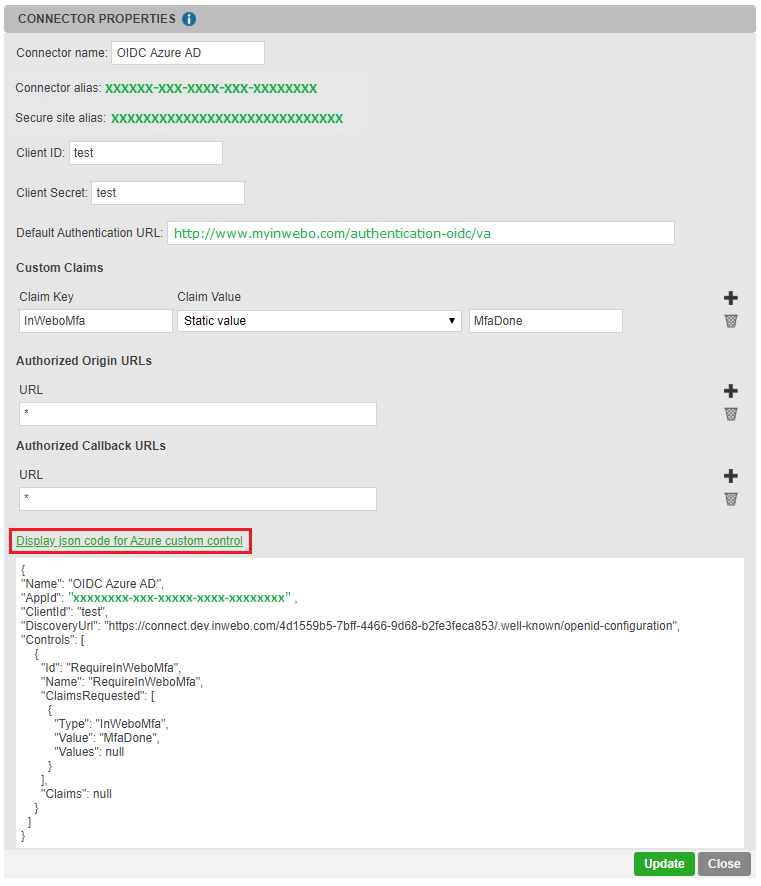
Copy the json code: it should be used for Entra ID custom control (see “Step 2: Creating a new custom control in Entra ID” below).
The "Id": "RequireInWeboMfa" and "Name": "RequireInWeboMfa" fields must be unique. They must not be used by other "custom control" mechanisms.
However, you can change the "Name" field to "RequireInWeboMfa service name"for a more meaningful display by adding the name of the related TrustBuilder service for Entra ID.
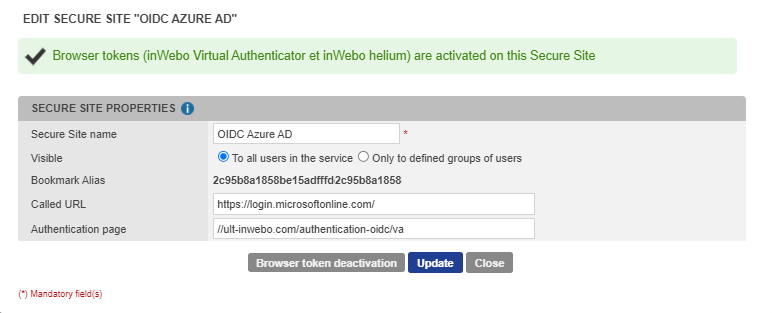
The associated secure site is automatically created after OIDC Azure AD connector creation (in Secure sites tab).
Step 2: Creating a new custom control in Entra ID
To add TrustBuilder multi-factor authentication you have to create and configure an Entra ID custom control.
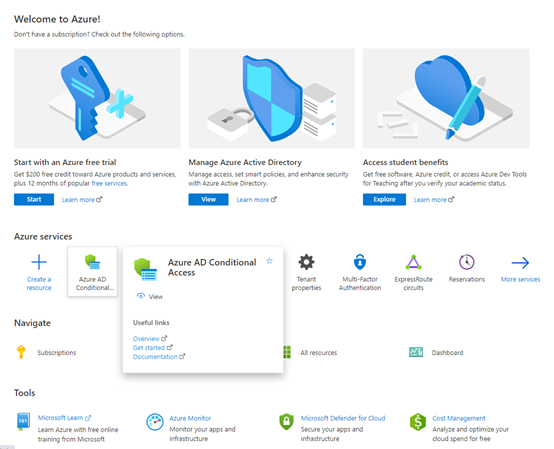
As an Administrator, access your Microsoft Entra ID tenant with the Microsoft Azure Portal.
Select "More Services", browse to "Identity" category and select "Entra ID Conditional Access".
Select "Custom controls (preview)" in the Conditional Access menu.
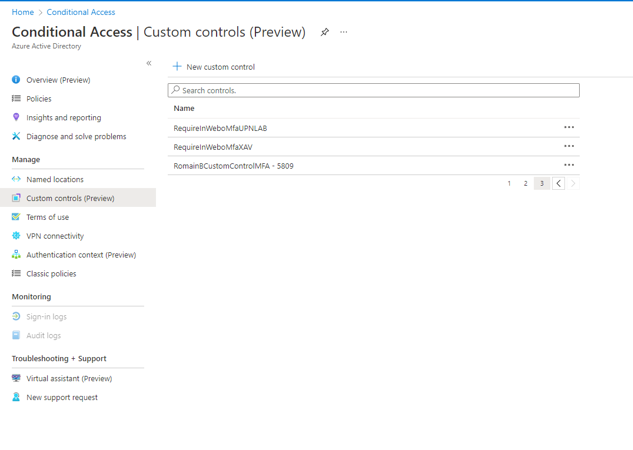
Click on the "+" at the top of the displayed page, next to "New Custom Control”.
Delete the existing code displayed and paste the TrustBuilder Json code provided by TrustBuilder (see “Step1: Creating a new Azure AD connector” above).

Click on "Create".
Step 3: Creating a new conditional access policy in Entra ID
You can control how authorized users can access your cloud apps.
The objective of a conditional access policy is to enforce additional access controls when a user attempts to access a cloud app, depending on how the access attempt is performed. You can control how authorized users can access your cloud apps.
From the Microsoft Azure Portal, go to Azure Active Directory > Security > Conditional Access.
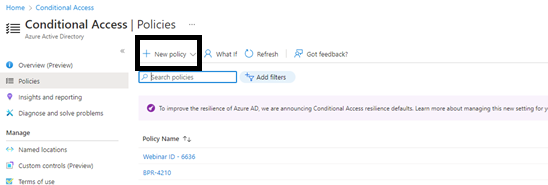
Go to "Policies" in the left menu and click on "+ New policy".
Name your new Policy i.e "TrustBuilder policy"
Assign impacted Users groups following your own specifications.
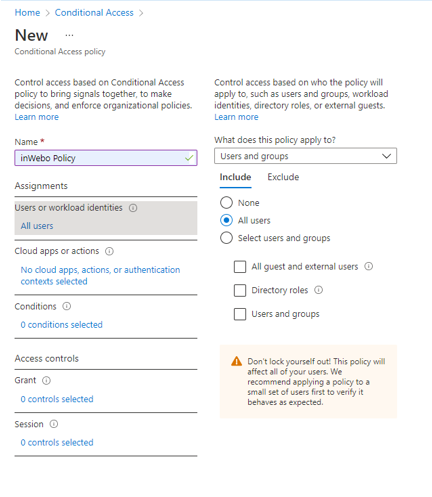
When testing it is recommended to not apply this policy on your own Administrator. Test it on a limited group of users at first to verify your authentication mechanism.
Assign impacted apps following your own specifications.
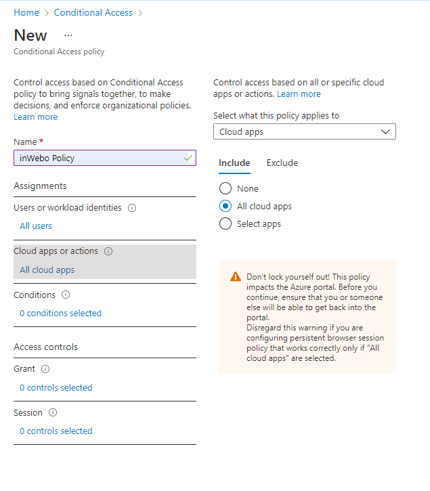
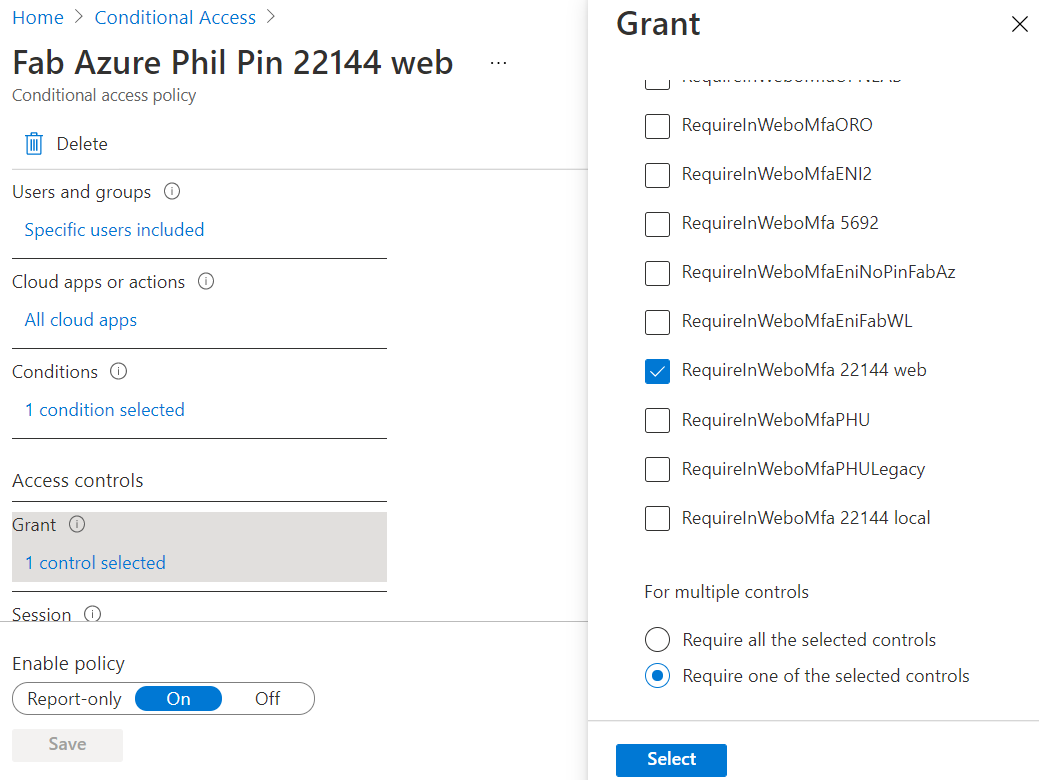
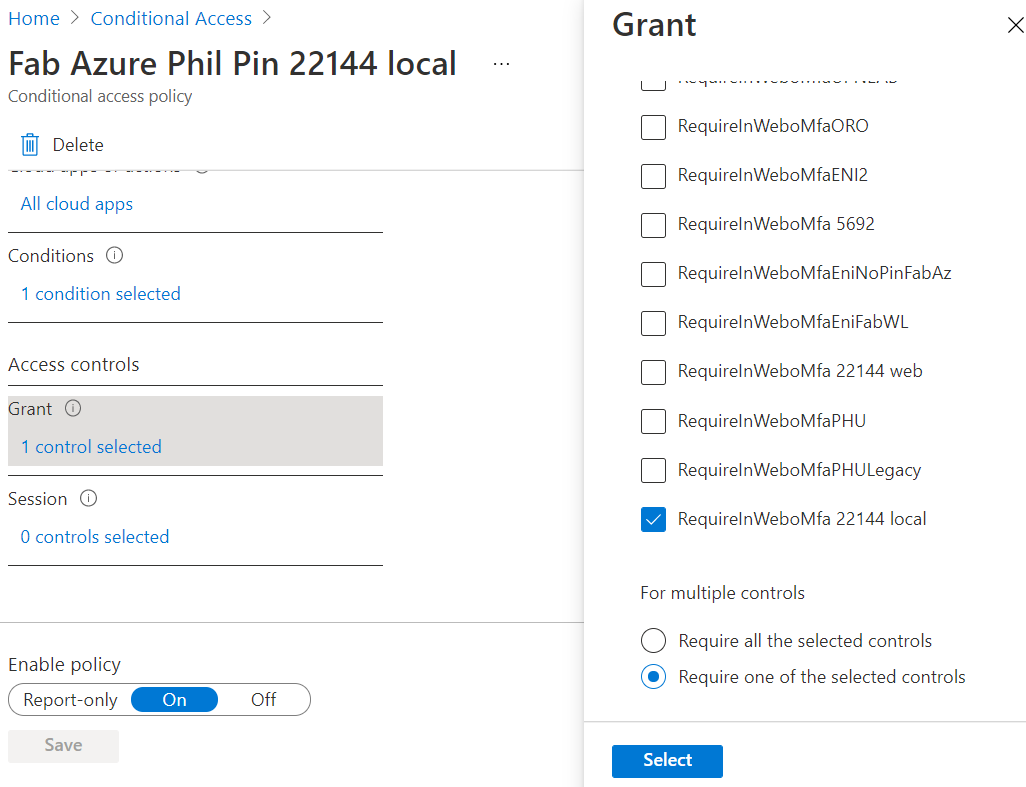
Under the "Access controls" section, select "Grant".
At the top of the displayed page, select "Grant access".
In the check-list,
Make sure "require Multi-factor authentication" is not checked (this is Microsoft MFA),
Scroll down and select the custom control ID you have created ("RequireInWeboMfa" in our exemple).
Click on “Select”.
Set the "Enable Policy" parameter to On.
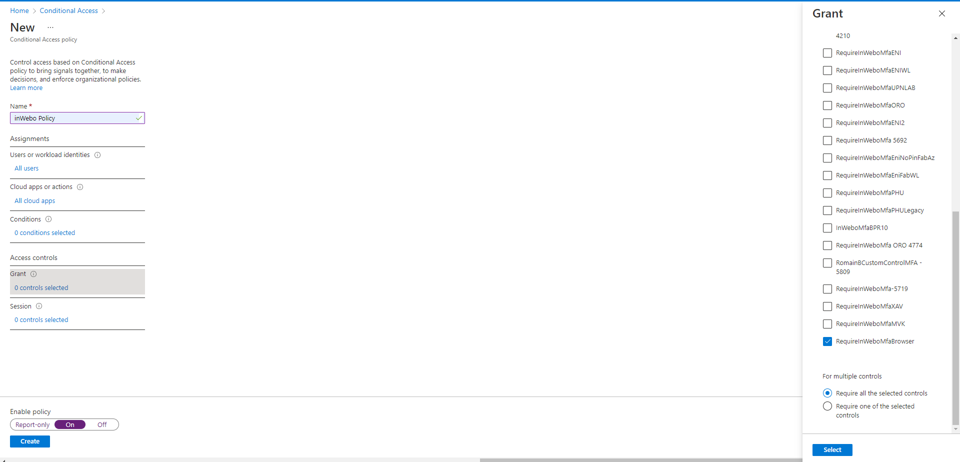
Click on “Create” to save the new policy.
Specific configuration for client apps and web apps
The following section describes the configuration to optimize the user experience on both client applications and web applications.
For an optimal user experience, you should pay attention to the chosen authentication method in the connector settings, depending on the application type (client apps or web apps). For client applications (for example Outlook for Windows/IOS/Android, Teams, native IOS/Android mail client), the user experience may be affected when using Virtual Authenticator (VA) authentication method.
The VA authentication method enrolls a web browser. When using VA for a client application, the enrolled web browser is actually a WebView embedded in the application.
The WebView evolution (the emulated browser type, compatibility, versions) in the application is unknown and not documented by the third party vendor.
A client application enrollment will not always be used by another application (meaning that each application will have to be enrolled).
Procedure
To optimize the user experience on both client applications and web applications, for an Entra ID integration with TrustBuilder, our recommendations are the following:
In TrustBuilder MFA platform, create two Azure AD connectors (with their own secure sites associated):
one for the client applications, configured to work with push Authenticator,
one for the web applications, configured to work with Virtual Authenticator.
to avoid an Entra ID rejection/duplicate error, manually edit the Access Controls name and ID in one of the Json files.
from RequireInWeboMfa to a custom name) i.e : "Id": "RequireInWeboMfa_2", "Name": "RequireInWeboMfa - 2nd Control"
In Entra ID interface:
create two custom controls with the JSON code retrieved in each connector.
create two policies with the right configuration for each connector.
To sum up, you should make two configurations: one for client apps, another for web apps . The goal is to get a different authentication scenario depending on the application type: a mobile scenario for client apps and a web scenario web app.
This procedure focuses on the user experience.
To protect users from attacks such as Push Bombing, we recommend that you select the QR code authentication. The QR code authentication method does not use push notifications, therefore it does not enable a push bombing scenario.
More information about protecting users from Push Bombing attacks
In the following procedures, we give the specific settings for each use case. The general procedure is available in Configuring TrustBuilder MFA.
For web apps
Create an Azure AD connector and set it to work with Virtual Authenticator (VA).
Create a new custom control and paste the JSON code retrieved in the connector settings.
Create a new policy and configure it with the following parameters:
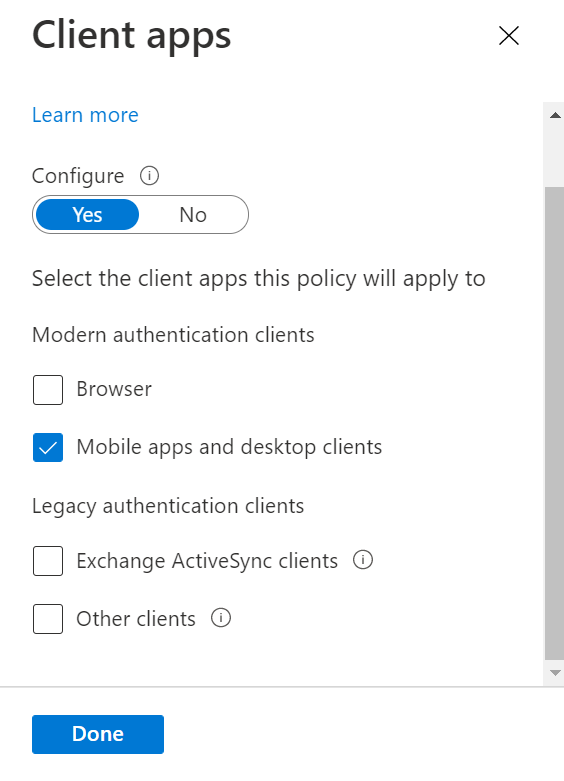
In the conditions settings, set the Client apps parameter to “Browser”
In Grant settings, select the custom control you have created.
For client apps
Create an Azure AD connector and set it to work with TrustBuilder Authenticator App.
Create a new custom control and paste the JSON code retrieved in the connector settings.
Create a new policy and configure it with the following parameters:
In the conditions settings, set the Client apps parameter to “Mobile apps and desktop clients”.
In Grant settings, select the custom control you have created.
Additional references
https://docs.microsoft.com/en-us/azure/active-directory/conditional-access/controls
https://docs.microsoft.com/en-us/azure/active-directory/conditional-access/conditions