Authenticator app
This documentation refers to TrustBuilder Authenticator 6 installation and configuration.
TrustBuilder Authenticator is a One-Time Password generator App that supports push notifications as well a fully offline mode. The main terms you may encounter are the following:
Activation → action of enrolling, registering a device as a trusted authentication tool.
Device → trusted authentication tool. It may be a mobile, a computer (desktop app) or a web-browser.
OTP → the One-Time Password you can generate to log in.
Service → the environment in which your account is registered. It is usually your company.
Account → the space where your personal data is stored as a user in a service. You access your account settings from your Authenticator application.
PIN code → the personal identification number (PIN) used for authentication. It is also required to validate an important action in your account.
Installing Authenticator app
TrustBuilder Authenticator App is available for the following operating systems:
Authenticator 4 application is no longer supported on recent versions of operating systems. The current Authenticator app that we recommend installing is Authenticator 6.
See the “Migrating from Authenticator 4 to Authenticator 6” documentation.
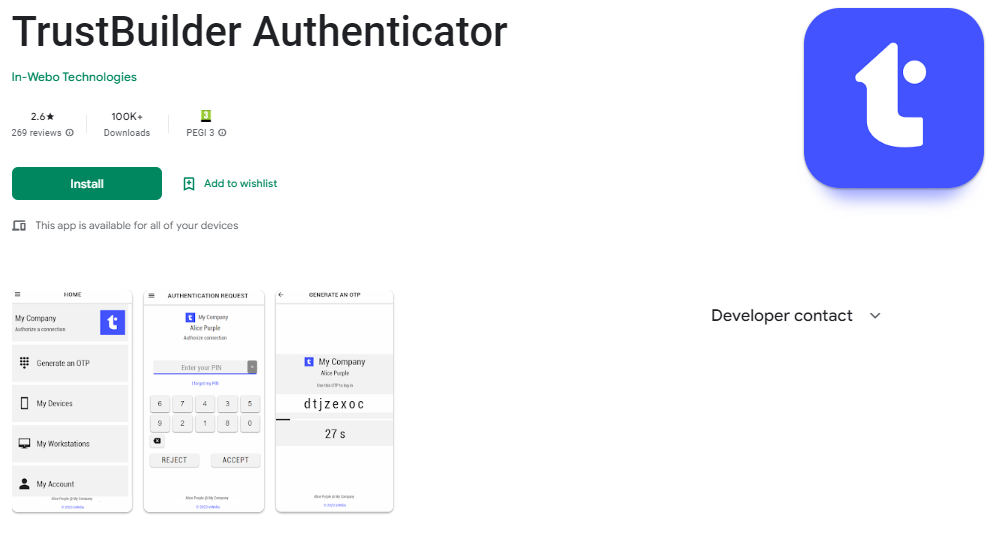
Android
Download TrustBuilder Authenticator for Android → Google Play Store
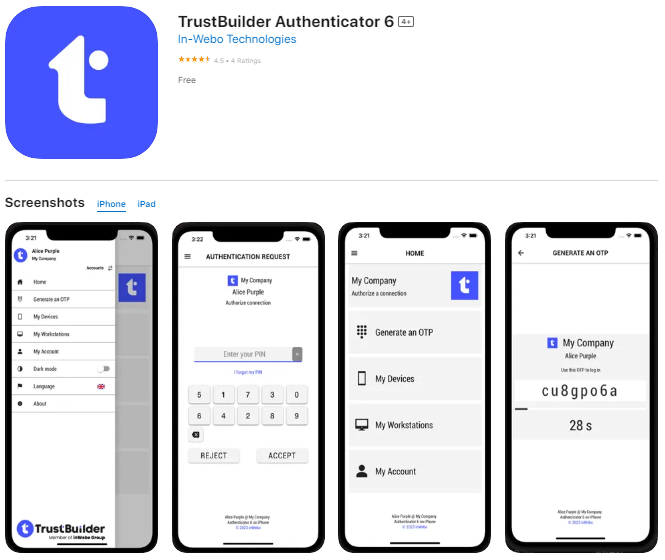
iOS
Download TrustBuilder Authenticator for iOS: App Store
MacOS
Download TrustBuilder Authenticator for iOS → App Downloads page
Windows
Download or deployment
You can chose between a few deployment methods and packages:
Users may download the exe file from the App Downloads page
Users may install it directly from the Windows Store
Note: to set Authenticator app to start automatically on Windows startup, the user must start it manually at least once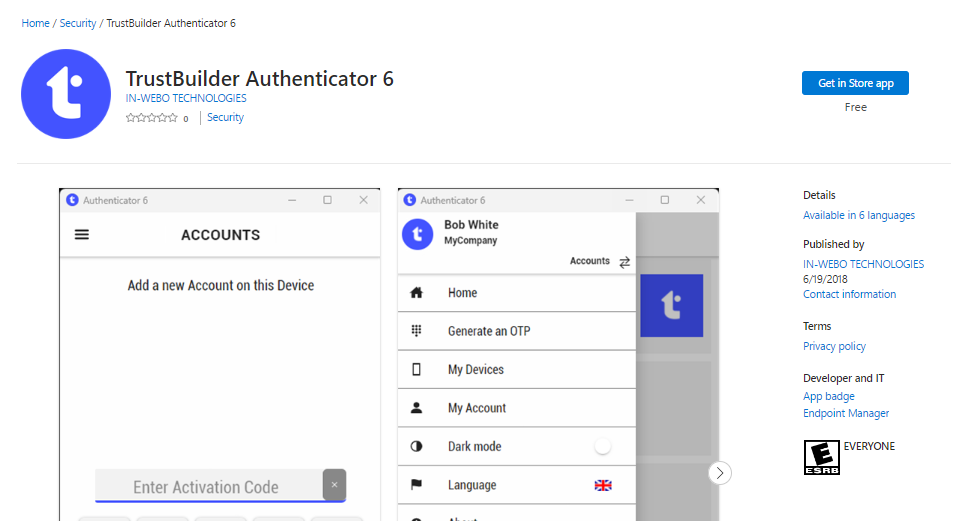
Administrators may want to deploy it automatically to your users via GPO. You can find the msi file for scripting and deployment in the Resources Downloads
Install the app certificate
Note: The certificate is used for admins connecting to the Admin Console V2 using desktop Authenticator. There are two ways to install the certificate.
Install the certificate by launching the app as administrator
Install Authenticator manually with exe, with a non admin user
Close Authenticator.
Launch Authenticator as an administrator, by right clicking on the icon. This installs the certificate
The following application launches can be done with a non admin user.
or
Install the certificate manually
Install Authenticator application and launch it.
Save the certificate in a folder on the local computer. The certificate is available in the “About” page of your installed Authenticator 6 App.
Rename the file in .crt format
Right click and select "Install certificate"
Select "open" and "Local Machine" in the Certificate Import Wizard screen
Select "Next" and "Place all certificates in the following store"
"Browse" Certificate store" and select "Trusted Root Certification Authorities"
Select "OK", "Next" and "Finish".
Silent installation
The TrustBuilder Authenticator application can be silently installed. Run the following commands with admin privileges: "Authenticator-Windows-Setup.exe" /S
Error codes
TrustBuilder Authenticator installer returns error codes as a result of their execution:
0 - Normal execution (no error)
1 - Installation aborted by user (cancel button)
2 - Installation aborted by script
Upgrading the Authenticator app
Our recommendations when upgrading Authenticator on Windows are the following:
Install the new version without uninstalling the previous one. This will allow you to keep the activated accounts of your Authenticator devices. If you uninstall your Authenticator application, you will lose the TrustBuilder MFA profiles activated on these tools.
Keep the same installation method (exe or msi or Windows Store) as the one used to install the previous version. EXE files, MSI installers and Windows Store installation use different installation paths. For example, upgrading exe to msi will not keep your users' enrollments.
To see if you have previously installed via the exe or via the msi, check the Authenticator 6 installation directory:
for the exe, the installation directory is: C:\users\<User_Name>\AppData\Local\Programs\authenticator6
for the msi, the installation directory is: C:\Programmes(x86)\Authenticator 6
To upgrade to Authenticator 6.14, you should upgrade from 6.12 only. Upgrading from Authenticator 6.8 to Authenticator 6.14 is not possible.
Proxy
Authenticator for Windows will use the PROXY - HTTP_PROXY - HTTPS_PROXY environment variables when they are defined. To ignore any proxy settings, you can add the environment variable NO_PROXY with any value (supported from Authenticator 6.26.0).
Linux
TrustBuilder Authenticator for Linux is delivered in AppImage format. This format is compatible with a wide range of Linux distributions, however TrustBuilder is using the latest version of Ubuntu LTS as a reference platform. The reference platform is used by TrustBuilder as follows:
The app is validated by TrustBuilder on the reference platform
If an issue is reported, TrustBuilder will use the reference platform to reproduce and fix the issue
The AppImage format will ensure compatibility with other Linux distributions
Download
Download TrustBuilder Authenticator for Linux here → Resources Downloads
Prerequisites
The Keyring package is mandatory as it is used to store the user secrets in the user keychain.
If the package is not present, you can install it usingsudo apt install gnome-keyring.
When launching the application, the Keyring must be unlocked by the user.AppImages require FUSE version 2 to run. Depending on the Linux distribution you are using, you may have to install it. You can install it using
sudo apt install libfuse2. For more information see FUSE.
Installation
To run TrustBuilder Authenticator application for Linux you should:
Make the TrustBuilder_Authenticator6.AppImage file executable:
Right-click on the file > Properties > Permissions > Enable “Allow executing file as a program”
orRun the following command:
$ chmod a+x TrustBuilder_Authenticator6.AppImage
Run the application:
Double-click on the file
orRun the following command:
$ ./TrustBuilder_Authenticator6.AppImage
Notes and Tips
Automated launch at session opening is possible with a command-line, see AppImage documentation . You can also use AppImage Launcher.
When launching the application, the Keyring must be unlocked by the user.
The deeplinking (direct link to an application page) is not yet available on Linux
When uninstalling TrustBuilder Authenticator for Linux, you will have to delete the folder
~/.config/Authenticator 6manuallyThe connection to the Admin Console v2 with Authenticator for Linux is not supported. Administrators with a Linux workstation can use Virtual Authenticator.
Authenticator app User guide
Download TrustBuilder Authenticator application
First app launch
To get started with Authenticator 6 app, you should first add a new account.
Prerequisite: an activation code (contact your administrator)
Launch TrustBuilder Authenticator application.
Check “I agree” to give your consent to the Privacy Policy.
Allow Authenticator to take pictures (this is used to scan QR codes).
Enter a valid activation code and click the validate button.
To get a valid activation code for the first time, contact your administrator.Define a new PIN code.
You have successfully added your account. Your device is now activated as a trusted device. You can use it for authentication.
Overview
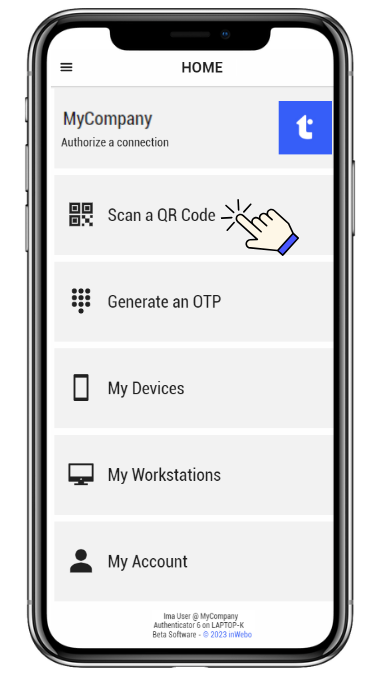
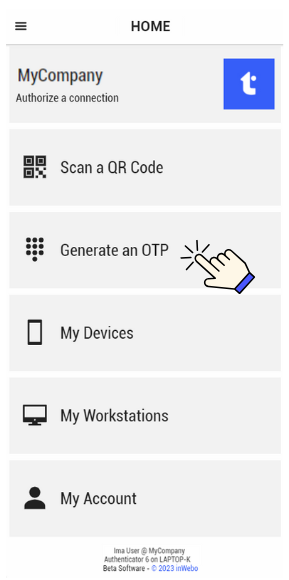
From the home page you can perform several actions:
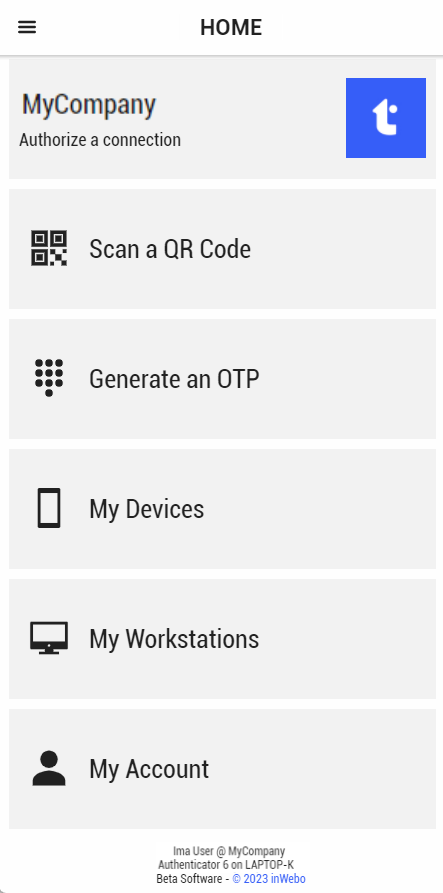
Service name and logo | Authorize a connection: When clicking on your service name and logo, "Authorize a connection",
you can check pending authentication.
Scan a QR code: scan the QR code displayed in the authentication page to authenticate (from TrustBuilder Authenticator 6.31)
Generate an OTP: generate an One-Time Password and enter it in the authentication page.
My Devices: manage your trusted devices related to your account. You can also add a new trusted device for this account.
My workstations: manage your workstations and your scratch codes (Windows Logon only).
My Account: manage your PIN code, your antiphishing security, or initiate the account recovery (when blocked). You can also register biometric (mobile app only).
Click on the top-left three stacked lines (hamburger menu) to display the hidden left menu. From the left menu you can perform other actions.
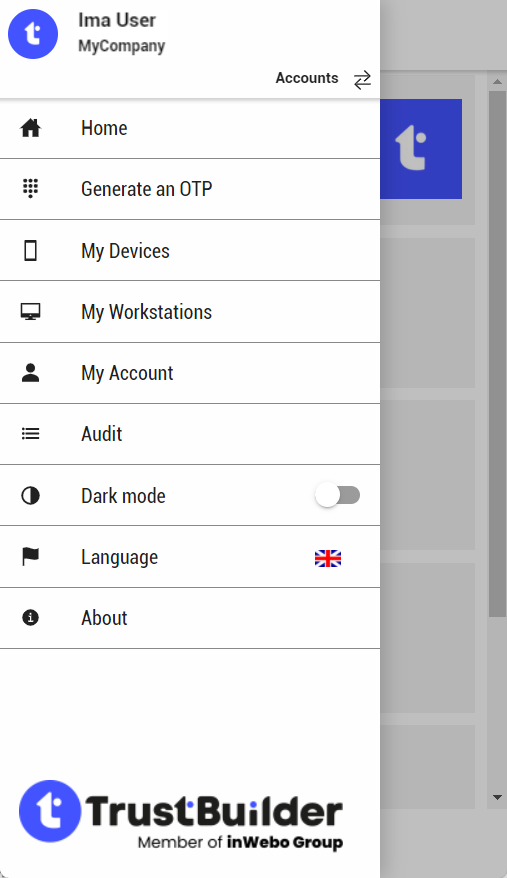
Accounts: switch between your accounts.
Audit: view your authentication activity
Dark mode: enable/disable dark mode for the app
Language: switch the interface language of your App (English, French, Spanish, German, Italian, Chinese)
About: read about the application (current version and other information)
Authentication with the app
There are several methods to authenticate using TrustBuilder Authenticator app. Depending on the service parameter configuration, you may be able to authenticate with the following methods: push notifications, QR code scanning and OTP generating.
Receive a push notification
You will receive a push notification trough TrustBuilder Authenticator app. Push notifications can be sent automatically or triggered manually, depending on configuration. You should then approve or reject the pending operation. Each approval operation is protected by PIN code or biometric (except for services without PIN).
On the authentication page, click OK to trigger the push notification.
This step may not occur depending on the configuration. The push notification can be sent automatically.Click on the notification to open the application.
.gif?inst-v=187c6d1d-cab2-470a-a11d-7ceaac8d5fb3)
Accept or reject the authentication request.
Enter your PIN or provide biokey if requested.
Scan a QR code
(from TrustBuilder Authenticator 6.31)
The authentication page displays a QR code that you should scan with TrustBuilder Authenticator app. You should then approve or reject the pending operation. Each approval operation is protected by PIN code or biometric (except for services without PIN).
Go to “Scan a QR Code”.
Scan the QR code displayed in the authentication page.
If you cannot scan the QR code, click on the Open Authenticator link on the authentication page. It will open the Authenticator app.
Accept (or reject) the authentication request.
Enter your PIN or provide biokey if requested.
Generate a One-Time-Password (OTP)
Generate a One-Time-Password (OTP) in TrustBuilder Authenticator app. The generated OTP should be manually entered in the TrustBuilder MFA authentication page. You have 30 seconds to input the OTP before it generates another. Each OTP generating operation is protected by PIN code or biometric (except for services without PIN).
Go to “Generate an OTP”.
Enter your PIN or provide biokey if requested to get an OTP.
On the authentication page, enter the OTP and click on OK.
You have 30 seconds to input the OTP before it generates another.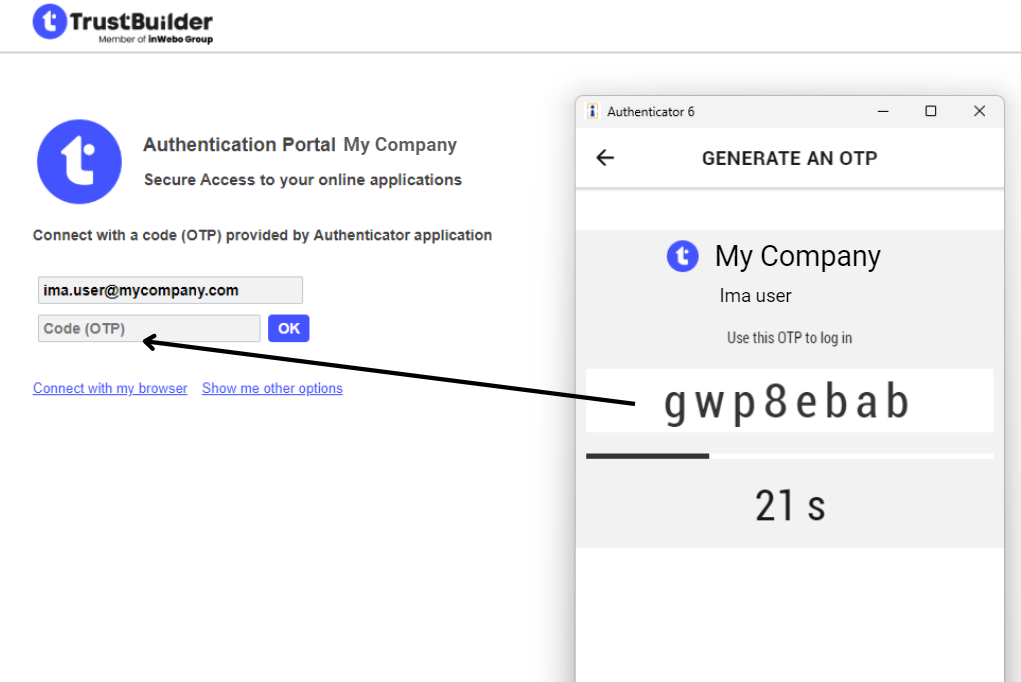
Configuration
My Account
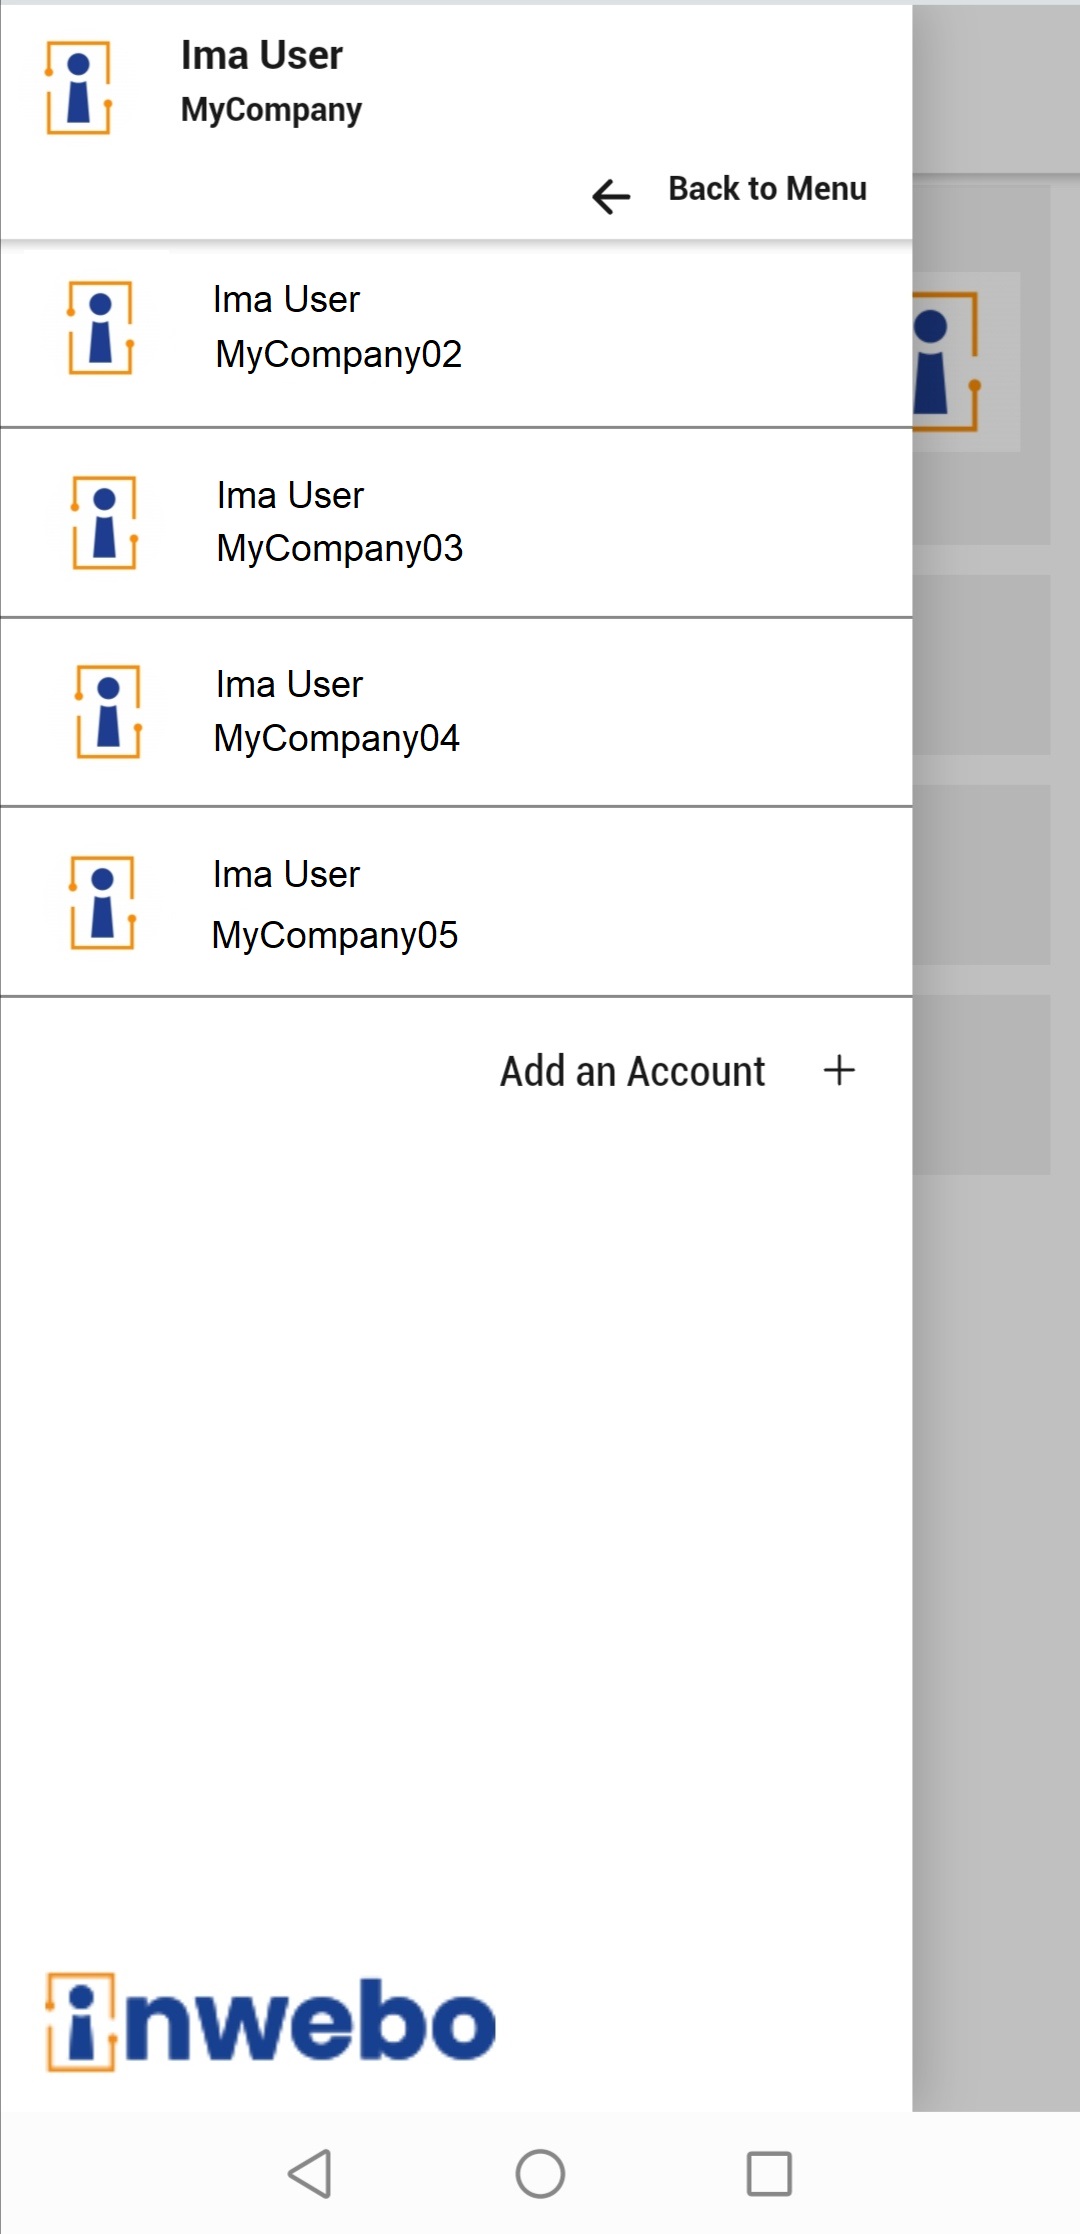
If you registered for more than one service, you may need to switch from one account to another.
Click on the top-left three stacked lines (hamburger menu) to display the hidden left menu.
Click on Accounts to get the list of your accounts registered on the current device.
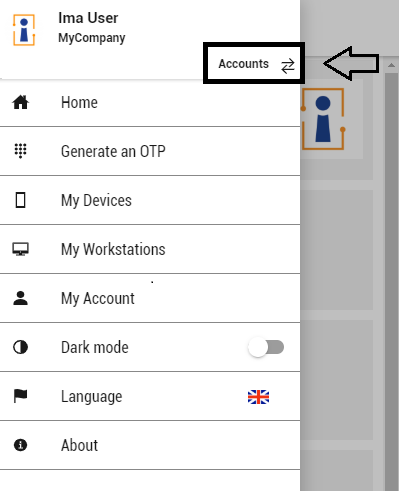
Select the account you wish to use.
Prerequisite: you should have a valid activation code or a valid QR code for the account you wish to add.
You can get an activation code (or a QR code for activation):
from your administrator
orby yourself from a web-browser → https://www.myinwebo.com/ > My Devices > Add a device
orby yourself from another TrustBuilder Authenticator app → My devices > + Add a device
Click on the top-left three stacked lines (hamburger menu) to display the hidden left menu.
Click on Accounts to get the list of your accounts registered on the current device.
Click the Add an Account + at the bottom of your accounts list.

Enter a valid Activation code or scan a valid QR code to add a new account on this device.
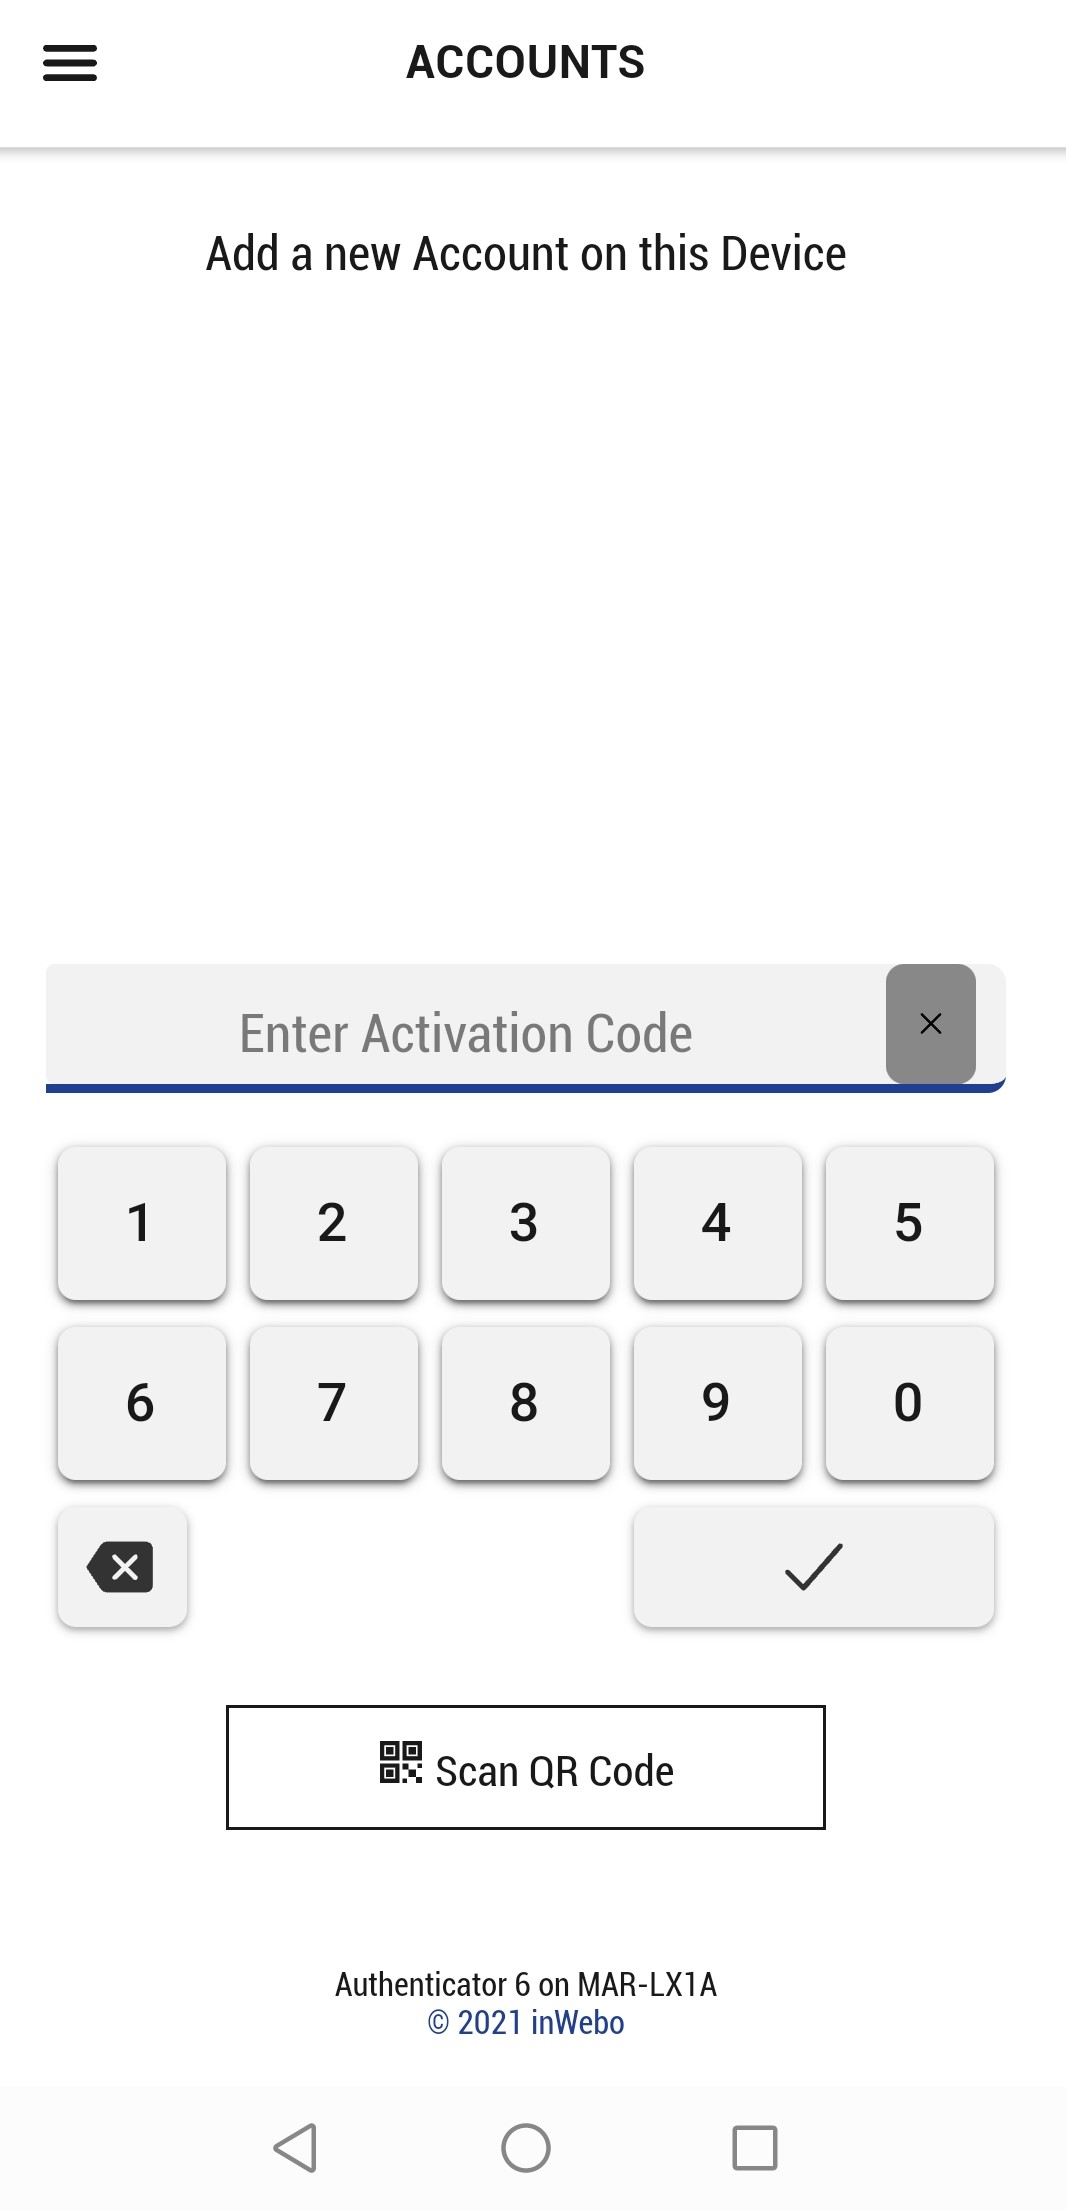
Your account is successfully added to TrustBuilder Authenticator app on the current device.
From TrustBuilder Authenticator home, go to My Account.

Click on Change your PIN.
Enter your current PIN code and your new PIN code and validate.
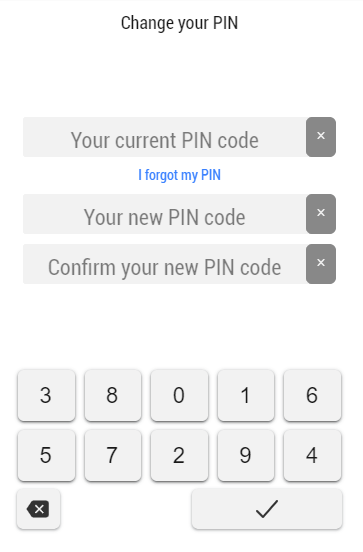
Your PIN code has been successfully updated.
Prerequisite: a Reset code (or a QR code for PIN reset) provided by your administrator
From TrustBuilder Authenticator home, go to My Account
Click on Reset my PIN code
Enter a valid Reset code (or scan a valid QR code for PIN reset).
Enter your new PIN code.
Your PIN code has been successfully reset.
On TrustBuilder Authenticator mobile app, you can register biometric information (fingerprint).
From TrustBuilder Authenticator home, go to My Account
Click on Register your BioKey > Register
Enter your PIN.
Press the touch sensor.
This action compares your fingerprint with the one stored on your device. Both have to match in order to link the fingerprint stored on your phone to TrustBuilder mobile application.
If the fingerprint provided matches the biometric information stored on the device, your Biokey is successfully registered. You should be able to use it to authenticate.
About supported biometrics
On iOS:
When Touch Id (fingerprint sensor) is available on system, it can be used in TrustBuilder Authenticator as biometric factor
When Face Id (facial recognition) is available on system, it can be used in TrustBuilder Authenticator as biometric factor
On Android:
When fingerprint sensor is available on system, it can be used in TrustBuilder Authenticator as biometric factor
When facial recognition is available on system, it cannot be used in TrustBuilder Authenticator as biometric factor (Currently not supported)
This secret sentence is displayed in browsers authentication pages, whenever you are requested to enter your PIN code. It gives you a guarantee that you are directly connected with TrustBuilder servers and not with anyone else.
From TrustBuilder Authenticator home, go to My Account
Click on Antiphishing.
Enter an antiphishing sentence.
Click on Save.
Your antiphishing sentence has been successfully updated. It will be displayed in browsers authentication pages.
From TrustBuilder Authenticator home, go to My Account
Click on Account recovery.
Enter a valid email address or check that the displayed email address is valid.
It may be used for identification purposes when requesting account restoration on http://myinwebo.com . It may also be used to receive a restore code to unlock your trusted authentication devices.Click on Save if you have made any changes. You will receive a confirmation e-mail that you will need to validate in order for your e-mail address to be "verified".
My Devices
From TrustBuilder Authenticator home page, go to My Devices. It displays a list of the trusted devices registered for your account.
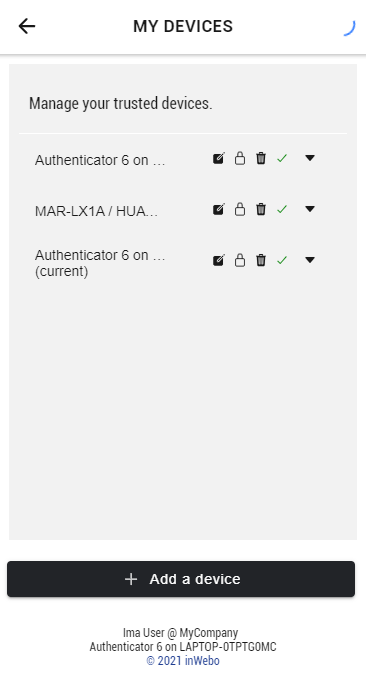
For each trusted device, you can rename it, lock it or delete it. You can also get information about the trusted device:
the type → Authenticator application (mobile or desktop), browser-based device (Virtual Authenticator or Helium)
the last authentication with the trusted device (DD/MM/YYYY hh/mm/ss)
Click on + Add a device to get an activation code and a QR code. You can use it on another device to add the current account.