Getting started with TrustBuilder MFA
General principles
The purpose of this documentation is to provide guidance for administrators who want to implement the TrustBuilder MFA service (formerly inWebo).
TrustBuilder MFA enables you to strengthen authentication to your web site / VPN / SaaS application by replacing the traditional login & password with a login & OTP (One-Time Password) mechanism.
TrustBuilder MFA application can be downloaded for free by end users. They will have to be “activated” by the end user, using an Activation code (a 9-digit code that you, administrator, will have to send him).
Prerequisites
Integrating TrustBuilder MFA is fairly simple. But before starting, you still need to have answers to a couple of questions:
What is the application or Web Site I want to use TrustBuilder MFA for?
If it is a Web Site you are developing, you’ll be interested in implementing the Web Services API
For Remote VPN access, you are likely to use Radius
For ADP-GSI, Google Apps or any other SAML compliant application, you will look at SAMLv2 integration
For Microsoft ADFS, Shibboleth, specific connectors are provided
For Ilex and Memority, TrustBuilder MFA is supported as a native strong authentication method.
Do you have “admin access” to this application or Web Site?
Which OTP generator(s) are you considering using?
Mobile or Desktop Token: TrustBuilder Authenticator App
Cloud Token: Virtual Authenticator or Helium
In-App Token: mAccess
For testing purposes, starting with Mobile Token is the easiest way.
Integrating TrustBuilder MFA with your application, the big picture
Here are the main steps you may follow to integrate TrustBuilder MFA
Create and configure your TrustBuilder account on our platform
Test authentication with TrustBuilder on our platform
Implement TrustBuilder MFA API on your platform
Start provisioning your users on our platform
The Activation Code was formerly called "Secure Site ID" in some authentication tools or in the documentation.
Please note that a "Secure Site ID" refers to an activation code.
Creating and configuring your TrustBuilder account
Creating your TrustBuilder account
To use TrustBuilder MFA authentication, you can subscribe to our free trial. The Signup process will allow you to create an account on TrustBuilder platform for 1 “standard” service, 10 users, valid for 30 days. Should you need more users or a longer period of time, please contact your reseller or partner.
At the end of the signup process, you will have to activate Virtual Authenticator in your browser.
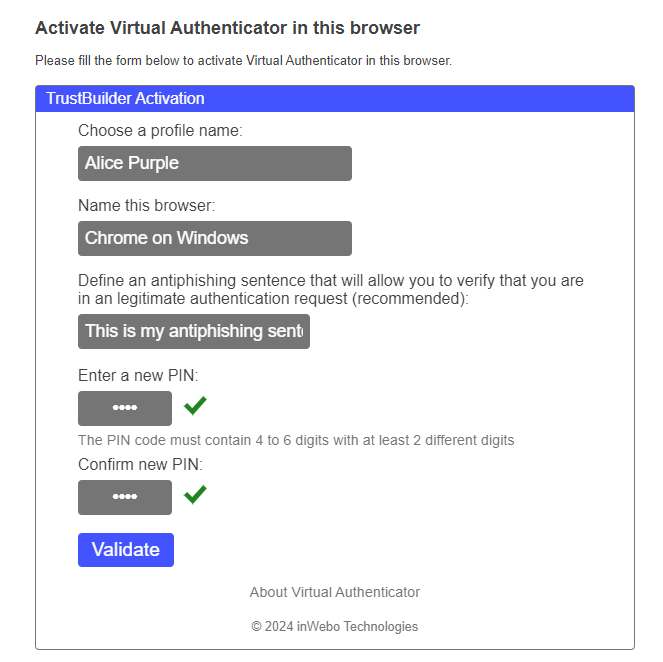
Virtual Authenticator is your first TrustBuilder Token to be enrolled, you are prompted to enter you pin code twice to define it. Be sure to remember it, as it will be asked every time you'll need to authenticate on http://myinwebo.com or to add a new trusted device.
Virtual Authenticator (often abbreviated as VA), among other things, allows you to access the Administration Console. To do so, go to https://www.myinwebo.com/console/logon .
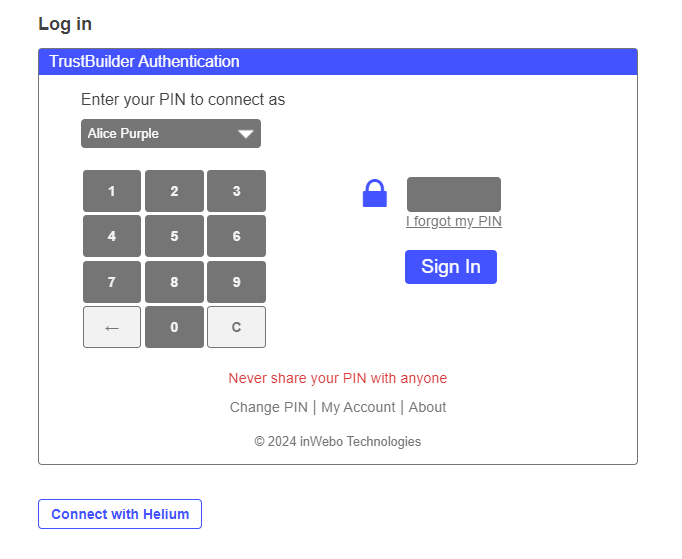
Type in your pin code, click ‘Sign in’ and you are connected.
Initial configuration of your TrustBuilder account
The first time you connect to TrustBuilder Admin Console you will be taken to the main admin window.
At this stage, you are the only user of your TrustBuilder account, and you have only one TrustBuilder token. For safety reasons, we strongly recommend that you:
Activate a second token for you
Add other administrators
Configure additional connectors and Secure Sites
According to the type of site or application you want to integrate TrustBuilder MFA to, you will have to create and configure the appropriate connector (for SAML 2.0, for Google Apps, for radius, for OpenID Connect…) in the Admin Console.
Once this connector is created, you will be able to add secure sites (bookmarks) of the given type in the console. Secure Sites are sites and applications your users can log into with their TrustBuilder authentication devices.
At this point, your TrustBuilder account is created and access to it is secured. You can now move on to Integration with your application / Web Site
Other recommended operations
Activate a second token
The safest choice is to activate TrustBuilder Authenticator App (Mobile/Desktop).
From your mobile phone, search ‘TrustBuilder’ in your Application Store (AppStore, Play Store, AppWorld) and install TrustBuilder Authenticator (formerly inWebo Authenticator).
When starting the app, you will be prompted for an Activation code.
From the Admin Console, hover over your name on the top right corner, and click on ‘My Account’ and then ‘My Devices’ (or go directly).
Click on ‘Activate a Device’ to get an Activation code
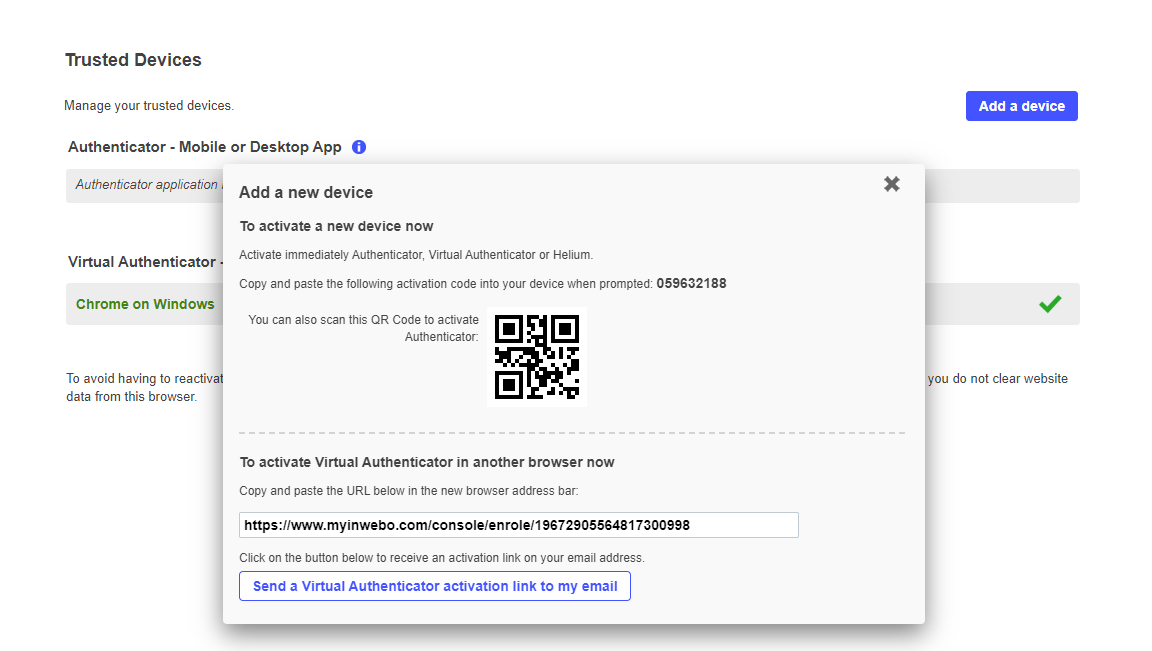
Type the ‘Activation code’ (or scan the QR code) in your app. Then, you will be prompted to confirm your identity by typing your PIN. Click ‘Ok’, your TrustBuilder Authenticator App is active.
Should you loose Virtual Authenticator, you will be able to activate a new instance from https://www.myinwebo.com/console/enrole , by using an Activation code provided by your TrustBuilder Authenticator App.
Add other administrators
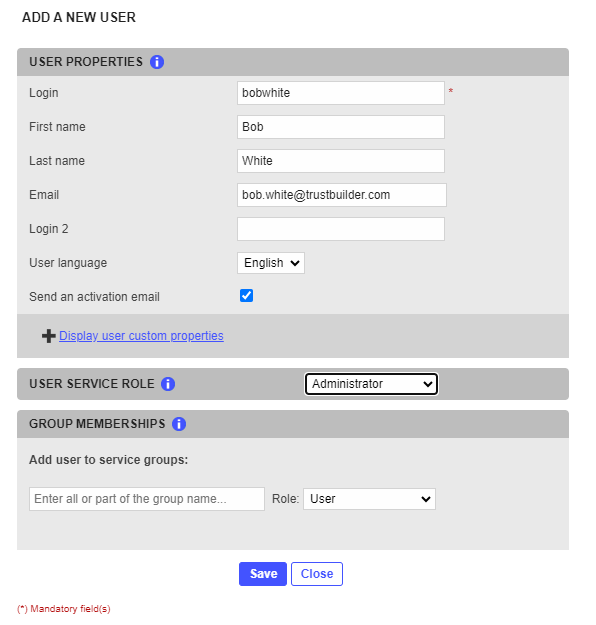
From the Admin Console, go to ‘Service Users’, click ‘Add a new user’ and fill the form. If you check ‘Send an Activation Email’, your colleague will receive an email with an activation link, valid for 3 weeks. We recommend that the 2nd admin activates his account as soon as possible, and configures 2 TrustBuilder tokens as described above for redundancy.
Testing authentication with TrustBuilder on our platform
TrustBuilder provides a simple demo web page for you and your users to try out TrustBuilder tokens.
This demo page is automatically generated when you create your account and its properties can be viewed and edited from the Admin Console (it is the first of your Secure Sites).
You can access the demo page from the SSO page: https://www.myinwebo.com/sso .
At this point, your TrustBuilder account is created and access to it is secured. You can now move on to Integration with your application / Web Site
Implement TrustBuilder MFA API on your platform
Basic API implementation
Depending on the technology in use in your site, download the appropriate TrustBuilder MFA API kit.
A manual for TrustBuilder MFA API is also available there. Read it carefully and check the code samples that will help you understand how to use the API.
Radius integration
For Radius integration, you need to do the following:
On your firewall, open port UDP 1812 towards TrustBuilder RADIUS addresses
TrustBuilder Radius server addresses :
Primary: radius-a.myinwebo.com (95.131.139.137)
Secondary: radius-b.myinwebo.com (217.180.130.59)
(See RADIUS integration and redundancy for additional details and configuration)
Get the public IP address of your VPN Gateway (i.e. the Radius client)
Choose a secret password that will be shared between the Radius client and TrustBuilder
For detailed implementation of Radius integration, please refer to one of the Tutorials available, such as:
TrustBuilder MFA integration with BoostEdge
TrustBuilder MFA integration-with Pulse Secure
TrustBuilder MFA integration with Netasq
TrustBuilder MFA integration with F5 Big-ip APM
SAML integration
Several guides already exist for SAML integration. You will choose which guide depending on the application you want to connect. For more information, check out:
TrustBuilder MFA Setup with ADFS (3.0, 4.0)
TrustBuilder MFA integration Google Apps
TrustBuilder MFA integration Salesforce SAML v2
TrustBuilder MFA integration with F5 Big-ip APM
Integrating Virtual Authenticator or Helium
In order to use Virtual Authenticator or Helium on your web site or your SSL VPN authentication page, you need to know a little bit of HTML, and maybe also some JavaScript for advanced integration. Please refer to our QuickStart Virtual Authenticator or Quickstart Helium for detailed information.
Other use cases
Salesforce Delegated authentication, QR Code, In-App Token (mAccess)… There are many use cases where TrustBuilder MFA service is relevant.
Start provisioning your users on our platform
Creating users
Users can be created from the Admin Console or using API Commands. For testing purposes, we recommend the Admin Console.
Warning: being the administrator who created the TrustBuilder account, your login has been set to your email address. You may change it by editing your own account in the ‘Service Users’ tab.
Customizing activation emails
Activation emails can be configured via the Admin Console, Service Users, Customize email templates.
Important: Customizing Email usage is not granted by default with trial accounts. It can be unlocked simply by requesting it to your Partner or Reseller.
Using IWDS (Directory Sync) for users provisioning
IWDS is a Java application that will synchronize any of your TrustBuilder users with any LDAP directory. It can be installed on any Windows or Linux server that supports Java 1.6 or later. For detailed information, check IWDS documentation.
Important: IWDS usage is not granted by default with trial accounts. It can be unlocked simply by requesting it to your Partner or Reseller.
Viewing Reports
Authentication and Provisioning logs are available in the ‘Service Reports’ tab. This can become handy for troubleshooting purposes.
Useful URLs Summary
URL | Description | |
|---|---|---|
Secure Sites Bookmarks | List of configured secure sites | |
Admin Console | Access to Administration Console | |
User's Profile | View/change user's personal information | |
User's Devices/selfcare | View/Add/Remove user's trusted devices | |
VA Enrolment | Default browser token enrolment page | |
Helium Enrolment | Helium enrolment page (if applicable)* | |
“Returning” | Re-enrolment by mail (if applicable)** |
* Please note that 'Helium' (another browser token) is not activated/activable in an “Standard Service” (and thus in the Trial context by default). Helium is part of our “White Label Service” offer which is not the purpose of this Getting Started manual.
**The returning user process is disabled by default (it corresponds to the 'Activate a new device per email' setting in tab 'Service Parameters'). When activated, it allows users to receive an activation email to re-enroll a browser. The pros are that users won't have to contact the helpdesk/admins in case of lost or additional device. The cons or the impacts are that from a security point of view you need to trust email as a secure enough channel for browser re-enrollment. Note though that users need to provide their PIN/password if your service requires one: email can be used to restore one factor only.