CAS Apereo inWebo integration
This documentation refers to the inWebo installation and configuration on a CAS Apereo Enterprise Single Sign-On.
CAS Apereo provides a friendly open source community that actively supports and contributes to the project. A dedicated inWebo connector has been integrated within CAS Apereo.
You can also find the official CAS Apereo documentation to implement inWebo here: https://apereo.github.io/cas/development//mfa/Inwebo-Authentication.html
We will see in this documentation how to activate the inWebo MFA within CAS Apereo.
Prerequisites
Before you start, please ensure that the following requirements are fulfilled:
CAS Apereo minimum version must be 6.6.2
An inWebo environment
inWebo configuration
1. Create an inWebo secure site
Open a browser and login to your inWebo administration console.
Go to the “Secure Sites” tab.
Click on “Add a secure site of type…” and choose “Web Service Connector”.
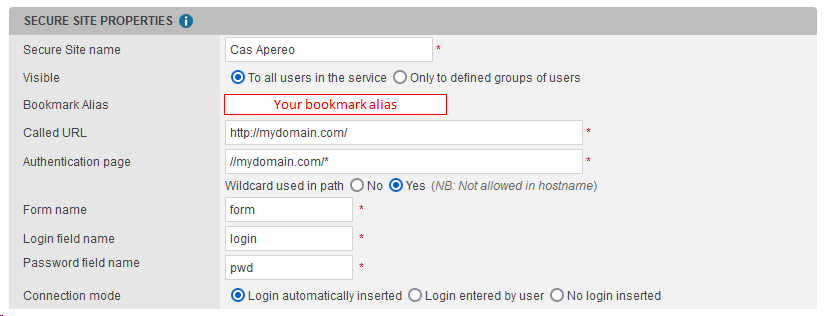
In the opening window, enter the following properties for the secure site:
it's mandatory to fill the following fields:
Called URL: https://<your_CAS_APEREO_server>/
Authentication page: //<your_CAS_APEREO_server>/*
Wildcard used in path: Yes
Form name: form
Login field name: login
Password field name: pwd
Click on “Add”.
Click the “Browser token activation” button.
A “bookmark alias” will appear, copy the "Bookmark alias" long string to your clipboard. (32 char string), you will need it to configure your CAS Apereo.
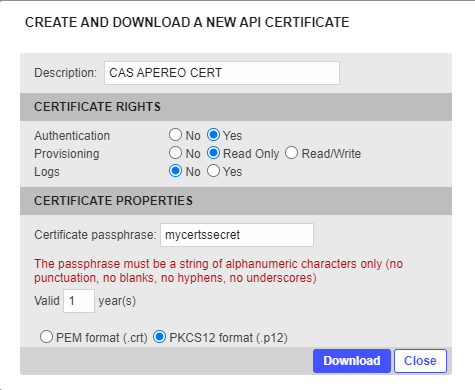
2. Create an inWebo certificate
You will need to generate a PKCS12 Certificate file for the InWebo Web Services API Access for your CAS Apereo.
Go to the 'Secure Sites' tab and click on “Download a certificate for API access”.
As it is an authentication certificate, set the certificate rights to ‘Yes’ for Authentication and to ‘Read Only’ for Provisioning.
Enter a passphrase (7 characters or more).
Define a validity period (10 years by default).
Choose “PKCS12 format (.p12)”.
Click the “Download” button.
3. Recover your Service ID
You can find your unique service ID within the inWebo administration console, at the top of the administration console.

You can now start the configuration of your CAS Apereo environment.
You will need to pass your secure site bookmark alias, your inWebo certificate and your inWebo service id.
CAS Apereo configuration
This documentation is based on a Gradle deployment for CAS Apereo.
Access to your CAS Apereo environment.
1. Update CAS dependencies and module
To add inWebo module to your CAS dependencies and module to add inWebo module:
Edit your build.gradle file
Add the inWebo module : org.apereo.cas:cas-server-support-inwebo-mfa
You should add it into the section related to dependencies, after the following line into build.gradle
/**     * CAS dependencies and modules may be listed here.
        *
        * There is no need to specify the version number for each dependency
        * since versions are all resolved and controlled by the dependency management
        * plugin via the CAS bom.
**/

implementation “org.apereo.cas:cas-server-support-inwebo-mfa”
2. Update your CAS properties
Edit your cas.properties file:
Add the authentication method of inWebo with : cas.authn.mfa.triggers.global.global-provider-id: mfa-inwebo
Update the configuration with the mandatory settings
Update the configuration to activate different type of inWebo’s tokens
Here is an example for a full configuration:
cas.authn.mfa.triggers.global.global-provider-id: mfa-inwebo

cas.authn.mfa.inwebo.client-certificate.certificate.location: classpath:/myinWebocert.p12
cas.authn.mfa.inwebo.client-certificate.passphrase: mycertsecret
cas.authn.mfa.inwebo.site-alias:5d4940fsae68946463a6cb78679f3
cas.authn.mfa.inwebo.service-id:2563

cas.authn.mfa.inwebo.push-enabled:true
cas.authn.mfa.inwebo.browser-authenticator: VIRTUAL_AUTHENTICATOR
cas.authn.mfa.inwebo.push-auto=false
Mandatory parameters → These mandatory parameters will create the unique and secure link with your inWebo environment.
To recover your certificate, the alias, the secureID, connect to your inWebo administration console. Follow the inWebo configuration part (see inWebo configuration section above):
cas.authn.mfa.inwebo.client-certificate.certificate.location: classpath:/yourinWebocertificate.p12cas.authn.mfa.inwebo.client-certificate.passphrase: thesecretofyourinWebocertificatecas.authn.mfa.inwebo.site-alias:aliasOfYourinWeboSecureSitecas.authn.mfa.inwebo.service-id:secureIdOfYourinWeboTenant
Choose the type of token that will be activated or not for your user within CAS Apereo:
cas.authn.mfa.inwebo.push-enabled:true or falsecas.authn.mfa.inwebo.browser-authenticator: VIRTUAL_AUTHENTICATOR or M_ACCESS_WEB or NONE
Define whether the push notification should be sent directly or the user have the choice of between triggering a notification and enrolling a browser token (only available from version 6.6.5 and later):
cas.authn.mfa.inwebo.push-auto=true or false
Examples:
If you want to allow only the Mobile or Desktop token (inWebo Authenticator), the configuration should be like that:
CODEcas.authn.mfa.inwebo.push-enabled:true cas.authn.mfa.inwebo.browser-authenticator: NONEIf you want to allow only the browser token with Virtual Authenticator (the standard browser token), the configuration should be like that:
CODEcas.authn.mfa.inwebo.push-enabled:false cas.authn.mfa.inwebo.browser-authenticator: VIRTUAL_AUTHENTICATOR
For the browser tokens, you can choose to activate either VIRTUAL_AUTHENTICATOR OR M_ACCESS_WEB
Virtual Authenticator is our standard browser token with inWebo design and features. You don’t need to code at all.
mAccess Web is our “white label” browser token that let you create your own design and branding with a maximum of flexibility. If you want to update the current integration & design, you will need to update the code itself to adapt the page to fit your needs.
If you want your users to have the choice of either triggering a notification or enrolling a browser token, your configuration could be like that:
CODEcas.authn.mfa.inwebo.push-enabled:true cas.authn.mfa.inwebo.browser-authenticator: VIRTUAL_AUTHENTICATOR cas.authn.mfa.inwebo.push-auto=false
You can also edit inWebo’s templates of Cas Apereo to update the design and the error messages.
Authentication demo
Once the inWebo and CAS Apereo configurations are done, users can connect to the Apereo CAS by first performing a basic login/pwd authentication, and then an inWebo MFA authentication.
In this video you can see:
an authentication through inWebo browser token Virtual Authenticator with some custom CSS,
then a second authentication with inWebo desktop token (inWebo Authenticator desktop application)