Microsoft ADFS 2019
This is the procedure to integrate TrustBuilder multi factor authentication (MFA) service with Microsoft Active Directory Federation Services 2019 (ADFS 2019) → Windows Server 2019.
If you want to integrate TrustBuilder MFA service on Windows Server 2012, see Microsoft ADFS 2.0.
If you want to integrate TrustBuilder MFA service on Windows Server2012 R2 or Windows Server 2016, see Microsoft ADFS 3.0 and ADFS 4.0.
This documentation explains how to use TrustBuilder MFA with various existing products running as a relying party trust with ADFS 2019 (examples : MS SharePoint, MS Office 365, etc…).
ADFS 2019 is fully integrated in Windows Server 2019 as a role to be activated on Server Manager.
Prerequisites
Before you start, please ensure that the following requirements are fulfilled.
A TrustBuilder MFA service with administrator rights (if you don't have any TrustBuilder MFA service yet, you can register for a trial account here).
Firewalls/TCP Filtering: your ADFS server will need to communicate with the TrustBuilder Cloud service. Thus, you have to open the network stream and route TCP packets from your ADFS server to api.myinwebo.com on HTTPS port (443).
The inWebo ADFS plugin (.exe file): you'll need to install the plugin on your ADFS server. You can download it here. Once downloaded, upload it to any accessible place from your ADFS server.
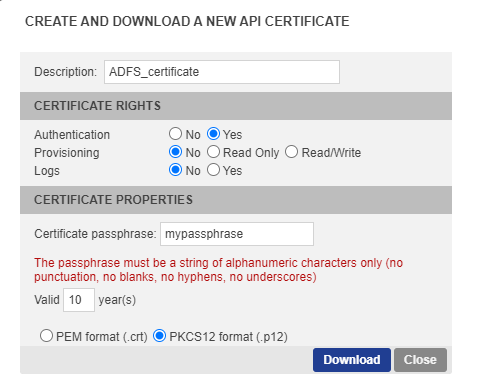
A PKCS12 Certificate file for the InWebo Web Services API Access. You should download it from your Administration Console following these steps :
Go to the 'Secure Sites' tab and click on “Download a certificate for API access”.
As it is an authentication certificate, set the certificate rights to ‘Yes’ for Authentication and to ‘No’ for Provisioning.
Enter a passphrase (7 characters or more).
Define a validity period (10 years by default).
Choose “PKCS12 format (.p12)”.
Click the “Download” button.
TLS 1.2 is required (see “Updating inWebo ADFS plugin version” sub-section below).
Installation
Step 1: Create a secure site
Open a browser and login to your administration console.
Go to the “Secure Sites” tab.
Click on “Add a secure site of type…” and choose “Web Service Connector”.
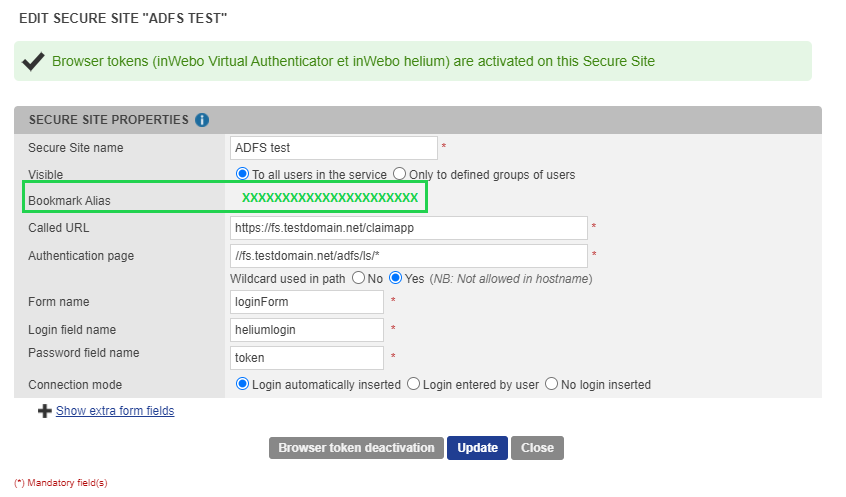
In the opening window, enter the following properties for the secure site :
For ADFS authentication, it's mandatory to fill the following fields:
.png?inst-v=ea44a320-f875-424c-be4c-1d37c5b30b70)
Called URL: https://<your_ADFS_server>/yourApp
Authentication page: //<your_ADFS_server>/adfs/ls*
 If this path does not work, it may be related to your custom ADFS configuration. Please try //<your_ADFS_server>/adfs/*
 Wildcard used in path: Yes
Form name: loginForm
Login field name: heliumlogin
Password field name: token
Click on “Add”.
Click the “Browser token activation” button.
Copy the "Bookmark alias" long string to your clipboard. (32 char string)
Step 2: Install the inWebo ADFS plugin on your ADFS server
If you have several ADFS servers in your farm, the inWebo ADFS plugin must be installed on each server.
Create a C:\InWebo directory on your ADFS server.
Copy the InWebo PKCS12 API certificate file (format PKCS12) to the C:\InWebo directory (See the “Prerequisites” section).
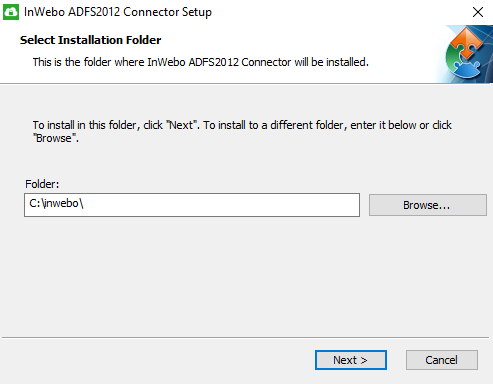
Launch the inWebo plugin .exe file you have previously downloaded (See the “Prerequisites” section).
Enter “C:\InWebo” for target destination folder.
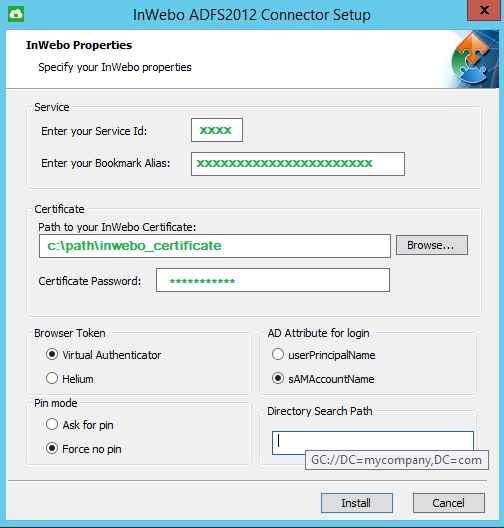
Specify your inWebo properties:
Setting | Description | |
|---|---|---|
Service | Enter your Service ID | You can retrieve your Service ID in the administrator console’s header.  |
Enter your Bookmark Alias | Paste the Bookmark Alias (See the “Step 1: Creating a secure site” sub-section) | |
Certificate | Path to your InWebo Certificate | Enter C:\InWebo\<cert_name>.p12 or browse for it |
Certificate Password | Enter the passphrase previously defined (See the “Prerequisites” section > “PKCS12 Certificate file” ) | |
Browser Token | This setting depends on your service type:
Services created before May 10 2016, both values (Virtual Authenticator or Helium) are acceptable (if the chosen token is activated on the service) | |
PIN mode | This parameter is useful to override the global service pin parameter:
| |
AD Attribute for login | Select the AD attribute to use during the user authentication process. Note that the AD attribute selected must match the inWebo user login.
| |
Directory Search Path | For multiple Active Directory forests, when using the "SamAccountName" attribute login, if needed you can provide the Global Catalog search path: "GC://DC=mycompanu,DC=com" | |
Once all settings are correct, click the 'Install' button.
The inWebo ADFS plugin installation is successful.
The service account that runs ADFS Federation Service must have write rights in the plugin directory.
Step 3: Customize the HTTP security response headers
As you are installing inWebo ADFS plugin on Windows Server 2019, you should let your ADFS contact the inWebo domain (http://ult-inwebo.com). ADFS 2019 added the functionality to customize the HTTP security response headers sent by ADFS. This is accomplished through the introduction of two new cmdlets: Get-AdfsResponseHeaders and Set-AdfsResponseHeaders.
You should add the address https://ult-inwebo.com to the default CSP header for ADFS on 2019 Windows server. (By default on Windows 2019 → Content-Security-Policy: default-src ‘self’ ‘unsafe-inline’ ‘’unsafe-eval’; img-src ‘self’ data:;)
To customize the HTTP security response headers to add inWebo in Cross Origin Resource Sharing (CORS) and Content Security Policy (CSP) headers in ADFS 2019, paste the following PowerShell Command lines :
Change HTTP security settings for inWebo (restaining the access in HTTPS):
POWERSHELLSet-AdfsResponseHeaders -SetHeaderName "Strict-Transport-Security" -SetHeaderValue "max-age=31536000; includeSubDomains"Modifying Content-Security-Policy values to accept script from ult-inwebo.com:
POWERSHELLSet-AdfsResponseHeaders -SetHeaderName "Content-Security-Policy" -SetHeaderValue "default-src 'self' 'unsafe-inline' 'unsafe-eval' https://ult-inwebo.com;"Modifying CORS values to accept access to ult-inwebo.com:
POWERSHELLSet-AdfsResponseHeaders -EnableCORS $true Set-AdfsResponseHeaders -CORSTrustedOrigins https://ult-inwebo.comChecking the current HTTP security settings:
CODEGet-AdfsResponseHeaders
The response headers should look like this:
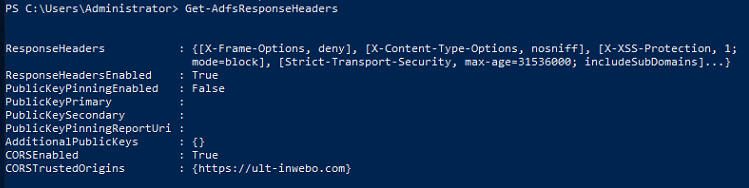
As you can see, ult-inwebo.com is now a trusted domain.
Restart the ADFS service.
Step 4: Enable inWebo Authentication provider
Log onto your ADFS server.
Open the ADFS management console.
Go to Service > “Authentication Methods” folder > “Multi-factor Authentication” section.
Click on “EDIT” the Authentication methods and go to the “Multi-factor” tab.
Enable “inWebo Authentication Provider”.
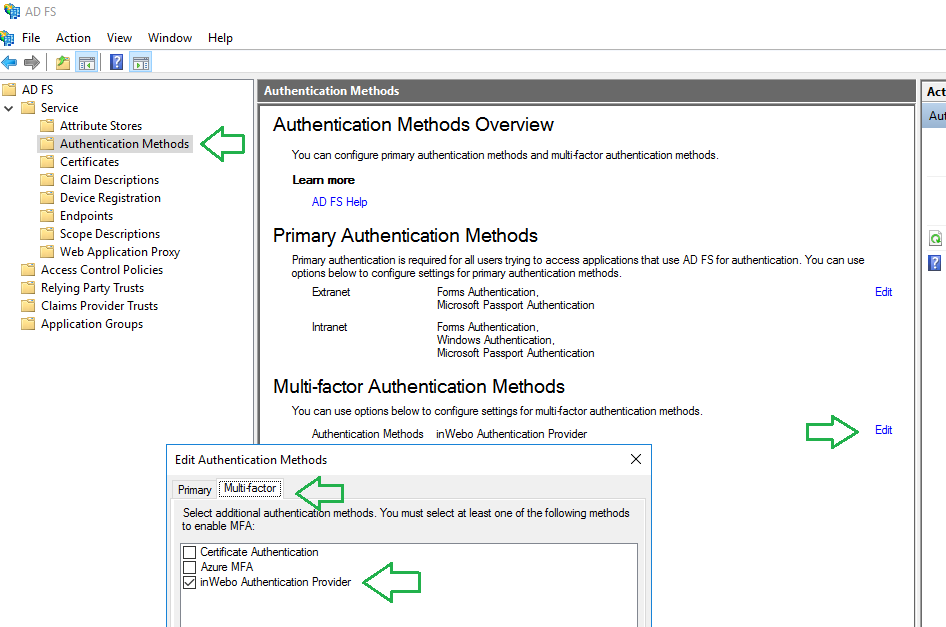
You should now see “inWebo Authentication Provider” in the “Multi-Factor authentication” tab.
Step 5: Configure Relying Party Trust to be protected by TrustBuilder MFA
In the ADFS management console, go to Relying Party Trusts. You see a list of your ADFS applications.
Right-click on the application you want to be protected by inWebo MFA.
Choose Edit Access Control Policies.
Choose a policy that includes MFA, for example the default policy “Permit everyone and require MFA” (or any other customized Access Control Policy requiring MFA) and click on “Apply”.
You can edit and create an Access Control Policy. For example, you can choose a specific user/group to be concerning by the policy. It is useful in test case for example.
The selected applications will be protected by the chosen Access Control Policy, asking to perform a MFA.
Configuration
Moving the inWebo log storage to another destination
inWebo.log4net file modification:
You will find this file at the root of the inWebo directory "C: \ inwebo"
In this file, you can modify the line:
<file value = "C: \inWebo\inwebo.log"\>
with the destination path you have chosen for your logs
You must restart the ADFS service for the change to the log storage path to take effect.
Updating the inWebo ADFS plugin
In order to strengthen its platform, inWebo supports TLS v1.2 flows on all its services. A transition will take place from July 2021 to December 2021 with the objective of closing all TLS v1 and 1.1 flows by December 31, 2021.
If you are using an obsolete SSL protocol (TLS 1.0 and TLS 1.1), you should upgrade the inWebo ADFS plugin version. Read the following procedure.
The up-to-date version of the ADFS plugin is available here. To check your current ADFS plugin version, go to C:\inwebo directory > inwebo-install.log file.
Step 1: preserve current state and data
If possible, take a VM Snapshot to do a rollback if needed.
Copy the current C:\inwebo directory and paste it in C:\inwebo_OLD.
Open the inwebo.config file.
Copy (or write down) the inWebo plugin properties: Service ID, Bookmark Alias, inWebo Certificate path and password, AD attribute, PIN Mode, BrowserToken.
Step 2: in ADFS management, disable inWebo as an authentication provider.
for ADFS 3.0: go to Authentication Policies folder> “Multi-factor Authentication” section. Click on “EDIT” the Global Settings and disable “inWebo Authentication Provider”.
for ADFS 4.0: go to Service > “Authentication Methods” folder > “Multi-factor Authentication” section. Click on “EDIT” the Authentication methods and go to the “Multi-factor” tab. Disable “inWebo Authentication Provider”.
Step 3: Hot-swap uninstall of the previous inWebo plugin ⚠ Do not stop the ADFS service.
Step 4: install the up-to-date version of the inWebo ADFS plugin.
Hot-swap install the up-to-date version of the inWebo ADFS plugin. ⚠ Do not stop the ADFS service.
In inWebo ADFS plugin installer, paste the properties previously retrieved from inWebo C:\inwebo\inWebo.config.
Step 5: in ADFS management, enable inWebo as an authentication provider.
for ADFS 3.0: go to Authentication Policies folder folder > “Multi-factor Authentication” section. Click on “EDIT” the Global Settings and enable “inWebo Authentication Provider”.
for ADFS 4.0: go to Service > “Authentication Methods” folder > “Multi-factor Authentication” section. Click on “EDIT” the Authentication methods and go to the “Multi-factor” tab. Enable “inWebo Authentication Provider”.
Step 6: Restart the ADFS service.
Step 7: Check the ADFS service and the plugin inWebo display.
Force browser token and push authentication (3 factors)
To protect users against Man-in-the-middle attacks with push authentication method, we recommend a specific configuration involving web browser token (VA) and push notifications with TrustBuilder Authenticator. This configuration forces the browser token activation and enables the browser token to send notifications only. It adds an authentication factor: a hacker will not be able to send push notifications to a user without an enrolled browser token.
Configure the browser token (VA) to send push notifications only:
In the admin console, go to Service parameters tab, in Virtual Authenticator (browser) section. Set “Authentication with notifications allowed” to Yes and “Authentication with notifications only” to Yes
Force users to activate browser token (VA):
In inwebova.js file (located in the inWebo ADFS plugin installation folder), edit the script to force the authentication through Virtual Authenticator (VA). You should delete a few lines from the script (see comment lines 6 to 12 in the code below).
Download the inwebova.js file set to force VAJSiwstart("vaAuthenticate", function (iw, data) { if (data.type == "success" && data.code == "ok" && data.action == "authentication") { iw.insertFields(data.result); } if (data.type == "error" && data.code == "nok" && data.result.reason == "no_profile") { /* IW_jQuery('#heliumAuthenticate').attr('action', 'push_authenticate'); m.style.display = "block"; start_helium("heliumAuthenticate", function (iw, helium_data) { if (helium_data.result == 'ok') { iw.insertFields(helium_data); } else { */ s.style.display = "block"; f.style.display = "block"; h.style.display = "none"; m.style.display = "none"; }
Troubleshooting
Allow read/write permissions to C:\inwebo for ADFS service account.
ADFS is unable to modify/read inWebo.config. Verify c:\inwebo\inWebo.log for read/write error. The following error message is displayed.
Error message displayed in inWebo.log:
2019-03-19 07:47:10,797 [5] ERROR inWebo.AuthenticationAdapter - System.UnauthorizedAccessException: Access to the path 'C:\inwebo\inWebo.config' is denied.
at System.IO.__Error.WinIOError(Int32 errorCode, String maybeFullPath)
at System.IO.FileStream.Init(String path, FileMode mode, FileAccess access, Int32 rights, Boolean useRights, FileShare share, Int32 bufferSize, FileOptions options, SECURITY_ATTRIBUTES secAttrs, String msgPath, Boolean bFromProxy, Boolean useLongPath, Boolean checkHost)
at System.IO.FileStream..ctor(String path, FileMode mode, FileAccess access, FileShare share, Int32 bufferSize, FileOptions options, String msgPath, Boolean bFromProxy)
at System.IO.FileStream..ctor(String path, FileMode mode)
at inWebo.AuthenticationAdapter.loadConfig()
To allow read/write permissions to C:\inwebo for ADFS service account, read the following procedure:
On the c:\inwebo folder change security settings (security tab of the folder) EDIT to change permissions
Click on "Add" to Security Objects and select "Object Types".
Check "Service Accounts" and type the ADFS service account created in Active Directory (ex: FsGmsa). Click on “OK”.
Check read/write options for the ADFS service and press "OK" to close.
The error message should have disappeared.