Microsoft ADFS 2.0
This is the procedure to integrate inWebo multi factor authentication service with "Microsoft Active Directory Federation Services 2.0"
If you are running ADFS v3, you can skip this HowTo and use our InWebo_ADFSv3_Connector component for the integration. See our ADFS v3 integration tutorial
Introduction
In-Webo provides innovative, no-hardware, 100% SaaS, strong authentication solutions for employee and consumer secure transactions.
The purpose of this guide is to explain how to use InWebo products with various existing products running as a relying party trust with ADFS 2.0 (examples : MS SharePoint, MS Office 365, etc…).
1. Check the URL of your Federation Server Identifier
On ADFS Server:
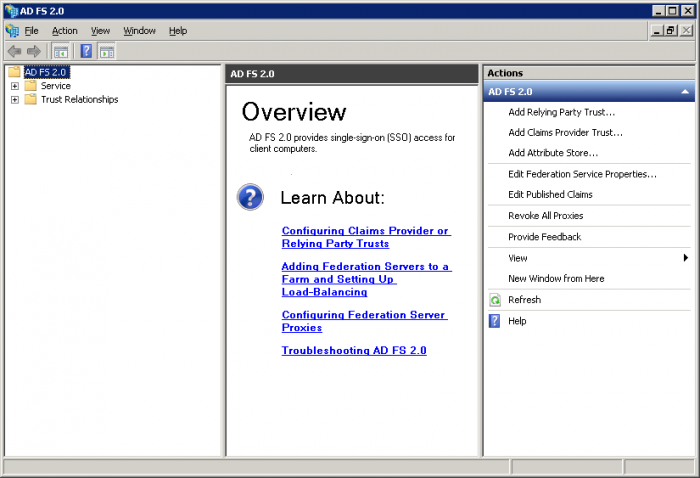
Click on Start → Administrative Tools → ADFS 2. Manager
On the right panel, click on Edit Federation Service Properties…
On the field « Federation Service Identifier » check that the beginning of the URL is https and not http. Otherwise, the link between InWebo and ADFS Server won't work.
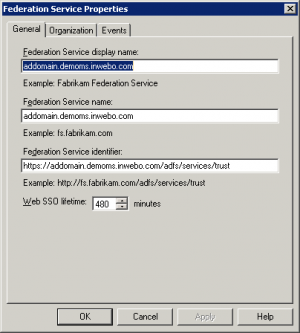
Click on OK and close AD FS 2.0 Management.
2. Configure your InWebo account
Open a browser and go to this address: https://<yourADFSServeraddress>/FederationMetadata/2007-06/FederationMetadata.xml.
Save the Metadata file on your PC
Open the Metadata file with notepad or wordpad and copy the entire content in the clipboard
Open a browser to your MyInWebo administration console
Click on Secured Sites
In the « Connectors » part at the bottom, click on Add a connector of type…
Select « SAML 2.0»
In the box « 1-Service Provider metadata », paste the Metadata from your clipboard
Click on Add
The window content is updated, then click on Download InWebo IDP SAML 2.0 metadata IDP in XML format and save it.
In the Secure Sites section, click on add a Secure Site of type… and select the connector you just created above
In the field called « Secured Site name», give a name to your destination service (SharePoint, Office365, etc…) and in the field « Called URL » type the URL of your destination service (ex: http://YourSharepointServerAddress:31436/).
Click on Add
Close your browser
3. In ADFS 2.0, configure InWebo as Claims Provider Trust
At this point, you need to configure ADFS 2.0. Open a Remote Desktop Connection to your ADFS server and start ADFS 2.0 Manager as follows:
Click on Start → Administrative Tools → ADFS 2. Manager
On the left panel, click on Trust Relationship and then Claims Providers Trusts
On the right click on add Claims Provider Trust…
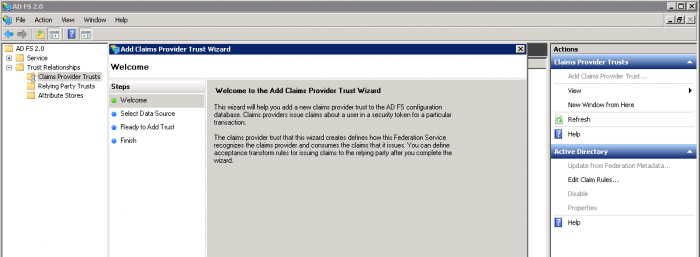
Click on Start
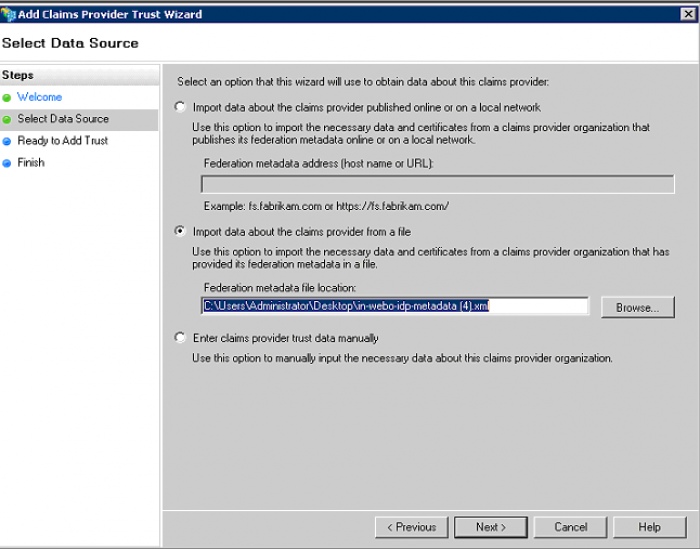
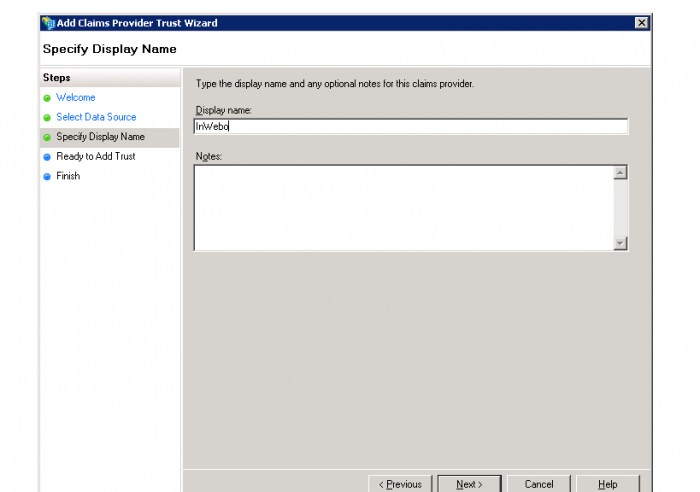
Choose Import data about claim provider from file and browse to the InWebo Metadata file that you have saved from InWebo WebConsole. Then click on next
On the field « Display Name », give a name to your Claim Provider Trust and click on next
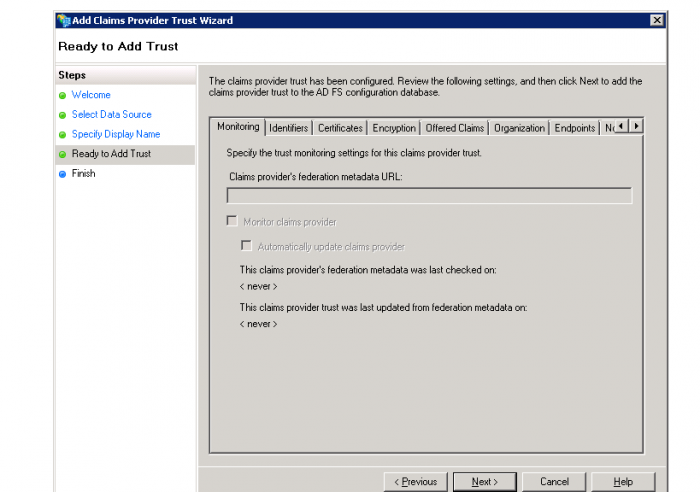
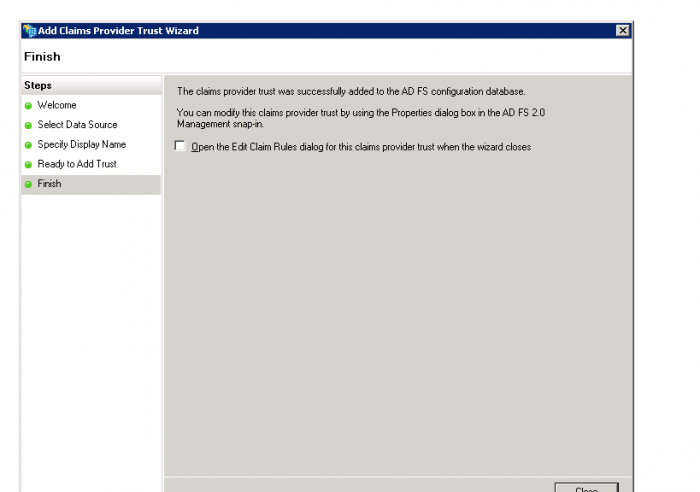
Verify that « Open the Edit Claim Rules dialog for this claims provider trust when the wizard closes » is not selected. Click on close
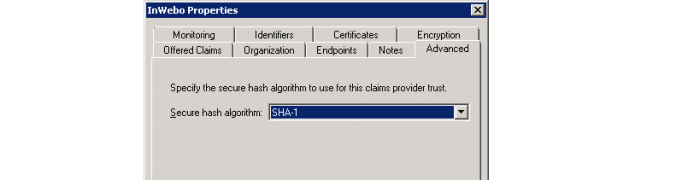
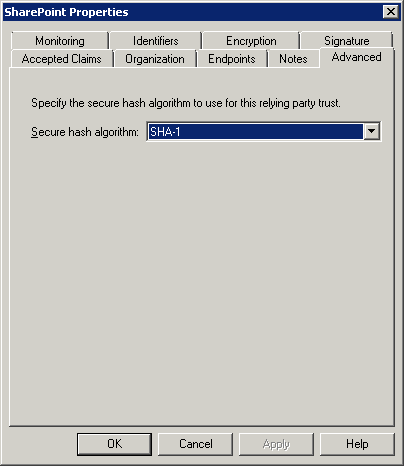
Double click on the new Claim Provide trust that you have just added. On the tab « Advanced », select SHA-1.
Click on OK
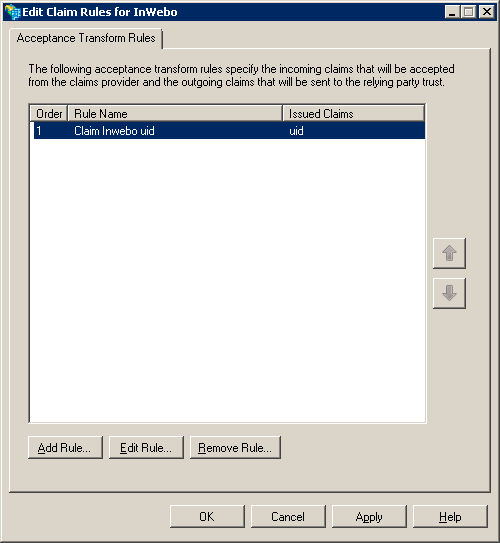
4. Add Claims Rules for InWebo Claims Provider Trust
InWebo is a SAML v2.0 Identity Provider. Its sends the authenticated username in a SAML assertion called “uid”. The value in uid corresponds to the InWebo login. You now have to add Claims Rules for this “uid”.
Click on the new Claims Provider trust that you just add.
On the right panel, click on Edit Claims Rules…
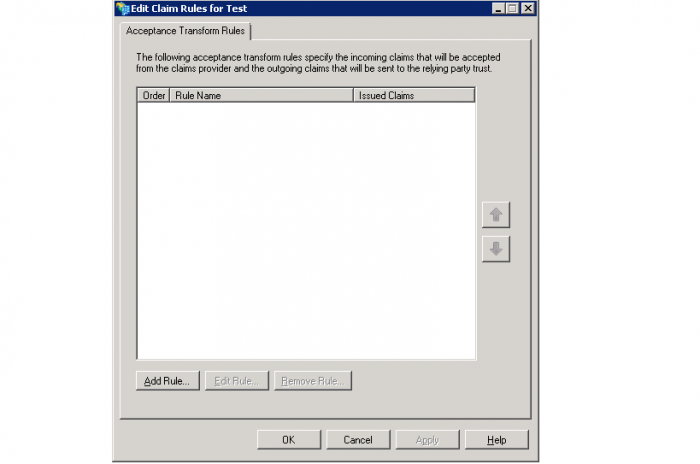
Click on Add a rule
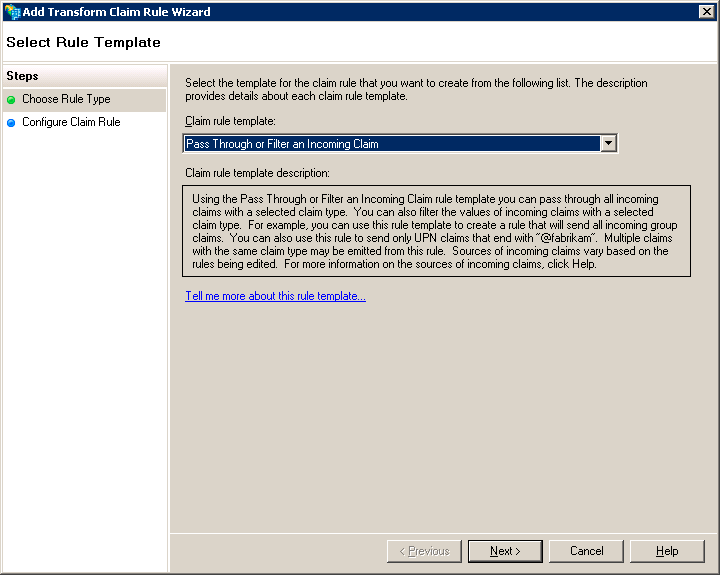
Select « Pass Trough or Filter an Incoming Claim » and click on next
In the field Claim rule name, give a name to your rule.
In the field Incoming Claim Type type: uid
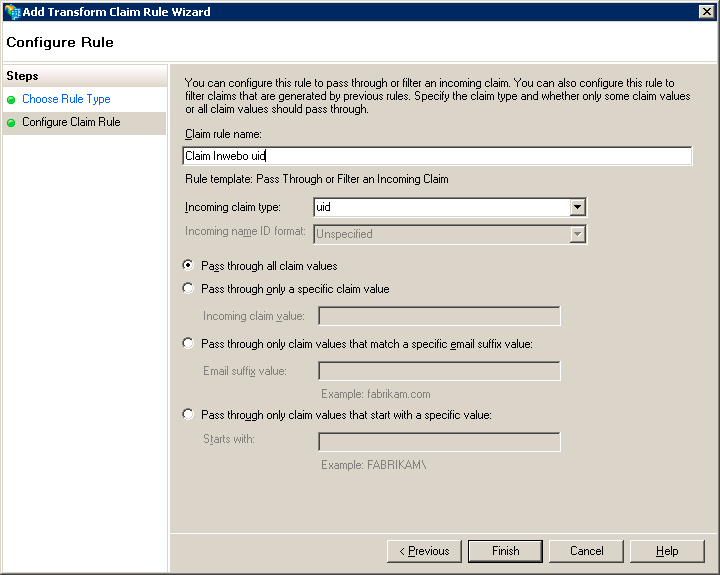
NB: The SAML InWebo response contains the InWebo's login within a “uid” claim type. This Claim Rule passes through the InWebo login as a uid claim type.Click on Finish
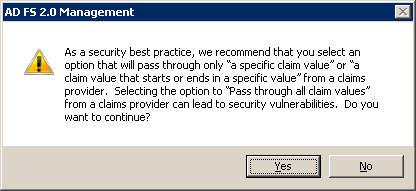
Click on Yes
Click on OK
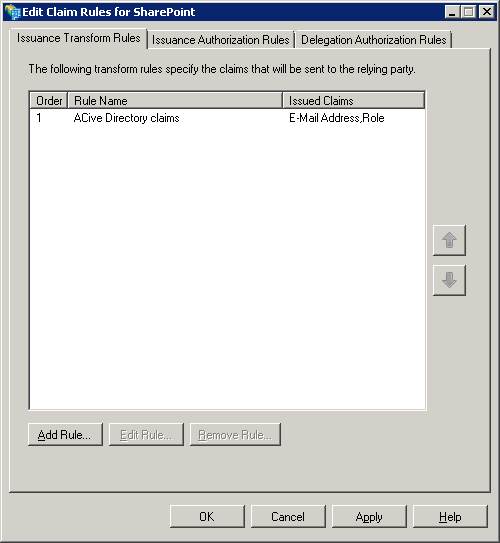
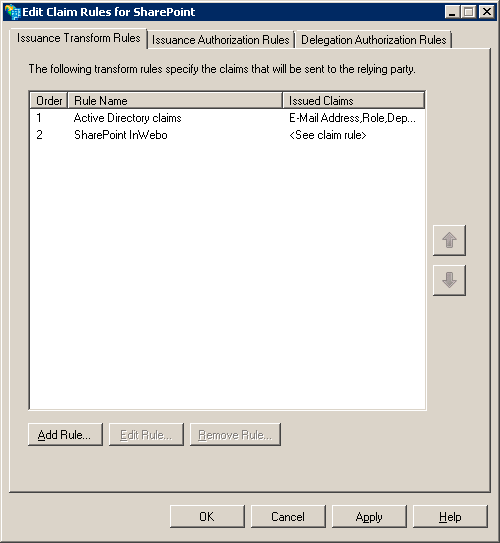
5a. Sample of claims Rules for SharePoint
If configured with Active Directory as Claims Provider, SharePoint receives its claims directly from Active Directory based on Windows Authentication. Now that InWebo is the Claims Provider, you need to build a link between the authenticated username sent by InWebo (the “uid”) and the required attributes (email, role) contained in Active Directory.
On the left panel, click on Relying Party Trust
Click on your SharePoint relying party trust
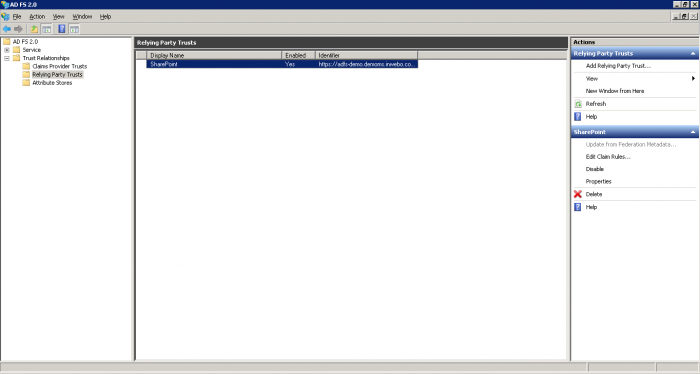
On the right, click on Edit Claim Rules…
Click on Add Rule…
Select « Send Claims Using a Custom Rule » and click on next
In the field Claim rule name, give a name to your rule.
In the field Custom rule type:
XMLc:[Type == "uid"] => issue( store = "Active Directory", types = ("http://schemas.xmlsoap.org/ws/2005/05/identity/claims/emailaddress", "http://schemas.microsoft.com/ws/2008/06/identity/claims/role"), query = "samAccountName={0};mail,tokenGroups;YOUR_DOMAIN_NAME\user", param = c.Value );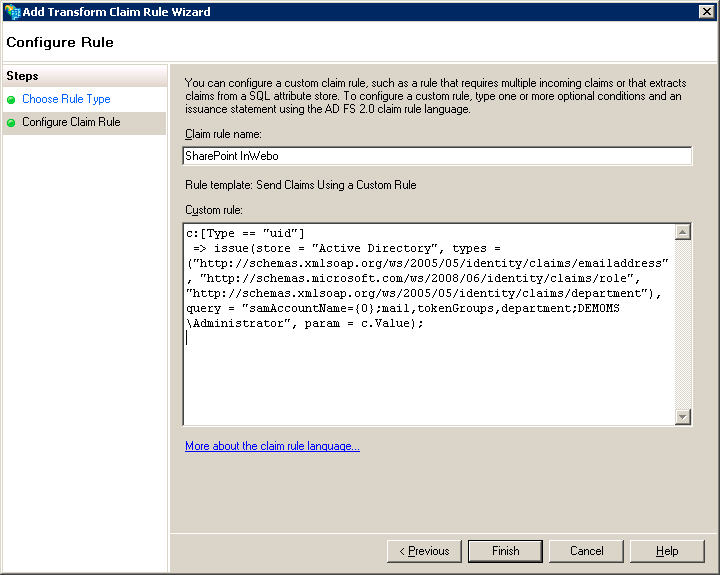
NB: This rule takes the InWebo login and looks in Active Directory if a user has the same Windows Account Name (samAccountName = {0} & param = c.Value). It means that you have to use the same login on InWebo and on ADFS. If you want to use a different identifier (email address, UPN …), you have to adapt this rule.
When Active Directory has found the user, it gives the email, the role and the department of the user. This depends on what kind of claims you need to send to SharePoint. Indeed in this case, SharePoint asks for the email, the role and for the department. You should adapt this rule on the claims that your SharePoint implementation requires.Click on Finish
Click on OK
Double click on your Sharepoint relying party trust. On the tab “Advanced”, select SHA-1.
Click on OK
Close AD FS 2.0 Management.
5b. Sample of claims Rules for Office 365
If configured with Active Directory as Claims Provider,Office 365 receives its claims directly from Active Directory based on Windows Authentication. Now that InWebo is the Claims Provider, you need to build a link between the authenticated username sent by InWebo (the “uid”) and the required attributes (email, role) contained in Active Directory.
On the left panel, click on Relying Party Trust
Click on your Office 365 relying party trust
On the right, click on Edit Claim Rules…
Click on Add Rule…
Select « Send Claims Using a Custom Rule » and click on next
In the field Claim rule name, give a name to your rule.
Samples of Custom rule for Office 365:
- XML
c:[Type == "uid"] => issue( store = "Active Directory", types = ("http://schemas.xmlsoap.org/claims/UPN", "http://schemas.microsoft.com/LiveID/Federation/2008/05/ImmutableID"), query = "samAccountName={0};userPrincipalName,objectGUID;YOUR_DOMAIN_NAME\user", param = c.Value); - XML
c:[Type == "http://schemas.microsoft.com/LiveID/Federation/2008/05/ImmutableID"] => issue(Type = "http://schemas.xmlsoap.org/ws/2005/05/identity/claims/nameidentifier", Value = c.Value, Properties["http://schemas.xmlsoap.org/ws/2005/05/identity/claimproperties/format"] = "urn:oasis:names:tc:SAML:1.1:nameid-format:unspecified"); - XML
c:[Type == "http://schemas.xmlsoap.org/claims/UPN"]
=> issue(Type = "http://schemas.microsoft.com/ws/2008/06/identity/claims/issuerid", Value = regexreplace(c.Value, "^((.*)([.|@]))?(?<domain>[^.]*.(aero|asia|biz|cat|co|fr|com|coop|edu|gov|health|info|int|jobs|mil|mobi|museum|name|net|org|post|pro|tel|travel)(.\w\w)?)$", "http://${domain}/adfs/services/trust/"));
NB: This rule takes the InWebo login and looks in Active Directory if a user has the same Windows Account Name (samAccountName = {0} & param = c.Value). It means that you have to use the same login on InWebo and on ADFS. If you want to use a different identifier (email address, UPN …), you have to adapt this rule.
When Active Directory has found the user, it gives the email, the role and the department of the user. This depends on what kind of claims you need to send to Office 365.
Indeed in this case, Office 365 asks for the email, the role and for the department. You should adapt this rule on the claims that your Office 365 implementation requires.Click on Finish
Click on OK to close "Edit Claim Rules for Office 365"
Double click on your Office 365 relying party trust. On the tab “Advanced”, select SHA-1.
Click on OK
Close AD FS 2.0 Management.
6. Delete the "Sign in" page
This step is not mandatory and you can skip it, the link between InWebo and SharePoint should work by now. But you will realize that when you go on your SharePoint web you will have to choose between adfs authentication and InWebo authentication. In order to delete this page, follow this step.
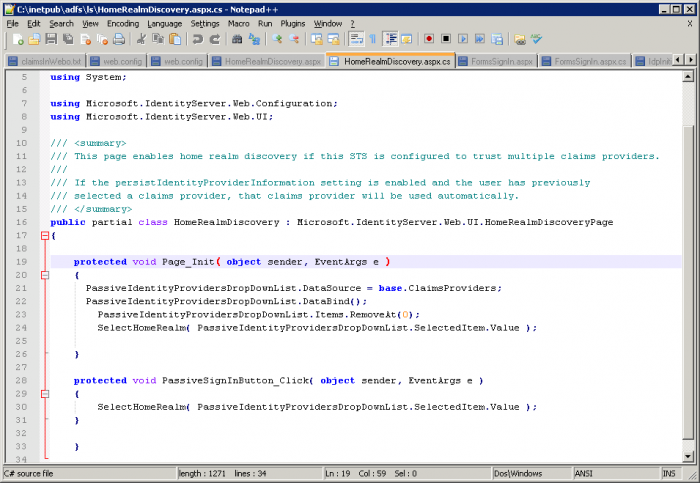
On the ADFS Server, find the file name HomeRealmDiscovery.aspx.cs
C:\inetpub\adfs\ls\ HomeRealmDiscovery.aspx.csOpen the file with an appropriate publisher (notepad++)
In the function « protected void Page_Init » add this two lines :
POWERSHELLPassiveIdentityProvidersDropDownList.Items.RemoveAt(0) ; SelectHomeRealm( PassiveIdentityProvidersDropDownList.SelectedItem.Value );The first one deletes the possibility to choose adfs authentication and the second one imposes an automatic choice.
Save the file and restart your IIS.
Force browser token and push authentication (3 factors)
To protect users against Man-in-the-middle attacks with push authentication method, we recommend a specific configuration involving web browser token (VA) and push notifications with TrustBuilder Authenticator. This configuration forces the browser token activation and enables the browser token to send notifications only. It adds an authentication factor: a hacker will not be able to send push notifications to a user without an enrolled browser token.
Configure the browser token (VA) to send push notifications only:
In the admin console, go to Service parameters tab, in Virtual Authenticator (browser) section. Set “Authentication with notifications allowed” to Yes and “Authentication with notifications only” to Yes
Force users to activate browser token (VA):
In inwebova.js file (located in the inWebo ADFS plugin installation folder), edit the script to force the authentication through Virtual Authenticator (VA). You should delete a few lines from the script (see comment lines 6 to 12 in the code below).
Download the inwebova.js file set to force VACODEiwstart("vaAuthenticate", function (iw, data) { if (data.type == "success" && data.code == "ok" && data.action == "authentication") { iw.insertFields(data.result); } if (data.type == "error" && data.code == "nok" && data.result.reason == "no_profile") { /* IW_jQuery('#heliumAuthenticate').attr('action', 'push_authenticate'); m.style.display = "block"; start_helium("heliumAuthenticate", function (iw, helium_data) { if (helium_data.result == 'ok') { iw.insertFields(helium_data); } else { */ s.style.display = "block"; f.style.display = "block"; h.style.display = "none"; m.style.display = "none"; }